Toyota Tacoma (2005–2015) Owners Manual: Rear seats (Access Cab and Double Cab models)
 Access Cab models
The bottom cushion of the rear seats can be raised and lowered.
■ Before raising the bottom cushion
Stow the seat belt buckles.
This prevents the seat belt buckles from falling out when you fold the seatback.
■ Raising the bottom cushion
Raise the bottom cushion up while pulling the lever until it locks.
■ Lowering the bottom cushion
Push the bottom cushion down while pulling the lever until the bottom cushion locks into the seat position.
 Double Cab models
The seatback of the rear seat can be folded.
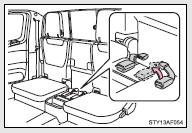
■ Before folding rear seats
Stow the rear seat belt buckles.
This prevents the seat belt buckles from falling out when you fold the seatback.
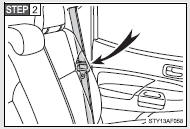
Pass the seat belts through the seat belt hangers.
This prevents the shoulder belt from being damaged.
Make sure that the seat belts are removed from the hangers before using them.
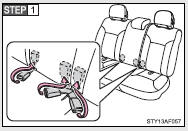
■ Folding rear seats
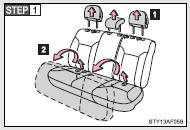
 Remove the head restraint
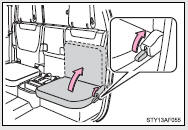
 Swing the bottom cushion up by pulling
the lock release strap
Swing the bottom cushion up by pulling
the lock release strap
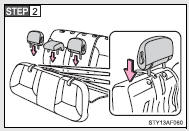
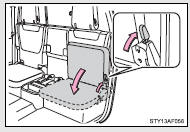
Attach the head restraints to the holders located on the back sides of the bottom cushions.
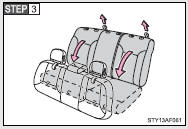
Fold down the seatback by pulling the lock release strap.
■Waterproof and water-repellent seats (if equipped)
Waterproof and water-repellent seats are installed in your vehicle; however, the water-repellent effect does not last forever.
CAUTION
■When the seatback is folded/the bottom cushion is raised
Do not sit on or place anything on the seatback or auxiliary box while driving.
■When returning the seats to their original position
Observe the following precautions. Failure to do so may result in death or serious injury.
●Be careful not to get your hands or feet pinched in the seat.
●Make sure the seatbacks and bottom cushions are securely locked. Failure to do so will prevent the seat belt from operating properly.
●Check that the seat belts are not twisted or caught under the seat.
●Arrange the seat belts in the proper positions for ready use.
NOTICE
■Before folding the seats
The seat belts buckles must be stowed.
 Active head restraints (Access Cab and Double Cab models only)
When the occupant’s back presses against the seatback during a rear-end collision,
the head restraint moves slightly forward to help reduce the risk of whiplash on
the seat occupant.
■A ...
 Head restraints
Head restraints are provided for all seats.
■ Adjusting the head restraints
Bench type front seat
Up
Pull the head restraints up.
Down
Push the head restraint down while pushing the l ...
Other materials:
Portable Player cannot be Operated Using In-vehicle Device or Track Information
is not Displayed on In-vehicle Device
PROCEDURE
1.
CHECK USING ANOTHER "Bluetooth" AUDIO COMPATIBLE VEHICLE OF SAME MODEL
(a) Check if track information is displayed normally on another "Bluetooth" audio
compatible vehicle of the same model.
OK:
Track information is displayed no ...
Starter Relay Circuit Short to Battery (P061512)
DESCRIPTION
While the engine is being cranked, positive battery voltage is applied to terminal
STA of the ECM. If the ECM detects the starter control (STA) signal while the vehicle
is being driven, it determines that there is a malfunction in the STA circuit. The
ECM then illuminates the MIL ...
Engine Coolant Temperature Receiver Gauge Malfunction
DESCRIPTION
In this circuit, the meter CPU receives engine coolant temperature signals from
the ECM using the CAN communication system (CAN V1 Bus). The meter CPU displays
engine coolant temperature that is calculated based on the data received from the
ECM.
WIRING DIAGRAM
CAUTION / NOTIC ...
