Toyota Tacoma (2015-2018) Service Manual: Replacement
REPLACEMENT
CAUTION / NOTICE / HINT
NOTICE:
Immediately wash off any brake fluid that comes into contact with any painted surfaces.
HINT:
If any work is done on the brake system or if air in the brake lines is suspected, bleed the air from the system.
PROCEDURE
1. FILL RESERVOIR WITH BRAKE FLUID

Fluid:
SAE J1703 or FMVSS No. 116 DOT3
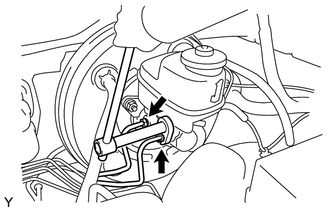
2. BLEED MASTER CYLINDER
.gif)
HINT:
If the master cylinder has been disassembled or if the reservoir becomes empty, bleed the air from the master cylinder.
|
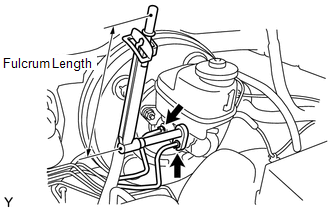
(a) Using a union nut wrench, separate the brake tubes from the master cylinder. |
|
|
(b) Slowly depress the brake pedal and hold it there (Step A). |
|
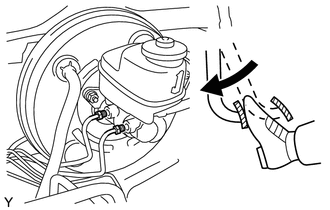
|
(c) Block the outer holes with your fingers, and release the brake pedal (Step B). |
|
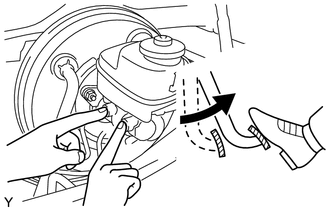
(d) Repeat steps A and B 3 or 4 times.
|
(e) Using a union nut wrench, install the brake tubes into the master cylinder. Torque: without union nut wrench : 20 N·m {199 kgf·cm, 14 ft·lbf} with union nut wrench : 18 N·m {187 kgf·cm, 13 ft·lbf} HINT:
|
|
3. BLEED BRAKE LINE
.png)
(a) Connect a vinyl tube to the bleeder plug.
(b) Depress the brake pedal several times, and then loosen the bleeder plug with the pedal depressed (Step C).
(c) At the point where the fluid stops coming out, tighten the bleeder plug, and then release the brake pedal (Step D).
(d) Repeat steps C and D until all the air in the fluid is completely bled out.
(e) Tighten the bleeder plug.
Torque:
11 N·m {112 kgf·cm, 8 ft·lbf}
(f) Repeat the above procedure to bleed the air out of the brake line for each wheel.
4. BLEED BRAKE ACTUATOR
NOTICE:
After bleeding the air from the brake system, if the height or feel of the brake pedal cannot be obtained, perform air bleeding of the brake actuator with the Techstream by following the procedure below.
(a) Depress the brake pedal more than 20 times with the engine off.
(b) Connect the Techstream to the DLC3, and turn the ignition switch ON.
NOTICE:
Do not start the engine.
(c) Select "Air Bleeding" on the Techstream.
HINT:
Refer to the Techstream operator's manual for further details.
(d) Bleed the air out of the brake line when Step 1: Increase appears on the Techstream display.
NOTICE:
- Bleed the air by following the steps displayed on the Techstream.
- Make sure that the master cylinder reservoir tank does not become empty.
(1) Connect the vinyl tube to either one of the bleeder plugs.
|
(2) Depress the brake pedal several times, and then loosen the bleeder plug connected to the vinyl tube with the pedal depressed (Step E). |
|
(3) When fluid stops coming out, tighten the bleeder plug and release the brake pedal (Step F).
(4) Repeat steps E and F until all the air in the fluid is completely bled out.
(5) Tighten the bleeder plug completely.
Torque:
11 N·m {112 kgf·cm, 8 ft·lbf}
(6) Repeat the above procedure for each wheel to bleed the air out of the brake line.
(e) Bleed the air out of the suction line when Step 2: Inhalation appears on the Techstream display.
NOTICE:
- Bleed the air by following the steps displayed on the Techstream.
- Make sure that the master cylinder reservoir tank does not become empty.
(1) Connect the vinyl tube to the bleeder plug at the right front wheel or the right rear wheel and loosen the bleeder plug.
(2) Operate the brake actuator to bleed the air using the Techstream (Step G).
NOTICE:
Release the brake pedal at this time.
HINT:
This operation stops automatically after 4 seconds.
(3) Check if the operation has stopped by referring to the Techstream display and tighten the bleeder plug (Step H).
(4) Repeat steps G and H until all the air in the fluid is completely bled out.
(5) Tighten the bleeder plug.
Torque:
11 N·m {112 kgf·cm, 8 ft·lbf}
(6) Repeat the above procedure for the other wheels to bleed the air out of the brake line.
(f) Bleed the air out of the pressure reduction line when Step 3: Decrease appears on the Techstream display.
NOTICE:
- Bleed the air by following the steps displayed on the Techstream.
- Make sure that the master cylinder reservoir tank does not become empty.
(1) Connect a vinyl tube to either one of the bleeder plugs.
(2) Loosen the bleeder plug (Step I).
(3) Using the Techstream, operate the brake actuator assembly, completely depress the brake pedal and hold it there (Step J).
NOTICE:
- During this procedure, the pedal will feel heavy, but completely depress it so that the brake fluid comes out of the bleeder plug.
- Hold the brake pedal depressed. Do not depress and release the pedal repeatedly.
HINT:
- The operation stops automatically after 4 seconds. When performing this procedure continuously, set an interval of at least 20 seconds.
- When the operation is complete, the brake pedal goes down slightly. This is a normal phenomenon caused when the solenoid opens.
(4) Tighten the bleeder plug, and then release the brake pedal (Step K).
(5) Repeat steps I to K until all the air in the fluid is completely bled out.
(6) Tighten the bleeder plug.
Torque:
11 N·m {112 kgf·cm, 8 ft·lbf}
(7) Repeat the above procedure for the other wheels to bleed the air out of the brake line.
(g) Bleed the air out of the brake line again when Step 4: Increase appears on the Techstream display.
NOTICE:
- Bleed the air by following the steps displayed on the Techstream.
- Make sure that the master cylinder reservoir tank does not become empty.
(1) Connect the vinyl tube to either one of the bleeder plugs.
|
(2) Depress the brake pedal several times, and then loosen the bleeder plug connected to the vinyl tube with the pedal depressed (Step L). |
|
(3) When fluid stops coming out, tighten the bleeder plug, and then release the brake pedal (Step M).
(4) Repeat steps L and M until all the air in the fluid is completely bled out.
(5) Tighten the bleeder plug.
Torque:
11 N·m {112 kgf·cm, 8 ft·lbf}
(6) Repeat the above procedure for the other wheels to bleed the air out of the brake line.
(7) Make sure that the air bleeding is complete by referring to the Techstream display and turn off the Techstream.
(8) Disconnect the Techstream from the DLC3.
(9) Turn the ignition switch off.
5. INSPECT FOR BRAKE FLUID LEAK
6. INSPECT FLUID LEVEL IN RESERVOIR
 On-vehicle Inspection
ON-VEHICLE INSPECTION
PROCEDURE
1. INSPECT FLUID LEVEL IN RESERVOIR
(a) Check the fluid level.
If the brake fluid level is lower than the MIN line, check for leaks and inspect
the disc brake p ...

Other materials:
Coolant
Replacement
REPLACEMENT
PROCEDURE
1. REMOVE NO. 2 ENGINE UNDER COVER SUB-ASSEMBLY (w/ Off Road Package)
2. REMOVE NO. 1 ENGINE UNDER COVER SUB-ASSEMBLY
3. DRAIN ENGINE COOLANT
CAUTION:
Do not remove the radiator cap sub-assembly, cylinder block drain cock
plug or radiator drain ...
Installation
INSTALLATION
PROCEDURE
1. SET NO. 1 CYLINDER TO TDC/COMPRESSION
2. INSTALL CAMSHAFT TIMING GEAR BOLT
NOTICE:
There are different types of camshaft timing gearbolts. Make sure to check the
identification mark todetermine the tightening torque.
*a
Identification Mark ...
Installing child restraints
Follow the child restraint system manufacturer’s instructions. Firmly secure
child restraints to the seats using the LATCH anchors or a seat belt. Attach the
top tether strap when installing a child restraint.
The lap/shoulder belt can be used if your child restraint system is not compatible ...
