VEHICLE LIFT AND SUPPORT LOCATIONS
1. NOTICE ABOUT VEHICLE CONDITION WHEN JACKING UP VEHICLE
(a) The vehicle must be unloaded before jacking up / lifting up the vehicle. Never jack up / lift up a heavily loaded vehicle.
(b) When removing heavy parts such as the engine and transmission, the center of gravity of the vehicle may shift. To stabilize the vehicle, place a balance weight in a location where it will not roll or shift, or use a mission jack to hold the jacking support.
2. NOTICE FOR USING 4 POST LIFT
(a) Follow the safety procedures outlined in the lift instruction manual.
(b) Use precautionary measures to prevent the free wheel beam from damaging tires or wheels.
(c) Use wheel chocks to secure the vehicle.
3. NOTICE FOR USING JACK AND SAFETY STAND
(a) Work on a level surface. Use wheel chocks at all times.
(b) Set the jack and rigid racks to the specified locations of the vehicle accurately.
(c) When jacking up the vehicle, first release the parking brake and move the shift lever to N.
(d) When jacking up the entire vehicle:
(1) When jacking up the front wheels first, make sure wheel chocks are behind the rear wheels.
(2) When jacking up the rear wheels first, make sure wheel chocks are in front of the front wheels.
(e) When jacking up only the front or rear wheels of the vehicle:
(1) Before jacking up the front wheels, place wheel chocks on both sides of the rear wheels.
(2) Before jacking up the rear wheels, place wheel chocks on both sides of the front wheels.
(f) When lowering a vehicle that only has its front or rear wheels jacked up:
(1) Before lowering the front wheels, make sure wheel chocks are in front of the rear wheels.
(2) Before lowering the rear wheels, make sure wheel chocks are behind the front wheels.
(g) It is extremely dangerous to perform any work on a vehicle raised on a jack alone, even for work that can be finished quickly. Rigid racks must be used to support the vehicle.
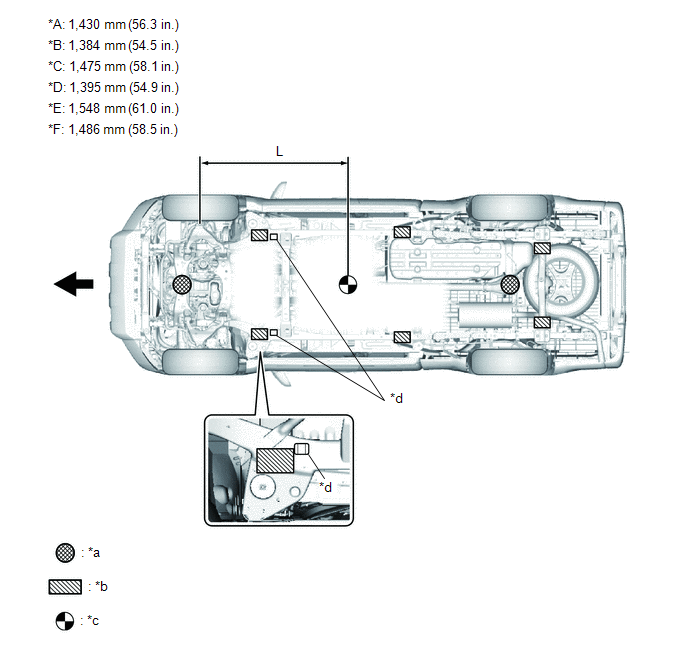
|
*A |
for Access Cab, 2WD |
*B |
for Access Cab, 4WD |
|
*C |
for Double Cab (Short deck), 2WD |
*D |
for Double Cab (Short deck), 4WD |
|
*E |
for Double Cab (Long deck), 2WD |
*F |
for Double Cab (Long deck), 4WD |
|
*a |
JACK POSITION Front: Center of crossmember Rear: Center of rear differential CAUTION: When jacking up the vehicle, make sure the vehicle is not carrying any extra weight. |
*b |
SUPPORT POSITION - Safety stand |
|
*c |
VEHICLE CENTER OF GRAVITY (Unloaded Condition) |
*d |
Resin Component |
NOTICE:
When setting the vehicle on the safety stands, be careful to avoid the resin component (*d) shown in the illustration.
4. NOTICE FOR USING SWING ARM TYPE LIFT
(a) Follow safety procedures outlined in its instruction manual.
(b) Use a swing arm equipped with a rubber attachment.
(c) Set in the vehicle so as to make its center of gravity as close as possible to the center of the lift. (L becomes short.)
(d) Place the vehicle horizontally by adjusting the height of the cradle, and match the groove of the cradle and the safety stand support location accurately.
(e) Be sure to lock the swing arms before lifting and during work (if equipped with arm locks).
(f) Lift the vehicle up off the ground. Stand at a safe distance and shake the vehicle to check its stability.
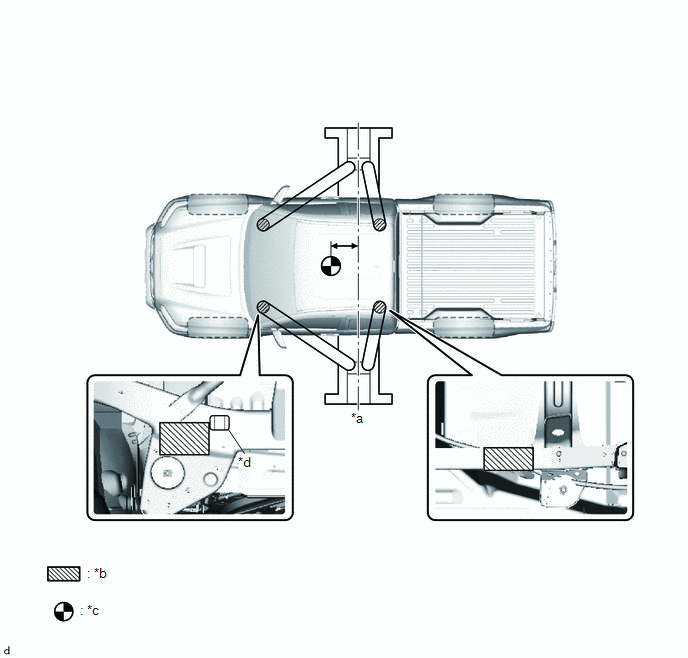
|
*a |
Center of lift |
*b |
SUPPORT POSITION - Attachment |
|
*c |
VEHICLE CENTER OF GRAVITY (Unloaded Condition) |
*d |
Resin Component |
NOTICE:
When setting the vehicle on the attachments of the swing arms, be careful to avoid the resin component (*d) shown in the illustration.

