Toyota Tacoma (2005‚Äď2015) Owners Manual: Setup menu
You can adjust the multimedia system to your desired settings.
Display ‚ÄúSetup‚ÄĚ screen
Press the ‚ÄúSETUP‚ÄĚ button to display the ‚ÄúSetup‚ÄĚ screen.
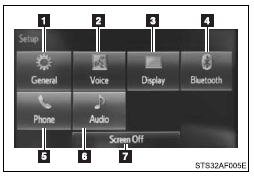
 Select to adjust the settings for
operation sounds, screen animation, etc.
Select to adjust the settings for
operation sounds, screen animation, etc.
 Select to set the voice settings.
 Select to adjust the settings for
contrast and brightness of the screen.
Select to adjust the settings for
contrast and brightness of the screen.
 Select to adjust the settings for
registering, removing, connecting and disconnecting Bluetooth¬ģ devices.
Select to adjust the settings for
registering, removing, connecting and disconnecting Bluetooth¬ģ devices.
 Select to adjust the settings for
phone sound, contact, etc.
Select to adjust the settings for
phone sound, contact, etc.
 Select to set audio settings.
 Select to turn the screen off.
General settings
Settings are available for adjusting the operation sounds, screen animation, etc.
■ Screen for general settings
 Press the ‚ÄúSETUP‚ÄĚ button.
 Select ‚ÄúGeneral‚ÄĚ on the ‚ÄúSetup‚ÄĚ
screen.
Select ‚ÄúGeneral‚ÄĚ on the ‚ÄúSetup‚ÄĚ
screen.
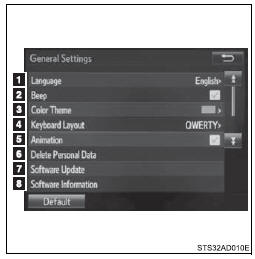
1. ‚ÄúEnglish‚ÄĚ, ‚ÄúFrançais‚ÄĚ or ‚ÄúEspañol‚ÄĚ can be selected.
2. On/off can be selected to sound beeps.
3. Select to change the screen color.
4. Select to change the keyboard layout.
5. The animation effect for the screen can be set to on/off.
6. Select to delete personal data
7. Select to update program versions.
For details, contact your Toyota dealer.
8. Select to display the software information. Notices related to third party software used in this product are enlisted. (This includes instructions for obtaining such software, where applicable.)
■To return to the default settings
Select ‚ÄúDefault‚ÄĚ, and then ‚ÄúYes‚ÄĚ.
■ Delete personal data
 Select ‚ÄúDelete Personal Data‚ÄĚ
on the ‚ÄúGeneral Settings‚ÄĚ screen.
Select ‚ÄúDelete Personal Data‚ÄĚ
on the ‚ÄúGeneral Settings‚ÄĚ screen.
 Select ‚ÄúDelete‚ÄĚ.
Check carefully beforehand, as data cannot be retrieved once deleted.
 A confirmation screen will be displayed.
Select ‚ÄúYes‚ÄĚ.
A confirmation screen will be displayed.
Select ‚ÄúYes‚ÄĚ.
The following personal data will be deleted or changed to its default settings.
‚ÄĘ General settings
‚ÄĘ Audio settings
‚ÄĘ Phone settings
Audio settings
Settings are available for adjusting the radio operation, cover art, etc.
■ Screen for audio settings
 Press the ‚ÄúSETUP‚ÄĚ button.
 Select ‚ÄúAudio‚ÄĚ on the ‚ÄúSetup‚ÄĚ screen.
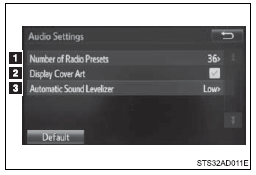
 Select the number of radio preset
stations.
Select the number of radio preset
stations.
 Select to display the cover art
 Select ‚ÄúHigh‚ÄĚ, ‚ÄúMiddle‚ÄĚ, ‚ÄúLow‚ÄĚ
or ‚ÄúOff‚ÄĚ.
Select ‚ÄúHigh‚ÄĚ, ‚ÄúMiddle‚ÄĚ, ‚ÄúLow‚ÄĚ
or ‚ÄúOff‚ÄĚ.
■About Automatic Sound Leveliser (ASL)
ASL automatically adjusts the volume and tone quality according to the vehicle speed.
Display settings
Settings are available for adjusting the contrast and brightness of the screen.
■ Screen for display settings
 Press the ‚ÄúSETUP‚ÄĚ button.
 Select ‚ÄúDisplay‚ÄĚ on the ‚ÄúSetup‚ÄĚ
screen.
Select ‚ÄúDisplay‚ÄĚ on the ‚ÄúSetup‚ÄĚ
screen.
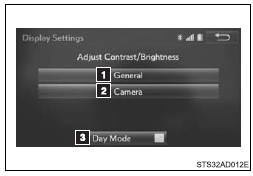
 Adjust general screen contrast/
brightness
Adjust general screen contrast/
brightness
 Adjust camera screen contrast/ brightness
 Changes to day mode.
■ Adjusting the screen contrast/brightness
 Select ‚ÄúGeneral‚ÄĚ or ‚ÄúCamera‚ÄĚ on
the ‚ÄúDisplay Settings‚ÄĚ screen.
Select ‚ÄúGeneral‚ÄĚ or ‚ÄúCamera‚ÄĚ on
the ‚ÄúDisplay Settings‚ÄĚ screen.
 Adjust the display as desired
by selecting ‚Äú+‚ÄĚ or ‚Äú-‚ÄĚ.
Adjust the display as desired
by selecting ‚Äú+‚ÄĚ or ‚Äú-‚ÄĚ.
■ Day mode
When the headlights are turned on, the screen dims.
However, the screen can be switched to day mode by selecting ‚ÄúDay Mode‚ÄĚ.
The screen will stay in day mode when the headlights are turned on until ‚ÄúDay Mode‚ÄĚ is selected again.
Voice settings
This screen is used for guidance for voice command systems setting.
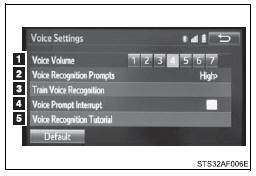
 Adjust the voice guidance volume
setting.
Adjust the voice guidance volume
setting.
 Set the voice recognition prompts
‚ÄúHigh‚ÄĚ, ‚ÄúLow‚ÄĚ or ‚ÄúOff‚ÄĚ.
Set the voice recognition prompts
‚ÄúHigh‚ÄĚ, ‚ÄúLow‚ÄĚ or ‚ÄúOff‚ÄĚ.
 Set the train voice recognition.
 Set the voice prompt interrupt on/off.
 Voice recognition tutorial
 USB port/AUX port
Connect an iPod, USB memory device or portable audio player to the USB port/AUX
port as indicated below. Select ‚ÄúiPod‚ÄĚ, ‚ÄúUSB‚ÄĚ or ‚ÄúAUX‚ÄĚ on the ‚ÄúSelect Audio Source‚ÄĚ
screen and the d ...
 Basic audio operations
Basic audio operations and functions common to each mode are explained in
this section.
Operating the multimedia system
1. Press this button to eject a disc
2. Insert a disc into the disc slot
...
Other materials:
Ambient Temperature Sensor Circuit (B1412)
DESCRIPTION
The ambient temperature sensor is installed in front of the condenser to detect
the ambient temperature which is used to control the air conditioning system AUTO
mode. This sensor is connected to the air conditioning amplifier assembly and detects
fluctuations in the ambient tempe ...
SRS Warning Light does not Come ON
DESCRIPTION
See page .
WIRING DIAGRAM
See page .
CAUTION / NOTICE / HINT
NOTICE:
Inspect the fuses for circuits related to this system before performing
the following inspection procedure.
After turning the ignition switch off, waiting time may be required
before disconne ...
Installation
INSTALLATION
PROCEDURE
1. INSTALL BRAKE ACTUATOR BRACKET ASSEMBLY
(a) Install the actuator bracket with the 3 bolts in the sequence shown
in the illustration.
Torque:
5.4 N·m {55 kgf·cm, 48 in·lbf}
2. INSTALL BRAKE ACTUATOR ...
