Toyota Tacoma (2015-2018) Service Manual: Removal
REMOVAL
CAUTION / NOTICE / HINT
HINT:
- Use the same procedure for the RH and LH sides.
- The procedure listed below is for the LH side.
PROCEDURE
1. REMOVE FRONT DOOR LOWER FRAME BRACKET GARNISH
(See page .gif) )
)
2. REMOVE FRONT DOOR INSIDE HANDLE BEZEL PLUG
(See page
)
3. REMOVE FRONT ARMREST BASE UPPER PANEL SUB-ASSEMBLY
(See page
)
4. REMOVE FRONT DOOR TRIM BOARD SUB-ASSEMBLY
(See page
)
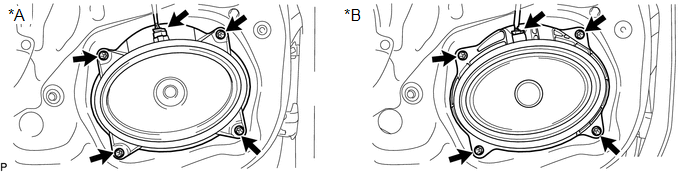
5. REMOVE FRONT NO. 1 SPEAKER ASSEMBLY
(a) Disconnect the connector.
 Text in Illustration
|
*A |
w/o Amplifier Box Speaker Assembly |
*B |
w/ Amplifier Box Speaker Assembly |
NOTICE:
Do not touch the cone part of the front No. 1 speaker assembly.
(b) Remove the 4 screws and front No. 1 speaker assembly.
 Components
COMPONENTS
ILLUSTRATION
...
 Inspection
INSPECTION
PROCEDURE
1. INSPECT FRONT NO. 1 SPEAKER ASSEMBLY (w/o Amplifier Box Speaker Assembly)
(a) Measure the resistance according to the value(s) in the table below.
Standard resistance:
...
Other materials:
Precaution
PRECAUTION
CAUTION:
The vehicle is equipped with SRS, which consists of a driver airbag,
front passenger airbag, side airbags and curtain shield airbags and knee
airbags. Failure to carry out service operations in the correct sequence
could cause the SRS to unexpectedly deploy ...
Power Source Circuit
DESCRIPTION
This circuit provides power to operate the forward recognition camera.
WIRING DIAGRAM
CAUTION / NOTICE / HINT
NOTICE:
Inspect the fuses for circuits related to this system before performing the following
inspection procedure.
PROCEDURE
1.
CHECK HARNESS A ...
System Description
SYSTEM DESCRIPTION
1. OUTLINE OF THEFT DETERRENT SYSTEM
The theft deterrent system can be set/canceled by locking/unlocking
the doors using the following operation:
Entry lock operation*1
Wireless lock operation*2
Key-linked lock operation
* ...
