Toyota Tacoma (2005–2015) Owners Manual: Installing child restraints
Follow the child restraint system manufacturer’s instructions. Firmly secure child restraints to the seats using the LATCH anchors or a seat belt. Attach the top tether strap when installing a child restraint.
The lap/shoulder belt can be used if your child restraint system is not compatible with the LATCH (Lower Anchors and Tethers for Children) system.
■ Using the LATCH anchors
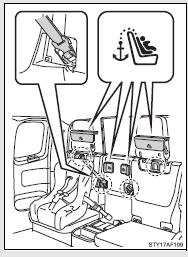
 Access Cab models
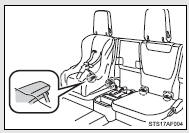
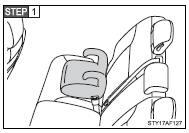
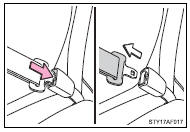
Child restraint LATCH anchors
LATCH anchors are provided for the each rear seat.
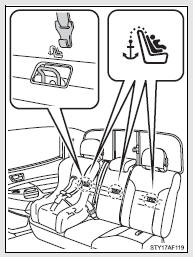
 Double Cab models
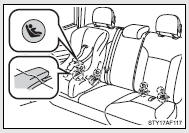
Child restraint LATCH anchors
LATCH anchors are provided for the outside rear seats.
Buttons displaying the location of the anchors are attached to the seats.
■ Using the seat belts
Seat belts equipped with a child restraint locking mechanism (ALR/ELR belts except driver’s seat belt)
■ Using the top tether strap
 Regular Cab models with bench type
seat
Regular Cab models with bench type
seat

Anchor bracket (for top tether strap)
Anchor bracket is provided for each passenger seat.
 Regular Cab models with separated
type seat
Regular Cab models with separated
type seat
Anchor bracket (for top tether strap)
Anchor bracket is provided for passenger seat.
 Access Cab models
Anchor bracket (for top tether strap)
Anchor bracket is provided for each rear seat.
 Double Cab models
Anchor bracket (for top tether strap) Anchor bracket is provided for each rear seat.
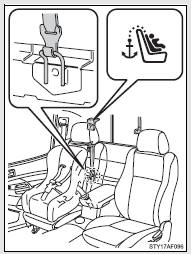
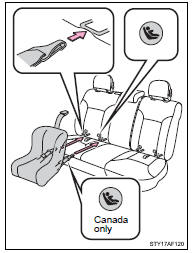
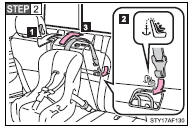
Installation with LATCH system (Access Cab models)
 Type A
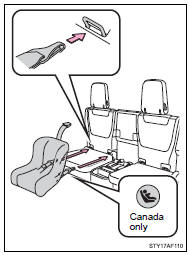
 Latch the hooks of the lower straps
onto the LATCH anchors and tighten the lower straps.
Latch the hooks of the lower straps
onto the LATCH anchors and tighten the lower straps.
 If the child restraint has a top
tether strap, the top tether strap should be latched onto the top tether strap anchor.
If the child restraint has a top
tether strap, the top tether strap should be latched onto the top tether strap anchor.
For owners in Canada: A symbol on a child restraint system indicates the presence of a lower connector system.
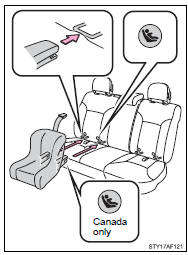
Type B
 Latch the buckles onto the LATCH
anchors.
Latch the buckles onto the LATCH
anchors.
 If the child restraint has a top
tether strap, the top tether strap should be latched onto the top tether strap anchor.
If the child restraint has a top
tether strap, the top tether strap should be latched onto the top tether strap anchor.
For owners in Canada: A symbol on a child restraint system indicates the presence of a lower connector system.
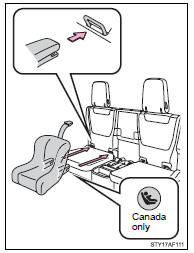
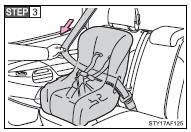
Installation with LATCH system (Double Cab models)
 Type A
 Widen the gap between the seat cushion
and seatback slightly.
Widen the gap between the seat cushion
and seatback slightly.
 Latch the hooks of the lower straps
onto the LATCH anchors and tighten the lower straps.
Latch the hooks of the lower straps
onto the LATCH anchors and tighten the lower straps.
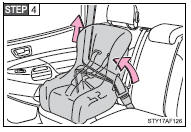
 If the child restraint has a top
tether strap, the top tether strap should be latched onto the top tether strap anchor.
If the child restraint has a top
tether strap, the top tether strap should be latched onto the top tether strap anchor.
For owners in Canada: A symbol on a child restraint system indicates the presence of a lower connector system.
 Type B
 Widen the gap between the seat cushion
and seatback slightly.
Widen the gap between the seat cushion
and seatback slightly.
 Latch the buckles onto the LATCH
anchors.
Latch the buckles onto the LATCH
anchors.
 If the child restraint has a top
tether strap, the top tether strap should be latched onto the top tether strap anchor.
If the child restraint has a top
tether strap, the top tether strap should be latched onto the top tether strap anchor.
For owners in Canada: A symbol on a child restraint system indicates the presence of a lower connector system.
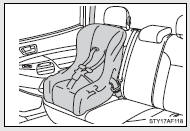
Installing child restraints using a seat belt (child restraint lock function belt)
■ Rear-facing (Regular Cab models) — Infant seat/convertible seat
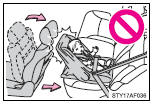
Never install a rear-facing child restraint. Your vehicle is not designed to carry an infant.
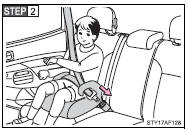
■ Rear-facing (Access Cab and Double Cab models) ⎯ Infant seat/convertible seat
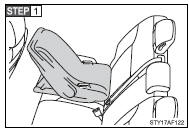
Place the child seat on the rear seat facing the rear of the vehicle.
Run the seat belt through the child seat and insert the plate into the buckle. Make sure that the belt is not twisted.
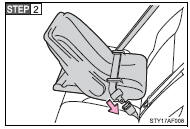
Fully extend the shoulder belt and then allow it to retract slightly in order to activate the ALR lock mode.
Lock mode allows the seat belt to retract only.
While pushing the child seat down into the rear seat, allow the shoulder belt to retract until the child seat is securely in place.
After the shoulder belt has retracted to a point where there is no slack in the belt, pull the belt to check that it cannot be extended.
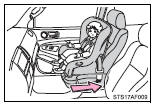
■ Forward-facing ⎯ Convertible seat
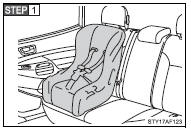
Place the child seat on the seat facing the front of the vehicle.
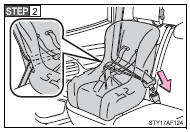
Run the seat belt through the child seat and insert the plate into the buckle. Make sure that the belt is not twisted.
Fully extend the shoulder belt and then allow it to retract slightly in order to activate the ALR lock mode.
Lock mode allows the seat belt to retract only.
While pushing the child seat into the seat, allow the shoulder belt to retract until the child seat is securely in place.
After the shoulder belt has retracted to a point where there is no slack in the belt, pull the belt to check that it cannot be extended.
 If the child restraint has a top
tether strap, the top tether strap should be latched onto the top tether strap anchor.
If the child restraint has a top
tether strap, the top tether strap should be latched onto the top tether strap anchor.
■ Booster seat
Place the booster seat on the seat facing the front of the vehicle.
Sit the child in the booster seat.
Fit the seat belt to the booster seat according to the manufacturer’s instructions and insert the plate into the buckle. Make sure that the belt is not twisted.
Check that the shoulder belt is correctly positioned over the child’s shoulder, and that the lap belt is as low as possible.
Removing a child restraint installed with a seat belt
Push the buckle release button and fully retract the seat belt.
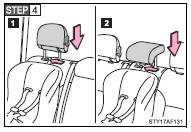
Child restraint systems with a top tether strap (Regular Cab models)
■ Bench type seat
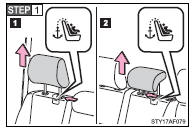
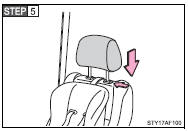
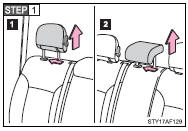
Remove the head restraint.
Installing position:
 Right side passenger seat
 Center passenger seat
Swing the seatback forward slightly (→P. 48) and remove the anchor bracket covers.
Installing position:
 Right side passenger seat
 Center passenger seat
Store the removed cover in a safe place such as the glove box.
 Right side passenger seat
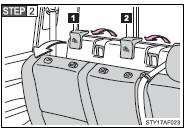
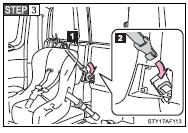
 Route the top tether strap through
the routing device as shown in the illustration.
Route the top tether strap through
the routing device as shown in the illustration.
Make sure the top tether strap is not twisted.
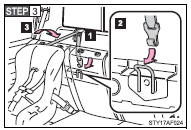
 Latch the hook onto the anchor
bracket.
Latch the hook onto the anchor
bracket.
 Return the seatback to its original
position.
Return the seatback to its original
position.
Make sure the seatback is securely locked by pushing forward and rearward on the top of the seatback.
 Center passenger seat
 Route the top tether strap through
the routing device as shown in the illustration.
Route the top tether strap through
the routing device as shown in the illustration.
Make sure the top tether strap is not twisted.
 Latch the hook onto the anchor bracket.
 Return the seatback to its original
position.
Return the seatback to its original
position.
Make sure the seatback is securely locked by pushing forward and rearward on the top of the seatback.
 Secure the child restraint using
a seat belt or lower anchors, and tighten the top tether strap.
Secure the child restraint using
a seat belt or lower anchors, and tighten the top tether strap.
Make sure the top tether strap is securely latched.
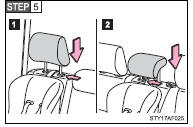
Replace the head restraint.
Installing position:
 Right side passenger seat
 Center passenger seat
■ Separated type seat
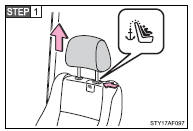
Remove the head restraint.
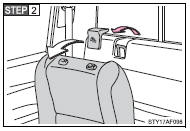
Swing the seatback forward slightly (→P. 47) and remove the anchor bracket cover.
Store the removed cover in a safe place such as the glove box.

 Route the top tether strap through
the routing device as shown in the illustration.
Route the top tether strap through
the routing device as shown in the illustration.
Make sure the top tether strap is not twisted.
 Latch the hook onto the anchor bracket.
 Return the seatback to its original
position.
Return the seatback to its original
position.
Make sure the seatback is securely locked by pushing forward and rearward on the top of the seatback.
 Secure the child restraint using
a seat belt or lower anchor, and tighten the top tether strap.
Secure the child restraint using
a seat belt or lower anchor, and tighten the top tether strap.
Make sure the top tether strap is securely latched.
Replace the head restraint.
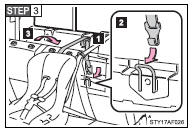
Child restraint systems with a top tether strap (Access Cab models)

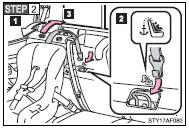
Remove the anchor bracket covers.
Store the removed covers in a safe place such as the glove box.
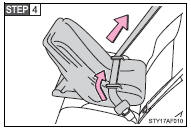
 Secure the child restraint using
a seat belt or lower anchors.
Secure the child restraint using
a seat belt or lower anchors.
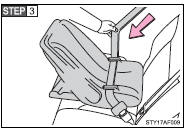
 Route the top tether strap through
the routing device as shown in the illustration.
Route the top tether strap through
the routing device as shown in the illustration.
Make sure the top tether strap is not twisted.
 Latch the hook onto the anchor bracket
and tighten the top tether strap.
Latch the hook onto the anchor bracket
and tighten the top tether strap.
Make sure the top tether strap is securely latched.
Child restraint systems with a top tether strap (Double Cab models)
Remove the head restraint.
Installing position:
 Outside passenger seat
 Center passenger seat
 Outside passenger seat
 Swing the seatback forward slightly.
 Latch the hook onto the anchor bracket.
 Return the seatback to its original
position.
Return the seatback to its original
position.
Make sure the seatback is securely locked by pushing forward and rearward on the top of the seatback.
 Center passenger seat
 Swing the seatback forward slightly.
 Latch the hook onto the anchor bracket.
 Return the seatback to its original
position.
Return the seatback to its original
position.
Make sure the seatback is securely locked by pushing forward and rearward on the top of the seatback.
 Secure the child restraint using
a seat belt or lower anchors, and tighten the top tether strap.
Secure the child restraint using
a seat belt or lower anchors, and tighten the top tether strap.
Make sure the top tether strap is securely latched.
Replace the head restraint.
Installing position:
 Outside passenger seat
 Center passenger seat
■Laws and regulations pertaining to anchorages
The LATCH system conforms to FMVSS225 or CMVSS210.2.
Child restraint systems conforming to FMVSS213 or CMVSS213 specifications can be used.
This vehicle is designed to conform to the SAE J1819.
CAUTION
■When installing a booster seat
Do not fully extend the shoulder belt to prevent the belt from going to ALR lock mode.
ALR mode causes the belt to tighten only which could cause injury or discomfort to the child.
■When installing a child restraint system
Follow the directions given in the child restraint system installation manual and fix the child restraint system securely in place.
If the child restraint system is not correctly fixed in place, the child or other passengers may be seriously injured or even killed in the event of sudden braking, sudden swerving or an accident.
●Access Cab and Double Cab models: If the driver’s seat interferes with the child restraint system and prevents it from being attached correctly, attach the child restraint system to the right-hand rear seat.
●Access Cab and Double Cab models: Adjust the front passenger seat so that it does not interfere with the child restraint system.
●Only put a forward-facing or booster child seat on the front seat when it is unavoidable. When installing a forwardfacing or booster child seat on the front passenger seat, move the seat as far back as possible even if AIR BAG OFF indicator light is illuminated. Failing to do so may result in death or serious injury if the airbags deploy (inflate).
CAUTION
■When installing a child restraint system
●When a booster seat is installed, always ensure that the shoulder belt is positioned across the center of the child’s shoulder. The belt should be kept away from the child’s neck, but not so that it could fall off the child’s shoulder. Failing to do so may result in death or serious injury in the event of sudden braking, sudden swerving or an accident.
●Ensure that the belt and tab are securely locked and the seat belt is not twisted.
●Push and pull the child restraint system from side to side and forward to be sure it is secure.
●After securing the child restraint system, never adjust the seat.
●Follow all installation instructions provided by the child restraint system manufacturer.
■Do not use a seat belt extender
If a seat belt extender is used when installing a child restraint system, the seat belt will not securely hold the child restraint system, which could cause death or serious injury to the child or other passengers in the event of sudden braking, sudden swerving or an accident.
■To correctly attach a child restraint system to the anchors
When using the LATCH anchors, be sure that there are no foreign objects around the anchors and that the seat belt is not caught behind the child restraint. Make sure the child restraint system is securely attached, or it may cause death or serious injury to the child or other passengers in the event of a sudden stop, sudden swerve or accident.
 Child restraint systems
A child restraint system for a small child or baby must itself be properly
restrained on the seat with the lap portion of the lap/shoulder belt.
The laws of all 50 states of the U.S.A. and Canada n ...
 When driving
...
Other materials:
Problem Symptoms Table
PROBLEM SYMPTOMS TABLE
HINT:
Use the table below to help determine the cause of problem symptoms. If multiple
suspected areas are listed, the potential causes of the symptoms are listed in order
of probability in the "Suspected Area" column of the table. Check each symptom by
check ...
Some Alarm Functions do not Operate
DESCRIPTION
When the alarm sounds, the following alarm functions operate: the roof console
box assembly and No. 1 room light assembly illuminates, and the headlights, taillights
and hazard lights flash, and the security horn and vehicle horn sound intermittently.
WIRING DIAGRAM
CAUTION / ...
Inspection
INSPECTION
PROCEDURE
1. INSPECT AIR CONDITIONING CONTROL ASSEMBLY
(a) Check the blower switch resistance.
(1) Measure the resistance according to the value(s) in the table below.
Text in Illustration
*a
Component without harness connected
...
