
Toyota Tacoma (2015-2018) Service Manual: Automatic Disconnecting Differential Motor Control Circuit Open (P17A0)
DESCRIPTION
This DTC is output when an open circuit in the A.D.D. shift motor drive circuit is detected.
|
DTC No. |
Detection Item |
DTC Detection Condition |
Trouble Area |
|---|---|---|---|
|
P17A0 |
Automatic Disconnecting Differential Motor Control Circuit Open |
|
|
WIRING DIAGRAM
Refer to DTC P17A9 (See page .gif) ).
).
PROCEDURE
|
1. |
CHECK HARNESS AND CONNECTOR (4 WHEEL DRIVE CONTROL ECU - DIFFERENTIAL VACUUM ACTUATOR ASSEMBLY) |
(a) Disconnect the F12 4 wheel drive control ECU connector.
(b) Disconnect the A3 A.D.D. actuator (differential vacuum actuator assembly) connector.
(c) Measure the resistance according to the value(s) in the table below.
Standard Resistance:
|
Tester Connection |
Condition |
Specified Condition |
|---|---|---|
|
F12-2 (DM1) - A3-1 (DM1) |
Always |
Below 1 Ω |
|
F12-6 (DM2) - A3-2 (DM2) |
Always |
Below 1 Ω |
| NG | .gif) |
REPAIR OR REPLACE HARNESS OR CONNECTOR |
|
.gif)
|
2. |
INSPECT DIFFERENTIAL VACUUM ACTUATOR ASSEMBLY (A.D.D. SHIFT MOTOR) |
|
(a) Disconnect the A3 A.D.D. actuator (differential vacuum actuator assembly) connector. |
|
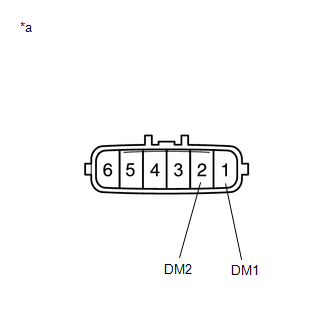
(b) Measure the resistance according to the value(s) in the table below.
Standard Resistance:
|
Tester Connection |
Condition |
Specified Condition |
|---|---|---|
|
1 (DM1) - 2 (DM2) |
Always |
1.5 to 10 Ω |
|
*a |
Component without harness connected (A.D.D. Actuator (Differential Vacuum Actuator Assembly)) |
| OK | |
REPLACE 4 WHEEL DRIVE CONTROL ECU |
| NG | |
REPLACE DIFFERENTIAL VACUUM ACTUATOR ASSEMBLY |
 Invalid Data Received From Vehicle Dynamics Control Module (U0416)
DESCRIPTION
This DTC is detected if a wheel speed malfunction signal is sent from the skid
control ECU (brake actuator assembly).
DTC No.
Detection Item
DTC Detect ...
 Automatic Disconnecting Differential Motor Limit Switch Circuit (P17A4)
DESCRIPTION
When the A.D.D. actuator switches between 2WD and 4WD, the DL1 and DL2 terminals
of the limit switch and ADD terminal of the A.D.D. position switch change to one
of the following ON/O ...
Other materials:
Sound Signal Circuit between Radio Receiver and Stereo Component Amplifier
DESCRIPTION
The navigation receiver assembly sends a sound signal to the stereo component
amplifier assembly via this circuit.
The sound signal that has been sent is amplified by the stereo component amplifier
assembly, and then is sent to the speakers.
If there is an open or short in the cir ...
Main Switch Circuit
DESCRIPTION
When the blind spot monitor main switch assembly (warning canceling switch assembly)
is turned on, a signal is sent to the blind spot monitor sensor LH. The blind spot
monitor system operates according to this signal.
WIRING DIAGRAM
CAUTION / NOTICE / HINT
NOTICE:
Inspect the ...
Problem Symptoms Table
PROBLEM SYMPTOMS TABLE
NOTICE:
When replacing the skid control ECU (brake actuator assembly), sensor, etc.,
turn the ignition switch off.
HINT:
Use the table below to help determine the cause of problem symptoms.
If multiple suspected areas are listed, the potential causes of the s ...
