
Toyota Tacoma (2015-2018) Service Manual: Steering Angle Sensor Power Source Voltage Malfunction (C1432)
DESCRIPTION
The skid control ECU (brake actuator assembly) outputs this DTC when it receives a sensor power source malfunction signal from the steering angle sensor.
|
DTC No. |
Detection Item |
DTC Detection Condition |
Trouble Area |
|---|---|---|---|
|
C1432 |
Steering Angle Sensor Power Source Voltage Malfunction |
Steering angle sensor power supply malfunction signal is received from steering angle sensor. |
|
WIRING DIAGRAM
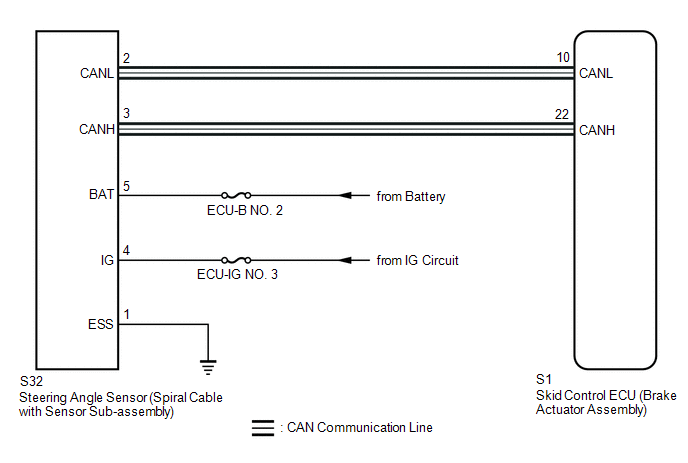
CAUTION / NOTICE / HINT
NOTICE:
- Do not remove the steering angle sensor from the spiral cable with sensor sub-assembly.
- When replacing the steering angle sensor (spiral cable with sensor sub-assembly), confirm that the replacement part is of the correct specification.
- Inspect the fuses for circuits related to this system before performing the following inspection procedure.
HINT:
- When U0073, U0124 and/or U0126 is output together with C1432, inspect
and repair the trouble areas indicated by U0073, U0124 and/or U0126 first
(See page
.gif) ).
). - When the speed sensor or the yaw rate sensor (airbag sensor assembly) has trouble, DTCs for the steering angle sensor (spiral cable with sensor sub-assembly) may be output even when the steering angle sensor is normal. When DTCs for the speed sensor or yaw rate sensor (airbag sensor assembly) are output together with DTCs for the steering angle sensor (spiral cable with sensor sub-assembly), inspect and repair the speed sensor and yaw rate sensor (airbag sensor assembly) first, and then inspect and repair the steering angle sensor (spiral cable with sensor sub-assembly).
PROCEDURE
|
1. |
CHECK TERMINAL VOLTAGE (BAT TERMINAL) |
(a) Turn the ignition switch off.
(b) Remove the steering wheel and the column cover lower (See page
).
|
(c) Make sure that there is no looseness at the locking part and the connecting part of the connectors. |
|
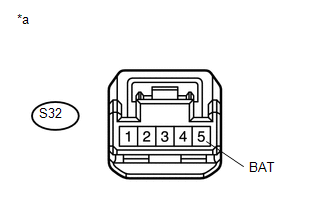
(d) Disconnect the S32 steering angle sensor (spiral cable with sensor sub-assembly) connector.
(e) Measure the voltage according to the value(s) in the table below.
Standard Voltage:
|
Tester Connection |
Condition |
Specified Condition |
|---|---|---|
|
S32-5 (BAT) - Body ground |
Always |
11 to 14 V |
|
*a |
Front view of wire harness connector (to Steering Angle Sensor [Spiral Cable with Sensor Sub-assembly]) |
| NG | .gif) |
REPAIR OR REPLACE HARNESS OR CONNECTOR (BAT CIRCUIT) |
|
.gif)
|
2. |
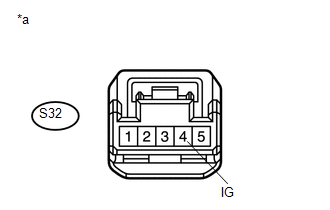
CHECK TERMINAL VOLTAGE (IG TERMINAL) |
(a) Turn the ignition switch to ON.
|
(b) Measure the voltage according to the value(s) in the table below. Standard Voltage:
|
|
| NG | |
REPAIR OR REPLACE HARNESS OR CONNECTOR (IG CIRCUIT) |
|
|
3. |
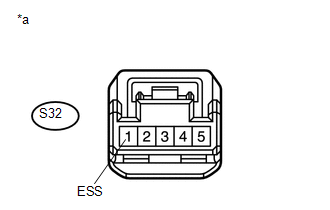
CHECK HARNESS AND CONNECTOR (ESS TERMINAL) |
(a) Turn the ignition switch off.
|
(b) Measure the resistance according to the value(s) in the table below. Standard Resistance:
HINT: If troubleshooting has been carried out according to the Problem Symptoms
Table, refer back to the table and proceed to the next step (See page
|
|
| OK | |
REPLACE SPIRAL CABLE WITH SENSOR SUB-ASSEMBLY |
| NG | |
REPAIR OR REPLACE HARNESS OR CONNECTOR (ESS CIRCUIT) |
 Motor Circuit Malfunction (C1428)
DESCRIPTION
DTC No.
Detection Item
DTC Detection Condition
Trouble Area
C1428
Motor Circuit Malfunction
With the mot ...
 Steering Angle Sensor Internal Circuit (C1433)
DESCRIPTION
The skid control ECU (brake actuator assembly) outputs this DTC when it receives
an internal malfunction signal from the steering angle sensor.
DTC No.
Detection ...
Other materials:
Installing child restraints
Follow the child restraint system manufacturer’s instructions. Firmly secure
child restraints to the seats using the LATCH anchors or a seat belt. Attach the
top tether strap when installing a child restraint.
The lap/shoulder belt can be used if your child restraint system is not compatible ...
Turn signal lever
Right turn
Left turn
Move and hold the lever partway to
signal a lane change.
The right hand signal will flash until you release the lever.
Move and hold the lever partway
to signal a lane change.
The left hand signal will flash until you release the lever.
■Turn signals can be ...
Mirror Heater does not Operate with Rear Defogger Switch
DESCRIPTION
When the mirror heater switch on the air conditioning control assembly is pressed,
the operation signal is sent to the air conditioning amplifier assembly. When the
air conditioning amplifier assembly receives the signal, it turns on a relay in
the air conditioning amplifier assem ...
