DESCRIPTION
|
DTC No. |
Detection Item |
DTC Detection Condition |
Trouble Area |
|---|---|---|---|
|
C1427 |
Motor Malfunction |
Actuator pump motor does not operate properly. |
|
WIRING DIAGRAM
Refer to DTCs C142B, C146C and C146D (See page
.gif) ).
).
CAUTION / NOTICE / HINT
NOTICE:
When replacing the skid control ECU (brake actuator assembly), perform zero point
calibration and store system information (See page
).
PROCEDURE
|
1. |
PERFORM ACTIVE TEST USING TECHSTREAM (MOTOR RELAY) |
(a) Connect the Techstream to the DLC3.
(b) Turn the ignition switch to ON.
(c) Turn the Techstream on.
(d) Enter the following menus: Chassis / ABS/VSC/TRAC / Active Test.
(e) According to the display on the Techstream, perform the Active Test.
ABS/VSC/TRAC|
Tester Display |
Measurement Item |
Control Range |
Diagnostic Note |
|---|---|---|---|
|
Motor Relay |
Motor relay |
Relay ON / OFF |
Operating sound of motor can be heard. Vehicle condition: Vehicle stopped |
(f) Check the operating sound of the motor relay when operating it with the Techstream.
Result|
Result |
Proceed to |
|---|---|
|
The operating sound is not heard |
A |
|
The operating sound is heard |
B |
| B | .gif) |
GO TO STEP 3 |
|
.gif)
|
2. |
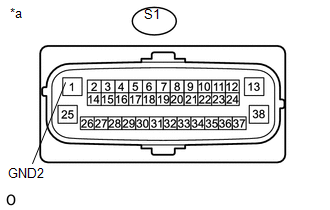
CHECK HARNESS AND CONNECTOR (GND2 TERMINAL) |
(a) Turn the ignition switch off.
(b) Make sure that there is no looseness at the locking part and the connecting part of the connectors.
(c) Disconnect the S1 skid control ECU (brake actuator assembly) connector.
|
(d) Measure the resistance according to the value(s) in the table below. Standard Resistance:
|
|
| NG | |
REPAIR OR REPLACE HARNESS OR CONNECTOR (GND2 CIRCUIT) |
|
|
3. |
RECONFIRM DTC |
HINT:
This code is detected when a problem is identified in the brake actuator assembly. The motor relay is in the brake actuator assembly.
Therefore, motor relay unit inspection cannot be performed. Be sure to check if the DTC is output before replacing the brake actuator assembly.
(a) Reconnect the S1 skid control ECU (brake actuator assembly) connector.
(b) Clear the DTCs (See page
).
(c) Turn the ignition switch off.
(d) Start the engine.
(e) Drive the vehicle at a speed of 20 km/h (12 mph) or more for 30 seconds or more.
(f) Check if the same DTC is recorded (See page
).
HINT:
- If a speed signal of 6 km/h (4 mph) or more is input to the skid control ECU (brake actuator assembly) with the ignition switch to ON and the stop light switch off, the ECU performs self diagnosis of the motor and solenoid circuits.
- If the normal system code is output (no trouble codes are output), slightly jiggle the connectors, wire harness, and fuses of the brake actuator assembly. Make sure that no DTCs are output.
- If any DTCs are output while jiggling a connector or wire harness of the skid control ECU (brake actuator assembly), inspect and repair the connector or wire harness.
- The DTCs were probably output due to a bad connection of the connector terminal.
|
Result |
Proceed to |
|---|---|
|
DTC C1427 is not output |
A |
|
DTC C1427 is output |
B |
| A | |
USE SIMULATION METHOD TO CHECK |
| B | |
REPLACE BRAKE ACTUATOR ASSEMBLY |

