Toyota Tacoma (2015-2018) Service Manual: Installation
INSTALLATION
PROCEDURE
1. INSTALL FORWARD RECOGNITION CAMERA
NOTICE:
- When replacing the forward recognition camera, replace it with a new one.
- Do not touch the camera lens. If the camera lens has been touched, do not use the forward recognition camera.
- If the forward recognition camera has been struck or dropped, replace it with a new one.
- If the forward recognition camera is not properly installed, forward recognition camera optical axis learning cannot be performed properly. Make sure the forward recognition camera is installed securely.
- Replace the forward recognition camera if there is any foreign matter on the camera lens.
- When replacing the windshield glass of a vehicle equipped with a forward recognition camera, make sure to use a Toyota genuine part. If a non-Toyota genuine part is used, the forward recognition camera may not be able to be installed due to a missing bracket. Also, the dynamic radar cruise control system, forward recognition camera system, lane departure alert system, pre-collision system may not operate properly due to a difference in the transmissivity or black ceramic border.
- If the forward recognition camera bracket is deformed or damaged, replace it together with the windshield glass.
- If there is any foreign matter on the area of the windshield glass in front of the forward recognition camera, clean the windshield glass before installing the forward recognition camera.
|
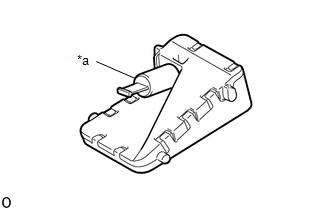
(a) When using a new forward recognition camera: (1) Remove the cap. NOTICE: Do not touch the camera lens after removing the protective cap. |
|
|
(b) Engage the 4 guides to install the forward recognition camera as shown in the illustration. NOTICE: Do not touch the camera lens. |
|
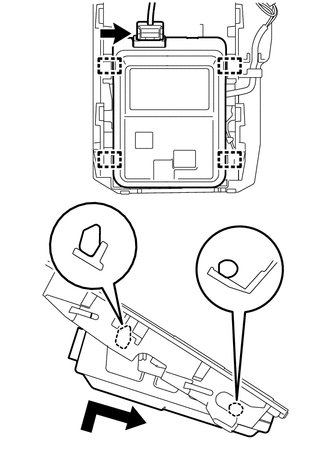
(c) Connect the connector.
2. INSTALL FORWARD RECOGNITION LATCH
NOTICE:
Before installing the forward recognition latch, be sure to check that the forward recognition camera is securely installed.
|
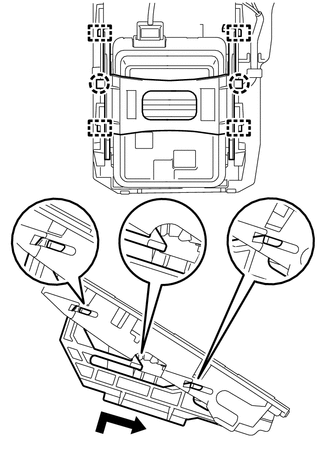
(a) Engage the 4 guides and 2 claws to install the forward recognition latch as shown in the illustration. NOTICE: Check that the forward recognition latch is securely installed. |
|
3. INSTALL NO. 1 FORWARD RECOGNITION COVER
|
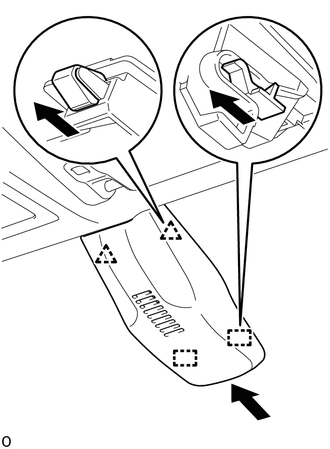
(a) Engage the 2 guides and 2 clips as shown in the illustration to install the No. 1 forward recognition cover. NOTICE: When installing, press the cover parallel to the windshield glass surface and install. |
|
4. ADJUST FORWARD RECOGNITION CAMERA
(a) If the forward recognition camera has been replaced or the windshield glass has been removed and installed, it is necessary to perform Forward Recognition Camera Learning.
Click here .gif)
 Before Starting Adjustment
BEFORE STARTING ADJUSTMENT
CAUTION / NOTICE / HINT
NOTICE:
When replacing the windshield glass of a vehicle equipped with a forward recognition
camera, make sure to use a Toyota genuine part. If ...

Other materials:
Short to GND in Outer Mirror Indicator(Master) (C1AB2)
DESCRIPTION
This DTC is stored when the blind spot monitor sensor LH detects a ground short
in the blind spot monitor indicator LH.
DTC Code
DTC Detection Condition
Trouble Area
C1AB2
With the blind spot monitor main switch assembly (w ...
Installation
INSTALLATION
PROCEDURE
1. INSTALL FRONT DISC
(a) Align the matchmarks of the front disc and the front axle hub and
install the front disc.
Text in Illustration
*a
Matchmark
HINT:
When replacing the disc with a new one, se ...
Registration
REGISTRATION
PROCEDURE
1. REGISTER TRANSMITTER CODE
HINT:
The vehicle's garage door opener records transmitter codes for systems
such as garage doors, gates, entry gates, door locks, home lighting systems,
security systems or other transmitter code based systems.
The gara ...
