Toyota Tacoma manuals

Toyota Tacoma (2015-2018) Service Manual: Installation

INSTALLATION

PROCEDURE

1. INSTALL AIR CONDITIONER PRESSURE SENSOR

(a) Remove the vinyl tape from the air conditioner tube and accessory assembly and connecting part of the air conditioner pressure sensor.

(b) Apply sufficiently compressor oil to a new O-ring and fitting surface of the air conditioner pressure sensor.

Compressor oil:

PSD1 or equivalent

NOTICE:

Keep the O-rings and O-ring fitting surfaces free of foreign matter.

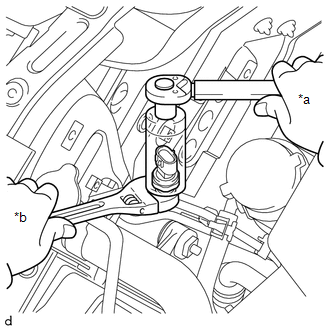
(c) Using a 27 mm deep socket wrench, install the air conditioner pressure sensor.

Text in Illustration

*a

Turn

*b

Hold

Torque:

11 N·m {110 kgf·cm, 8 ft·lbf}

(d) Connect the connector.

2. CHARGE AIR CONDITIONING SYSTEM WITH REFRIGERANT

3. WARM UP ENGINE

3. WARM UP ENGINE

4. INSPECT FOR REFRIGERANT LEAK

4. INSPECT FOR REFRIGERANT LEAK

On-vehicle Inspection

Components
COMPONENTS ILLUSTRATION ...

On-vehicle Inspection
ON-VEHICLE INSPECTION PROCEDURE 1. INSPECT AIR CONDITIONER PRESSURE SENSOR (for Automatic Air Conditioning System) (a) Check the wire harness. (1) Disconnect the A34 air conditioner pressure senso ...

Other materials:

Ignition Hold Monitor Malfunction (B2271)
DESCRIPTION This DTC is stored when a malfunction in the IG circuit or IG hold circuit in the certification ECU (smart key ECU assembly) is detected. HINT: When the cable is disconnected and reconnected to the negative (-) battery terminal, the power source mode returns to the state it was in ...

Driver Side Door Entry Lock and Unlock Functions do not Operate
DESCRIPTION If the entry lock and unlock functions do not operate for the driver door only, the request code may not be being transmitted from the driver door or the front door outside handle assembly LH (touch sensor) may be malfunctioning. If the entry functions for other doors operate prop ...

Radio Receiver
Components COMPONENTS ILLUSTRATION ILLUSTRATION Removal REMOVAL PROCEDURE 1. REMOVE INSTRUMENT CLUSTER CENTER FINISH PANEL SUB-ASSEMBLY (See page ) 2. REMOVE RADIO AND DISPLAY RECEIVER ASSEMBLY WITH BRACKET (a) Remove the 4 bolts. ...

© 2011-2026 Copyright www.ttguide.net