Toyota Tacoma (2015-2018) Service Manual: On-vehicle Inspection
ON-VEHICLE INSPECTION
PROCEDURE
1. INSPECT FRONT SEAT AIRBAG ASSEMBLY LH (for Vehicle not Involved in Collision)
|
(a) Perform a diagnostic system check (See page
|
|
.gif) ).
).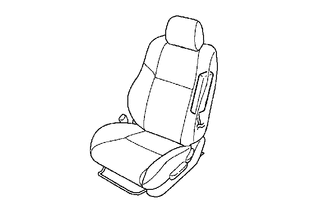
(b) With the front seat airbag assembly LH installed on the vehicle, perform a visual check. If there are any defects as mentioned below, replace the front seat with a new one:
Cuts, minute cracks or marked discoloration on the front seatback around the front seat airbag assembly LH.
2. INSPECT FRONT SEAT AIRBAG ASSEMBLY LH (for Vehicle Involved in Collision and Airbag has not Deployed)
|
(a) Perform a diagnostic system check (See page
|
|
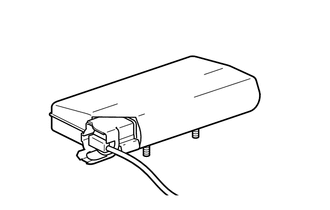
(b) With the front seat airbag assembly LH removed from the vehicle, perform a visual check. If there are any defects as mentioned below, replace the front seat airbag assembly LH with a new one:
- Cuts, minute cracks or marked discoloration on the front seat airbag assembly LH.
- Cracks or other damage to the wire harness or connector.
CAUTION:
For removal and installation procedures of the front seat airbag assembly LH, be sure to follow the correct procedure.
 Installation
INSTALLATION
CAUTION / NOTICE / HINT
CAUTION:
Wear protective gloves. Sharp areas on the parts may injure your hands.
HINT:
Use the same procedure for both the RH and LH sides.
The pr ...
 Removal
REMOVAL
CAUTION / NOTICE / HINT
CAUTION:
Be sure to read Precaution thoroughly before servicing (See page
).
If the side airbag was deployed, replace the front seat airbag assembly ...
Other materials:
Diagnostic Trouble Code Chart
DIAGNOSTIC TROUBLE CODE CHART
Smart Key System (for Start Function)
DTC Code
Detection Item
See page
B2271
Ignition Hold Monitor Malfunction
B2274
ACC Monitor Malfunction
...
Acceleration Sensor Stuck Malfunction (C1232,C1243,C1245,C1279)
DESCRIPTION
The skid control ECU (master cylinder solenoid) receives signals from the yaw
rate and acceleration (airbag sensor assembly) via the CAN communication system.
The airbag sensor assembly has a built-in yaw rate and acceleration sensor and
detects the vehicle's condition using 2 ...
Radio Antenna
Components
COMPONENTS
ILLUSTRATION
Removal
REMOVAL
PROCEDURE
1. REMOVE ROOF HEADLINING ASSEMBLY (for Double Cab)
(See page )
2. REMOVE ROOF HEADLINING ASSEMBLY (for Access Cab)
(See page )
3. REMOVE ANTENNA ASSEMBLY WITH HOLDER
(a) Disengage the 3 clamps.
(b) Remove the nut.
...
