Toyota Tacoma (2015-2018) Service Manual: Installation
INSTALLATION
PROCEDURE
1. INSTALL FORWARD RECOGNITION CAMERA
NOTICE:
- When replacing the forward recognition camera, replace it with a new one.
- Do not touch the camera lens. If the camera lens has been touched, do not use the forward recognition camera.
- If the forward recognition camera has been struck or dropped, replace it with a new one.
- If the forward recognition camera is not properly installed, forward recognition camera optical axis learning cannot be performed properly. Make sure the forward recognition camera is installed securely.
- Replace the forward recognition camera if there is any foreign matter on the camera lens.
- When replacing the windshield glass of a vehicle equipped with a forward recognition camera, make sure to use a Toyota genuine part. If a non-Toyota genuine part is used, the forward recognition camera may not be able to be installed due to a missing bracket. Also, the dynamic radar cruise control system, forward recognition camera system, lane departure alert system, pre-collision system may not operate properly due to a difference in the transmissivity or black ceramic border.
- If the forward recognition camera bracket is deformed or damaged, replace it together with the windshield glass.
- If there is any foreign matter on the area of the windshield glass in front of the forward recognition camera, clean the windshield glass before installing the forward recognition camera.
|
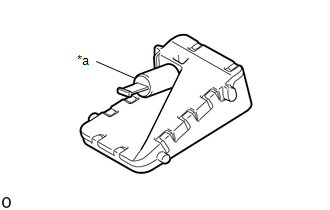
(a) When using a new forward recognition camera: (1) Remove the cap. NOTICE: Do not touch the camera lens after removing the protective cap. |
|
|
(b) Engage the 4 guides to install the forward recognition camera as shown in the illustration. NOTICE: Do not touch the camera lens. |
|
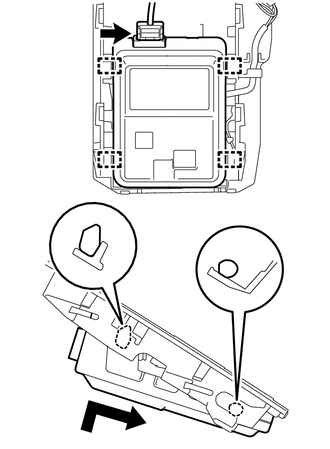
(c) Connect the connector.
2. INSTALL FORWARD RECOGNITION LATCH
NOTICE:
Before installing the forward recognition latch, be sure to check that the forward recognition camera is securely installed.
|
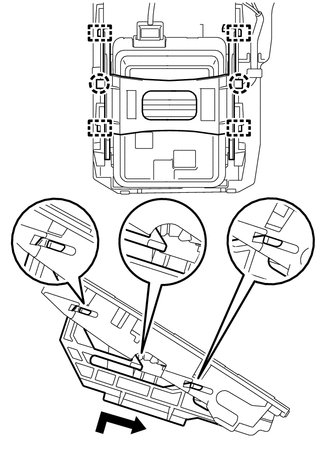
(a) Engage the 4 guides and 2 claws to install the forward recognition latch as shown in the illustration. NOTICE: Check that the forward recognition latch is securely installed. |
|
3. INSTALL NO. 1 FORWARD RECOGNITION COVER
|
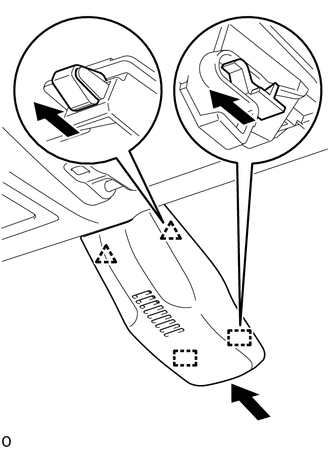
(a) Engage the 2 guides and 2 clips as shown in the illustration to install the No. 1 forward recognition cover. NOTICE: When installing, press the cover parallel to the windshield glass surface and install. |
|
4. ADJUST FORWARD RECOGNITION CAMERA
(a) If the forward recognition camera has been replaced or the windshield glass has been removed and installed, it is necessary to perform Forward Recognition Camera Learning.
Click here .gif)
 Before Starting Adjustment
BEFORE STARTING ADJUSTMENT
CAUTION / NOTICE / HINT
NOTICE:
When replacing the windshield glass of a vehicle equipped with a forward recognition
camera, make sure to use a Toyota genuine part. If ...

Other materials:
On-vehicle Inspection
ON-VEHICLE INSPECTION
PROCEDURE
1. INSPECT RADIATOR CAP SUB-ASSEMBLY
CAUTION:
Do not remove the radiator cap sub-assembly while the engine and radiator assembly
are still hot. Pressurized, hot engine coolant and steam may be released and cause
serious burns.
(a) Measure the valve opening pr ...
Washer Nozzle
Components
COMPONENTS
ILLUSTRATION
On-vehicle Inspection
ON-VEHICLE INSPECTION
PROCEDURE
1. INSPECT WASHER NOZZLE SUB-ASSEMBLY
(a) Operate the washer nozzle sub-assembly and check the position that the washer
fluid hits the windshield.
Standard:
Washer fluid hits the windshield gla ...
Meter Illumination does not Dim at Night
DESCRIPTION
In this circuit, the combination meter assembly auto dimmer signals from the
main body ECU using the CAN communication system (CAN V1 Bus). When the combination
meter assembly an auto dimmer signal, it dims the meter illumination (warning and
indicator lights). The main body ECU ( ...
