Toyota Tacoma (2005‚Äď2015) Owners Manual: Checking and replacing fuses
If any of the electrical components do not operate, a fuse may have blown. If this happens, check and replace the fuses as necessary.
 Turn the engine switch to the LOCK
position.
Turn the engine switch to the LOCK
position.
 The fuses are located in the following
places. To check the fuses, follow the instructions below.
The fuses are located in the following
places. To check the fuses, follow the instructions below.
 Engine compartment
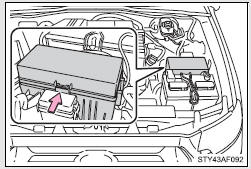
Push the tab in and lift the lid off.
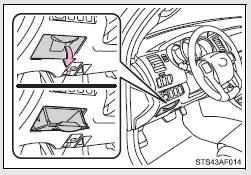
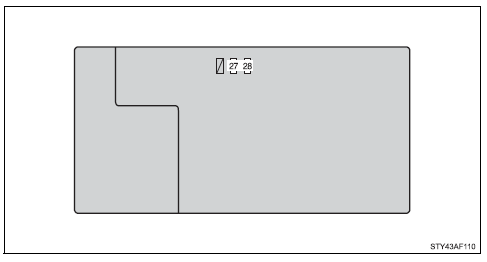
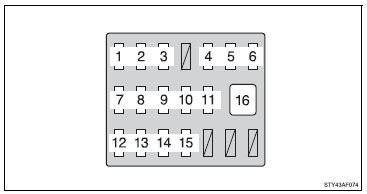
 Under the instrument panel
1.Open the auxiliary box.
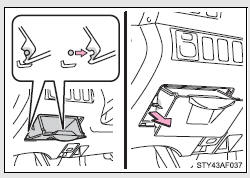
2.Pull up the box and disengage the claws. Remove the stoppers from the cutouts and remove the box.
 After a system failure, see
‚ÄúFuse layout and amperage ratings‚ÄĚ (→P. 455) for details about which fuse to check.
After a system failure, see
‚ÄúFuse layout and amperage ratings‚ÄĚ (→P. 455) for details about which fuse to check.

Remove the fuse with the pullout tool.
 Check if the fuse has blown.
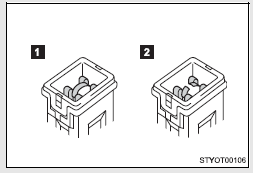
 Type A
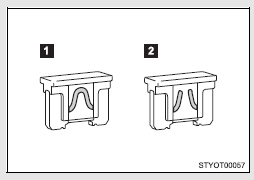
1. Normal fuse
2. Blown fuse
Replace it with one of an appropriate amperage rating.
The amperage rating can be found on the fuse box lid.
 Type B
1. Normal fuse
2. Blown fuse
Replace it with one of an appropriate amperage rating.
The amperage rating can be found on the fuse box lid.
 Type C
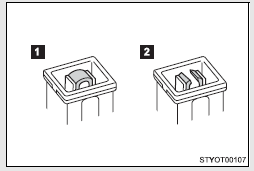
1. Normal fuse
2. Blown fuse
Replace it with one of an appropriate amperage rating.
The amperage rating can be found on the fuse box lid.
 Type D
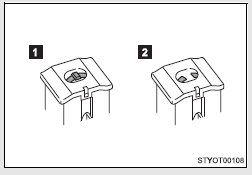
1. Normal fuse
2. Blown fuse
Replace it with one of an appropriate amperage rating.
The amperage rating can be found on the fuse box lid.
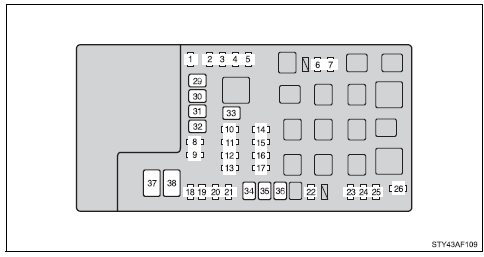
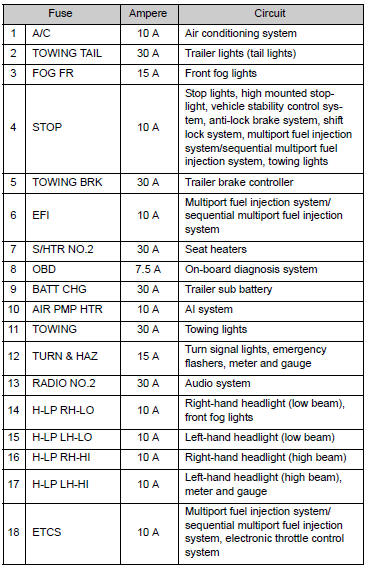
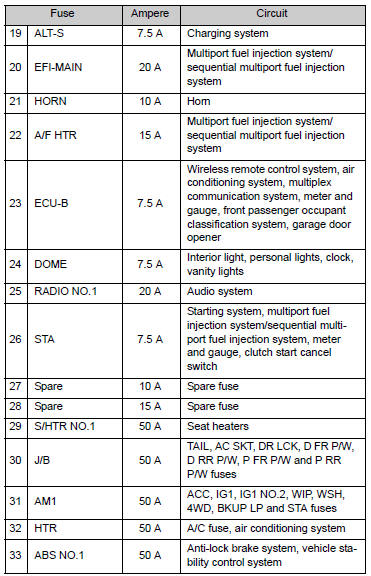
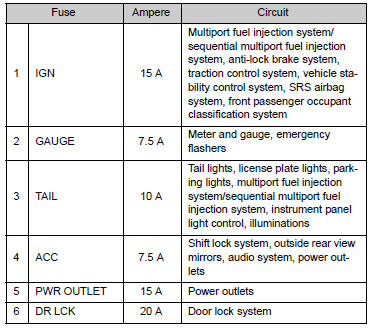
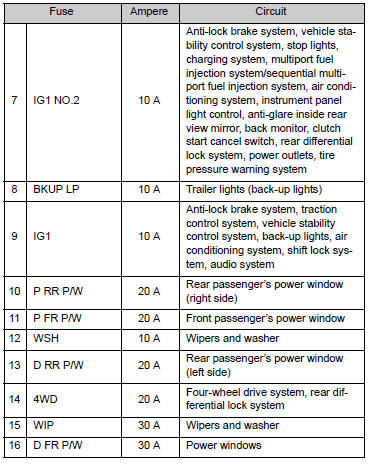
Fuse layout and amperage ratings
■ Engine compartment
 Type A
 Type B
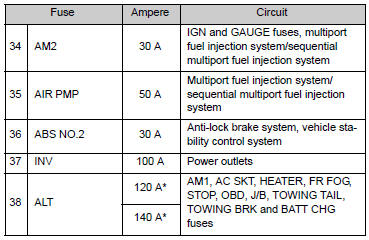
*: Replace the fuse with one of the same ampere rating as the original
■ Under the instrument panel
■After a fuse is repl
●If the lights do not turn on even after the fuse has been replaced, a bulb may need replacement.
●If the replaced fuse blows again, have the vehicle inspected by your Toyota dealer.
■If there is an overload in the circuits
The fuses are designed to blow, protecting the wiring harness from damage.
CAUTION
■To prevent system breakdowns and vehicle fire
Observe the following precautions.
Failing to do so may cause damage to the vehicle, and possibly a fire or injury.
●Never use a fuse of a higher amperage rating than indicated, or use any other object in place of a fuse.
●Always use a genuine Toyota fuse or equivalent.
Never replace a fuse with a wire, even as a temporary fix.
●Do not modify the fuse or the fuse box.
NOTICE
■Before replacing fuses
Have the cause of electrical overload determined and repaired by your Toyota dealer as soon as possible.
 Wireless remote control battery
Replace the battery with a new one if it is discharged.
■ You will need the following items:
Lithium battery CR2032
■ Replacing the battery
Remove the cover using a coin protected wi ...
 Light bulbs
You may replace the following bulbs yourself. The difficulty level of replacement
varies depending on the bulb. If necessary bulb replacement seems difficult to perform,
contact your Toyota dealer ...
Other materials:
Installation
INSTALLATION
PROCEDURE
1. INSTALL HYDRAULIC BRAKE BOOSTER
(a) Install a new brake booster gasket onto the hydraulic brake booster.
(b) Install the hydraulic brake booster with the 4 nuts.
Torque:
14 N·m {145 kgf·cm, 10 ft·lbf}
(c) Using a union nut wrench, connect the 4 brake l ...
Electronic Circuit Inspection Procedure
ELECTRONIC CIRCUIT INSPECTION PROCEDURE
1. BASIC INSPECTION
(a) WHEN MEASURING RESISTANCE OF ELECTRONIC PARTS
(1) Unless otherwise stated, all resistance measurements should be made at an
ambient temperature of 20¬įC (68¬įF). Resistance measurements may be inaccurate if
measured at high tempe ...
No Answer-Back
DESCRIPTION
In some cases, wireless door lock control functions are normal but the hazard
warning light and/or wireless door lock buzzer answer-back function(s) does not
operate. In such cases, hazard warning light and wireless door lock buzzer signal
outputs from the main body ECU (multiplex ...
