Toyota Tacoma (2005–2015) Owners Manual: Using the radio
Select “AM” or “FM” on the “Select Audio Source” screen to begin listening to the radio.
Audio control screen
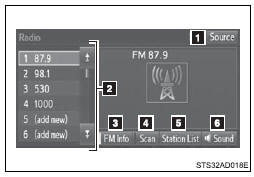
 “Select Audio Source” screen
appears
“Select Audio Source” screen
appears
 Preset stations
 Select to display RBDS text
message
Select to display RBDS text
message
 Scanning for receivable station
 Select to display a list of
receivable stations
Select to display a list of
receivable stations
 Setting the sound
Selecting a station
Tune in to the desired station using one of the following methods.
■ Seek tuning
Press the “<TRACK” or “SEEK>” button.
The radio will begin seeking up or down for a station of the nearest frequency and will stop when a station is found.
■ Manual tuning
Turn the “TUNE·SCROLL” knob.
■ Preset stations
Select the desired preset station.
Setting station presets
 Search for desired stations by turning
the “TUNE·SCROLL” knob or pressing the “<TRACK” or “SEEK>” button.
Search for desired stations by turning
the “TUNE·SCROLL” knob or pressing the “<TRACK” or “SEEK>” button.
 Select “(add new)”
To change the preset station to a different one, select and hold the preset station.
 Select “Yes
 Select “OK” after setting the new
preset station.
Select “OK” after setting the new
preset station.
■ Refreshing the station list
 Select “Refresh” on the “Station
List” screen.
Select “Refresh” on the “Station
List” screen.
To cancel the refresh, select “Cancel Refresh”.
■Reception sensitivity
●Maintaining perfect radio reception at all times is difficult due to the continually changing position of the antenna, differences in signal strength and surrounding objects, such as trains, transmitters, etc.
●The radio antenna is mounted inside the rear quarter window. To maintain clear radio reception, do not attach metallic window tinting or other metallic objects to the antenna wire mounted inside the rear quarter window.
 Basic audio operations
Basic audio operations and functions common to each mode are explained in
this section.
Operating the multimedia system
1. Press this button to eject a disc
2. Insert a disc into the disc slot
...
 Playing an audio CD and MP3/WMA/AAC discs
Insert disc or select “CD” on the “Select Audio Source” screen to begin listening
to a CD.
Audio control screen
1. “Select Audio Source” screen appears
2. Audio CD
Displaying the ...
Other materials:
Inspection
INSPECTION
PROCEDURE
1. INSPECT HAZARD WARNING SIGNAL SWITCH ASSEMBLY (AIR CONDITIONING CONTROL ASSEMBLY)
(a) Check the resistance.
(1) Measure the resistance according to the value(s) in the table below.
Text in Illustration
*a
Component withou ...
Steering Angle Sensor (C1A47)
DESCRIPTION
The forward recognition camera receives steering angle information from the spiral
cable with sensor sub-assembly. If the forward recognition camera detects a spiral
cable with sensor sub-assembly, DTC C1A47 is stored.
DTC No.
Detection Item
DTC Det ...
Installation
INSTALLATION
PROCEDURE
1. INSTALL TRANSFER POSITION SWITCH
(a) Attach the 2 claws to install the transfer position switch.
2. INSTALL AIR CONDITIONING CONTROL ASSEMBLY (for Automatic Air Conditioning
System)
(See page )
3. INSTALL INTEGRATION PANEL SUB-ASSEMBLY (for Manual Cooler System)
...
