
Toyota Tacoma (2015-2018) Service Manual: Transfer Shift Motor Limit Switch Circuit (P17AC)
DESCRIPTION
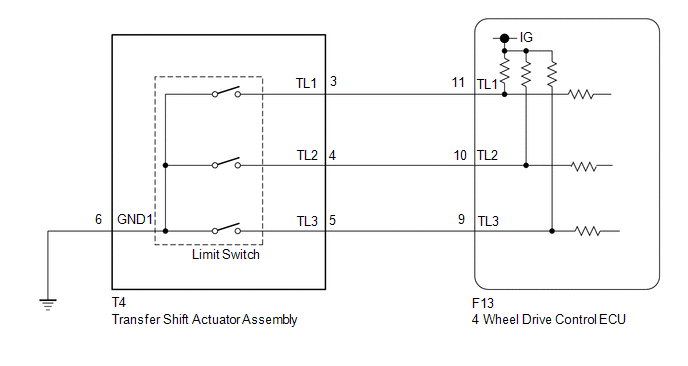
When the transfer switches modes, the TL1, TL2 and TL3 terminals of the limit switch are in one of the ON/OFF combinations listed in the table below.
|
Terminal |
When 2WD |
Switching between 2WD and H4 |
When H4 |
Switching between H4 and L4 |
When L4 |
|---|---|---|---|---|---|
|
TL1 |
ON (GND) |
ON (GND) |
OFF (OPEN) |
OFF (OPEN) |
OFF (OPEN) |
|
TL2 |
OFF (OPEN) |
OFF (OPEN) |
OFF (OPEN) |
ON (GND) |
ON (GND) |
|
TL3 |
OFF (OPEN) |
ON (GND) |
ON (GND) |
ON (GND) |
OFF (OPEN) |
A malfunction is detected depending on the combination of the 3 circuits that make up the limit switch of the transfer shift actuator assembly.
|
DTC No. |
Detection Item |
DTC Detection Condition |
Trouble Area |
|---|---|---|---|
|
P17AC |
Transfer Shift Motor Limit Switch Circuit |
|
|
WIRING DIAGRAM
PROCEDURE
|
1. |
CHECK HARNESS AND CONNECTOR (4 WHEEL DRIVE CONTROL ECU - TRANSFER SHIFT ACTUATOR ASSEMBLY) |
(a) Disconnect the F13 4 wheel drive control ECU connector.
(b) Disconnect the T4 transfer shift actuator assembly connector.
(c) Measure the resistance according to the value(s) in the table below.
Standard Resistance:
|
Tester Connection |
Condition |
Specified Condition |
|---|---|---|
|
F13-11 (TL1) - T4-3 (TL1) |
Always |
Below 1 Ω |
|
F13-10 (TL2) - T4-4 (TL2) |
Always |
Below 1 Ω |
|
F13-9 (TL3) - T4-5 (TL3) |
Always |
Below 1 Ω |
|
T4-6 (GND1) - Body ground |
Always |
Below 1 Ω |
|
F13-11 (TL1) or T4-3 (TL1) - Body ground |
Always |
10 kΩ or higher |
|
F13-10 (TL2) or T4-4 (TL2) - Body ground |
Always |
10 kΩ or higher |
|
F13-9 (TL3) or T4-5 (TL3) - Body ground |
Always |
10 kΩ or higher |
|
F13-11 (TL1) - T4-4 (TL2) and T4-5 (TL3) |
Always |
10 kΩ or higher |
|
F13-10 (TL2) - T4-3 (TL1) and T4-5 (TL3) |
Always |
10 kΩ or higher |
|
F13-9 (TL3) - T4-3 (TL1) and T4-4 (TL2) |
Always |
10 kΩ or higher |
| NG | .gif) |
REPAIR OR REPLACE HARNESS OR CONNECTOR |
|
.gif)
|
2. |
CHECK 4 WHEEL DRIVE CONTROL ECU (ECU OUTPUT VOLTAGE) |
|
(a) Disconnect the transfer shift actuator assembly connector. |
|
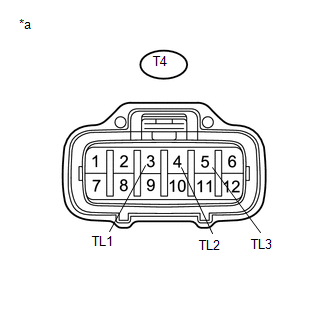
(b) Measure the voltage according to the value(s) in the table below.
Standard Voltage:
|
Tester Connection |
Switch Condition |
Specified Condition |
|---|---|---|
|
T4-3 (TL1) - Body ground |
Ignition switch ON |
10 to 14 V |
|
T4-4 (TL2) - Body ground |
Ignition switch ON |
10 to 14 V |
|
T4-5 (TL3) - Body ground |
Ignition switch ON |
10 to 14 V |
|
*a |
Front view of wire harness connector (to Transfer Shift Actuator Assembly) |
| OK | |
REPLACE TRANSFER SHIFT ACTUATOR ASSEMBLY |
| NG | |
REPLACE 4 WHEEL DRIVE CONTROL ECU |
 Transfer Shift Motor Control Circuit High (P17AA)
DESCRIPTION
This DTC is output when a short to B+ in the transfer shift motor and A.D.D.
shift motor drive circuit is detected.
DTC No.
Detection Item
DTC Detectio ...
 Clutch Switch Circuit
DESCRIPTION
While depressing the clutch pedal, the clutch start switch assembly sends a signal
to terminal MTN of the 4 wheel drive control ECU. While the signal is input, switching
between H4 an ...
Other materials:
Fuel Pressure Sensor
Components
COMPONENTS
ILLUSTRATION
Inspection
INSPECTION
PROCEDURE
1. INSPECT FUEL DELIVERY PIPE SUB-ASSEMBLY (FUEL PRESSURE SENSOR)
NOTICE:
Do not remove the fuel pressure sensor from the fuel delivery pipe sub-assembly.
If a fuel pressure sensor is removed, replace the ...
Inspection
INSPECTION
PROCEDURE
1. INSPECT PARK/NEUTRAL POSITION SWITCH
(a) Measure the resistance according to the value(s) in the table below.
Text in Illustration
*a
Component without harness connected
(Park/Neutral Position Switch)
...
Center Airbag Sensor Assembly Malfunction (B1000/31)
DESCRIPTION
The airbag sensor assembly consists of a deceleration sensor, safing sensor,
drive circuit, diagnosis circuit, ignition control, etc.
If the airbag sensor assembly receives signals from the deceleration sensor,
it determines whether or not the SRS should be activated.
DTC B1000/31 ...
