
Toyota Tacoma (2015-2018) Service Manual: Clutch Switch Circuit
DESCRIPTION
While depressing the clutch pedal, the clutch start switch assembly sends a signal to terminal MTN of the 4 wheel drive control ECU. While the signal is input, switching between H4 and L4 is possible.
WIRING DIAGRAM
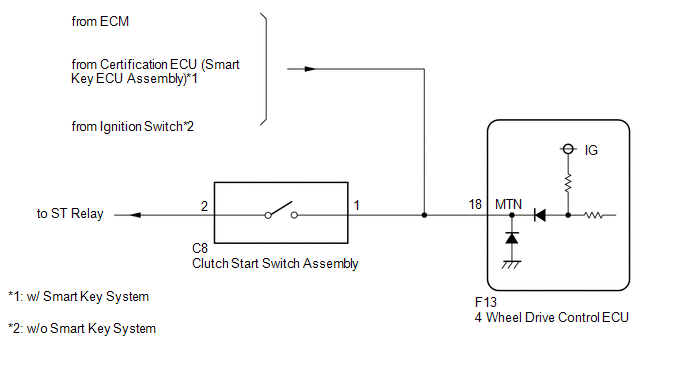
PROCEDURE
|
1. |
READ VALUE USING TECHSTREAM (CLUTCH SWITCH) |
(a) Turn the ignition switch off.
(b) Connect the Techstream to the DLC3.
(c) Turn the Techstream on.
(d) Turn the ignition switch to ON.
(e) Enter the following menus: Powertrain / Four Wheel Drive / Data List.
(f) According to the display on the Techstream, read the Data List.
Four Wheel Drive|
Tester Display |
Measurement Item/Range |
Normal Condition |
Diagnostic Note |
|---|---|---|---|
|
Clutch SW |
Clutch start switch status/ ON or OFF |
ON: Clutch pedal depressed OFF: Clutch pedal released |
Used only for vehicles with a manual transmission. Displays OFF for vehicles with an automatic transmission. |
OK:
The display changes according to the clutch pedal operation.
| OK | .gif) |
PROCEED TO NEXT SUSPECTED AREA SHOWN IN PROBLEM SYMPTOMS TABLE |
|
.gif)
|
2. |
CHECK SFI SYSTEM |
(a) Check that the SFI system operates normally.
- for 2TR-FE: See page
.gif)
- for 2GR-FKS: See page
OK:
SFI system operates normally.
Result|
Result |
Proceed to |
|---|---|
|
OK |
A |
|
NG (for 2TR-FE) |
B |
|
NG (for 2GR-FKS) |
C |
| B | |
CHECK SFI SYSTEM |
| C | |
CHECK SFI SYSTEM |
|
|
3. |
CHECK HARNESS AND CONNECTOR (4 WHEEL DRIVE CONTROL ECU - CLUTCH START SWITCH ASSEMBLY) |
(a) Disconnect the F13 4 wheel drive control ECU connector.
(b) Disconnect the C8 clutch start switch assembly connector.
(c) Measure the resistance according to the value(s) in the table below.
Standard Resistance:
|
Tester Connection |
Condition |
Specified Condition |
|---|---|---|
|
F13-18 (MTN) - C8-1 |
Always |
Below 1 Ω |
|
F13-18 (MTN) or C8-1 - Body ground |
Always |
10 kΩ or higher |
| OK | |
REPLACE 4 WHEEL DRIVE CONTROL ECU |
| NG | |
REPAIR OR REPLACE HARNESS OR CONNECTOR |
 Transfer Shift Motor Limit Switch Circuit (P17AC)
DESCRIPTION
When the transfer switches modes, the TL1, TL2 and TL3 terminals of the limit
switch are in one of the ON/OFF combinations listed in the table below.
Terminal
Whe ...
 Lost Communication with ECM / PCM "A" (U0100,U0122)
DESCRIPTION
This DTC is output when communication is lost with the skid control ECU (brake
actuator assembly) or ECM.
DTC No.
Detection Item
DTC Detection Conditio ...
Other materials:
Installation
INSTALLATION
PROCEDURE
1. INSTALL EXHAUST MANIFOLD SUB-ASSEMBLY LH
(a) Install a new gasket to the cylinder head LH.
NOTICE:
Be careful of the installation direction.
(b) Temporarily install the exhaust manifold sub-assembly LH with the 4 nuts.
(c) Tighten the 4 nuts in the sequenc ...
Terminals Of Ecu
TERMINALS OF ECU
1. CHECK ENGINE SWITCH
(a) Measure the resistance and voltage according to the value(s) in the table
below.
Terminal No. (Symbol)
Input/Output
Wiring Color
Terminal Description
Condition
Specified Condition
...
Installation
INSTALLATION
PROCEDURE
1. INSTALL REAR SEATBACK HINGE SUB-ASSEMBLY
(a) Install the rear seatback hinge sub-assembly with the 2 bolts.
Torque:
30 N·m {306 kgf·cm, 22 ft·lbf}
2. INSTALL REAR SEATBACK ASSEMBLY
(a) Install the rear seatback assembly with the 2 bolts.
Torque:
37 N·m {377 k ...
