Toyota Tacoma (2015-2018) Service Manual: Replacement
REPLACEMENT
PROCEDURE
1. REPLACE AUTOMATIC TRANSMISSION FLUID
(a) Lift the vehicle. [*1]
NOTICE:
Set the vehicle on a lift so that the vehicle is kept level when it is lifted up (make sure that the tilt angle from the front to rear of the vehicle is within +/-1°).
|
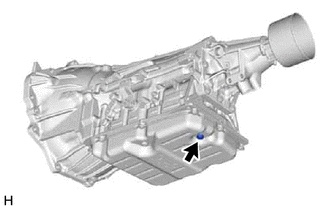
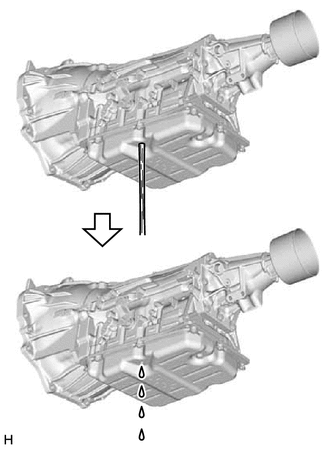
(b) Remove the drain plug and gasket from the automatic transmission assembly and drain the automatic transmission fluid. [*2] |
|
(c) Temporarily install the gasket and drain plug to the automatic transmission assembly. [*3]
HINT:
Reuse the old gasket as the drain plug will be removed again.
|
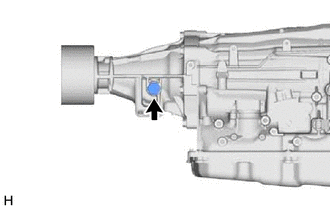
(d) Remove the refill plug and O-ring from the automatic transmission assembly. [*4] |
|
|
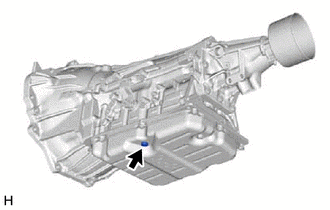
(e) Using a 5 mm hexagon socket wrench, remove the overflow plug and gasket from the automatic transmission assembly. [*5] |
|
|
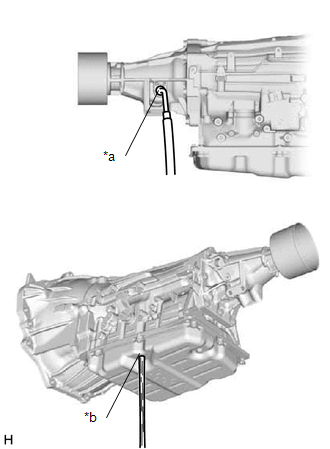
(f) Add automatic transmission fluid to the refill hole until it flows out of the overflow hole. [*6] Text in Illustration
NOTICE:
|
|
|
(g) Wait until the automatic transmission fluid flow slows and only drips come out. [*7] |
|
|
(h) Using a 5 mm hexagon socket wrench, temporarily install the gasket and overflow plug to the automatic transmission assembly. [*8] HINT: Reuse the old gasket as the overflow plug will be removed again. |
|
(i) Add the amount of automatic transmission fluid specified for removal and installation of the automatic transmission oil pan sub-assembly to the refill hole. [*9]
Specified amount of fluid:
for 2GR-FKS
3.1 liters (3.3 US qts, 2.7 Imp. qts)
for 2TR-FE
1.5 liters (1.6 US qts, 1.3 Imp. qts)
HINT:
If the specified amount of automatic transmission fluid cannot be added, perform steps [*10] to [*15].
(j) Temporarily install the O-ring and refill plug to the automatic transmission assembly. [*10]
HINT:
Reuse the old O-ring as the refill plug will be removed again.
(k) Lower the vehicle. [*11]
(l) Start the engine. [*12]
NOTICE:
To reduce load, make sure that all electrical systems, such as the air conditioning, lighting system, electric fan and audio system, are off.
(m) Slowly move the shift lever from P to S, and then back to P. [*13]
(n) Allow the engine to idle for 30 seconds to warm it up. [*14]
(o) Turn the ignition switch off. [*15]
(p) Repeat steps [*1] to [*15].
(q) Repeat steps [*1] to [*2].
(r) Install a new gasket and the drain plug to the automatic transmission assembly.
Torque:
20 N·m {204 kgf·cm, 15 ft·lbf}
(s) Repeat steps [*4] to [*11].
2. CHECK FLUID TEMPERATURE
.gif)
3. CHECK FLUID LEVEL
.gif)
4. AFTER FILLING TRANSMISSION
.gif)
5. ATF THERMAL DEGRADATION ESTIMATE RESET (for 2TR-FE)
HINT:
Approximately 50% or more of the automatic transmission fluid has been replaced
during a repair of the transmission or a similar operation (See page
.gif) ).
).
 Adjustment
ADJUSTMENT
PROCEDURE
1. BEFORE FILLING TRANSMISSION
The AC60E automatic transmission assembly requires Toyota Genuine ATF
WS.
If the entire automatic transmission assembly, automatic ...
Other materials:
Precaution
PRECAUTION
1. IGNITION SWITCH EXPRESSIONS
(a) The type of ignition switch used on this model differs according to the specifications
of the vehicle. The expressions listed in the table below are used in this section.
Expression
Ignition Switch (Position)
Engine ...
Diagnostic Trouble Code Chart
DIAGNOSTIC TROUBLE CODE CHART
Air Conditioning System
DTC Code
Detection Item
Memory
See page
B1411/11
Room Temperature Sensor Circuit
Memorized
(4 seconds or more)
B1412/12
...
Installation
INSTALLATION
CAUTION / NOTICE / HINT
HINT:
Use the same procedure for both the LH and RH sides.
The procedure described below is for the LH side.
PROCEDURE
1. INSTALL HEADLIGHT ASSEMBLY
(a) Connect the connectors.
(b) Engage the clamp to install the headlight assembly.
(c) ...

