Toyota Tacoma (2015-2018) Service Manual: Removal
REMOVAL
PROCEDURE
1. REMOVE AIR CONDITIONING CONTROL ASSEMBLY (for Automatic Air Conditioning System)
Click here .gif)
2. REMOVE AIR CONDITIONING CONTROL ASSEMBLY (for Manual Air Conditioning System)
Click here
3. REMOVE LOWER NO. 2 INSTRUMENT PANEL AIRBAG ASSEMBLY
Click here
4. REMOVE INSTRUMENT LOWER PANEL ASSEMBLY
Click here
5. REMOVE FRONT CONSOLE BOX
Click here
6. REMOVE NO. 2 INSTRUMENT PANEL GARNISH SUB-ASSEMBLY
Click here
7. REMOVE INSTRUMENT PANEL LOWER CENTER FINISH PANEL
Click here
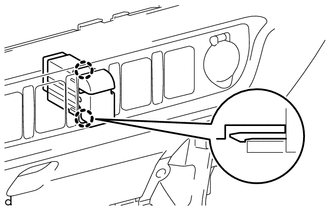
8. REMOVE REAR NO. 2 POWER WINDOW REGULATOR SWITCH ASSEMBLY
|
(a) Disengage the 2 claws to remove the rear No. 2 power window regulator switch assembly. |
|
 Inspection
INSPECTION
PROCEDURE
1. INSPECT REAR NO. 2 POWER WINDOW REGULATOR SWITCH ASSEMBLY
*a
Component without harness connected
(Rear No. 2 Power Window Regulator Switch Assembl ...
 Installation
INSTALLATION
PROCEDURE
1. INSTALL REAR NO. 2 POWER WINDOW REGULATOR SWITCH ASSEMBLY
(a) Engage the 2 claws to install the rear No. 2 power window regulator switch
assembly.
2. INSTALL INSTRUMENT ...
Other materials:
Traction Off Switch
Components
COMPONENTS
ILLUSTRATION
Removal
REMOVAL
PROCEDURE
1. REMOVE ROOF CONSOLE BOX ASSEMBLY
(See page )
2. REMOVE A-TRAC SWITCH (TRACTION CONTROL SWITCH)
(a) Disconnect the A-TRAC switch (traction control switch) connector.
(b) Using a screwdriver, detach the 2 claws ...
Components
COMPONENTS
ILLUSTRATION
*A
w/o Woofer
*B
w/ Woofer
*1
LUGGAGE COMPARTMENT SIDE TRAY LH
*2
LUGGAGE COMPARTMENT SIDE TRAY RH
ILLUSTRATION
*1
COWL SIDE TRIM BOARD LH
...
Remote Up / Down Function does not Operate
DESCRIPTION
When the ignition switch is ON, the power window regulator master switch assembly
sends remote up/down signals to each power window regulator motor assembly via the
LIN communication line.
WIRING DIAGRAM
CAUTION / NOTICE / HINT
NOTICE:
The power window control system u ...
