Toyota Tacoma (2015-2018) Service Manual: Removal
REMOVAL
CAUTION / NOTICE / HINT
HINT:
When removing the name plates or stripe tapes, heat the vehicle body or tail gate and name plates or stripe tapes using a heat light.
Heating Temperature|
Item |
Temperature |
|---|---|
|
Vehicle Body or Tail Gate |
40 to 60°C (104 to 140°F) |
|
Name Plate or Stripe Tape |
20 to 30°C (68 to 86°F) |
NOTICE:
Do not heat the vehicle body, tail gate, name plate or stripe tape excessively.
PROCEDURE
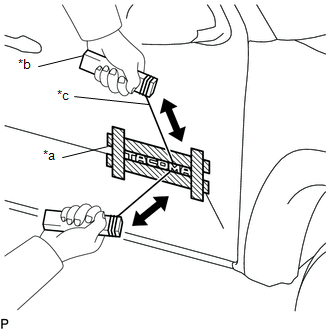
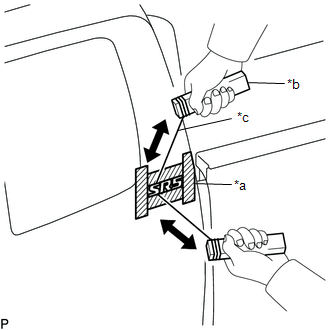
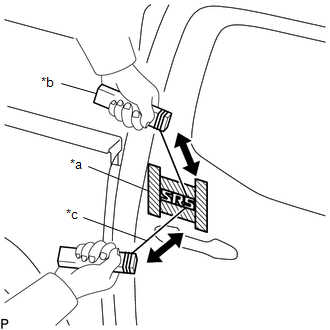
1. REMOVE NO. 1 FRONT DOOR NAME PLATE (for LH Side)
|
(a) Put protective tape around the No. 1 front door name plate. |
|
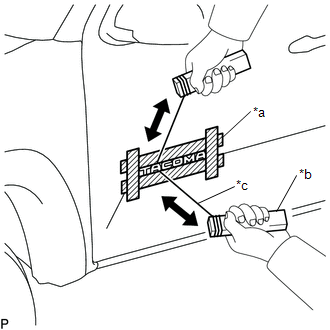
(b) Insert a piano wire between the vehicle body and No. 1 front door name plate.
(c) Tie objects that can serve as handles (for example, wooden blocks) to both wire ends.
(d) Pull the piano wire and cut the double-sided tape that holds the No. 1 front door name plate to the vehicle body.
NOTICE:
- If reusing the No. 1 front door name plate, take care not to damage the No. 1 front door name plate.
- Be careful not to damage the vehicle body.
(e) Remove the No. 1 front door name plate.
(f) Remove the protective tape.
|
(g) for LED Fog Light: (1) Put protective tape around the No. 1 front door name plate. (2) Insert a piano wire between the vehicle body and No. 1 front door name plate. (3) Tie objects that can serve as handles (for example, wooden blocks) to both wire ends. (4) Pull the piano wire and cut the double-sided tape that holds the No. 1 front door name plate to the vehicle body. NOTICE:
(5) Remove the No. 1 front door name plate. (6) Remove the protective tape. |
|
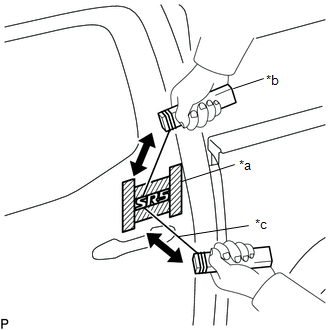
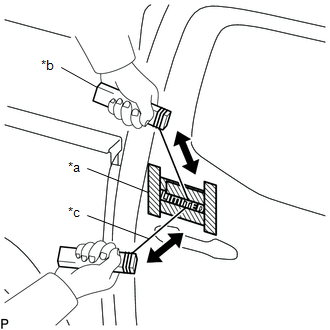
2. REMOVE NO. 1 FRONT DOOR NAME PLATE (for RH Side)
|
(a) Put protective tape around the No. 1 front door name plate. |
|
(b) Insert a piano wire between the vehicle body and No. 1 front door name plate.
(c) Tie objects that can serve as handles (for example, wooden blocks) to both wire ends.
(d) Pull the piano wire and cut the double-sided tape that holds the No. 1 front door name plate to the vehicle body.
NOTICE:
- If reusing the No. 1 front door name plate, take care not to damage the No. 1 front door name plate.
- Be careful not to damage the vehicle body.
(e) Remove the No. 1 front door name plate.
(f) Remove the protective tape.
|
(g) for LED Fog Light: (1) Put protective tape around the No. 1 front door name plate. (2) Insert a piano wire between the vehicle body and No. 1 front door name plate. (3) Tie objects that can serve as handles (for example, wooden blocks) to both wire ends. (4) Pull the piano wire and cut the double-sided tape that holds the No. 1 front door name plate to the vehicle body. NOTICE:
(5) Remove the No. 1 front door name plate. (6) Remove the protective tape. |
|
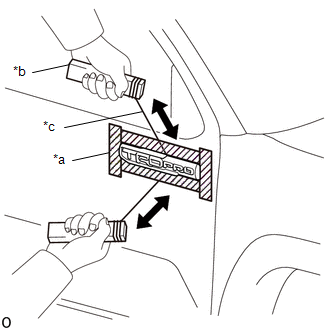
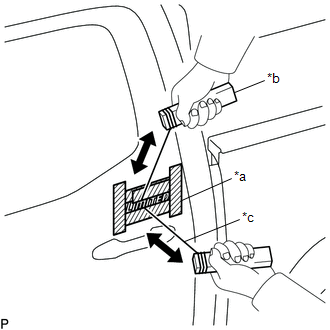
3. REMOVE NO. 1 ROOF SIDE NAME PLATE (for LH Side)
(a) for Access Cab:
|
(1) Put protective tape around the No. 1 roof side name plate. |
|
(2) Insert a piano wire between the vehicle body and No. 1 roof side name plate.
(3) Tie objects that can serve as handles (for example, wooden blocks) to both wire ends.
(4) Pull the piano wire and cut the double-sided tape that holds the No. 1 roof side name plate to the vehicle body.
NOTICE:
- If reusing the No. 1 roof side name plate, take care not to damage the No. 1 roof side name plate.
- Be careful not to damage the vehicle body.
(5) Remove the No. 1 roof side name plate.
(6) Remove the protective tape.
(b) for Double Cab Type A:
|
(1) Put protective tape around the No. 1 roof side name plate. |
|
(2) Insert a piano wire between the vehicle body and No. 1 roof side name plate.
(3) Tie objects that can serve as handles (for example, wooden blocks) to both wire ends.
(4) Pull the piano wire and cut the double-sided tape that holds the No. 1 roof side name plate to the vehicle body.
NOTICE:
- If reusing the No. 1 roof side name plate, take care not to damage the No. 1 roof side name plate.
- Be careful not to damage the vehicle body.
(5) Remove the No. 1 roof side name plate.
(6) Remove the protective tape.
(c) for Double Cab Type B:
|
(1) Put protective tape around the No. 1 roof side name plate. |
|
(2) Insert a piano wire between the vehicle body and No. 1 roof side name plate.
(3) Tie objects that can serve as handles (for example, wooden blocks) to both wire ends.
(4) Pull the piano wire and cut the double-sided tape that holds the No. 1 roof side name plate to the vehicle body.
NOTICE:
- If reusing the No. 1 roof side name plate, take care not to damage the No. 1 roof side name plate.
- Be careful not to damage the vehicle body.
(5) Remove the No. 1 roof side name plate.
(6) Remove the protective tape.
4. REMOVE NO. 1 ROOF SIDE NAME PLATE (for RH Side)
(a) for Access Cab:
|
(1) Put protective tape around the No. 1 roof side name plate. |
|
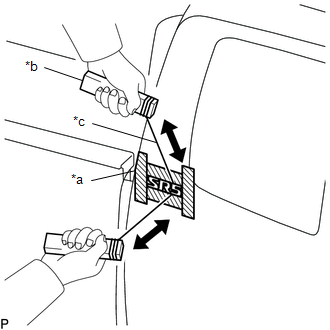
(2) Insert a piano wire between the vehicle body and No. 1 roof side name plate.
(3) Tie objects that can serve as handles (for example, wooden blocks) to both wire ends.
(4) Pull the piano wire and cut the double-sided tape that holds the No. 1 roof side name plate to the vehicle body.
NOTICE:
- If reusing the No. 1 roof side name plate, take care not to damage the No. 1 roof side name plate.
- Be careful not to damage the vehicle body.
(5) Remove the No. 1 roof side name plate.
(6) Remove the protective tape.
(b) for Double Cab Type A:
|
(1) Put protective tape around the No. 1 roof side name plate. |
|
(2) Insert a piano wire between the vehicle body and No. 1 roof side name plate.
(3) Tie objects that can serve as handles (for example, wooden blocks) to both wire ends.
(4) Pull the piano wire and cut the double-sided tape that holds the No. 1 roof side name plate to the vehicle body.
NOTICE:
- If reusing the No. 1 roof side name plate, take care not to damage the No. 1 roof side name plate.
- Be careful not to damage the vehicle body.
(5) Remove the No. 1 roof side name plate.
(6) Remove the protective tape.
(c) for Double Cab Type B:
|
(1) Put protective tape around the No. 1 roof side name plate. |
|
(2) Insert a piano wire between the vehicle body and No. 1 roof side name plate.
(3) Tie objects that can serve as handles (for example, wooden blocks) to both wire ends.
(4) Pull the piano wire and cut the double-sided tape that holds the No. 1 roof side name plate to the vehicle body.
NOTICE:
- If reusing the No. 1 roof side name plate, take care not to damage the No. 1 roof side name plate.
- Be careful not to damage the vehicle body.
(5) Remove the No. 1 roof side name plate.
(6) Remove the protective tape.
5. REMOVE NO. 2 REAR BODY NAME PLATE (for 4WD)
|
(a) Put protective tape around the No. 2 rear body name plate. |
|
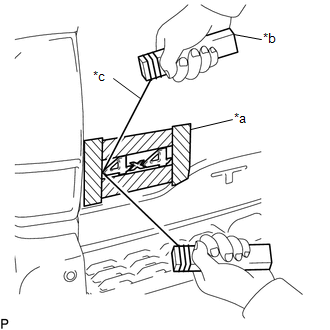
(b) Insert a piano wire between the tail gate and No. 2 rear body name plate.
(c) Tie objects that can serve as handles (for example, wooden blocks) to both wire ends.
(d) Pull the piano wire and cut the double-sided tape that holds the No. 2 rear body name plate to the tail gate.
NOTICE:
- If reusing the No. 2 rear body name plate, take care not to damage the No. 2 rear body name plate.
- Be careful not to damage the tail gate.
(e) Remove the No. 2 rear body name plate.
(f) Remove the protective tape.
6. REMOVE NO. 3 REAR BODY NAME PLATE (for 2GR-FKS)
|
(a) Put protective tape around the No. 3 rear body name plate. |
|
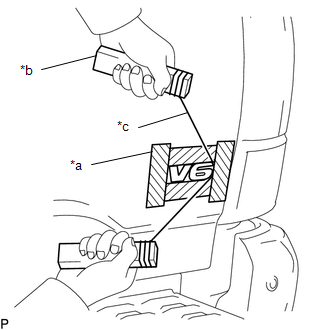
(b) Insert a piano wire between the tail gate and No. 3 rear body name plate.
(c) Tie objects that can serve as handles (for example, wooden blocks) to both wire ends.
(d) Pull the piano wire and cut the double-sided tape that holds the No. 3 rear body name plate to the tail gate.
NOTICE:
- If reusing the No. 3 rear body name plate, take care not to damage the No. 3 rear body name plate.
- Be careful not to damage the tail gate.
(e) Remove the No. 3 rear body name plate.
(f) Remove the protective tape.
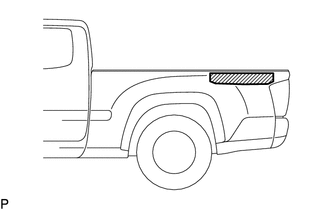
7. REMOVE REAR BODY STRIPE LH (w/ Stripe Tape)
|
(a) Pull back an edge of the rear body stripe LH and pull it parallel to the vehicle body to remove it. |
|
8. REMOVE REAR BODY STRIPE RH (w/ Stripe Tape)
HINT:
Use the same procedure described for the LH side.
 Components
COMPONENTS
ILLUSTRATION
*A
for Access Cab
-
-
*1
NO. 1 FRONT DOOR NAME PLATE
*2
NO. 1 ROOF SIDE NAME P ...
 Radiator Grille
...
Other materials:
Check Bus 5 Line for Short to GND
DESCRIPTION
There may be a short circuit between one of the CAN bus lines and GND when there
is no resistance between terminal 15 (CA5H) of the central gateway ECU (network
gateway ECU) and terminal 4 (CG) of the DLC3, or terminal 16 (CA5L) of the central
gateway ECU (network gateway ECU) and ...
AV Signal Stoppage (Low Battery Voltage) (B158F)
DESCRIPTION
This DTC is stored when a video or audio signal is interrupted due to battery
voltage input to the radio and display receiver assembly dropping temporarily.
DTC Code
DTC Detection Condition
Trouble Area
B158F
A video or aud ...
Software Incompatibility with Body Control Module "B" (U1331)
DESCRIPTION
This DTC is stored when the destination information of the main body ECU (multiplex
network body ECU) does not match that of the blind spot monitor sensors.
DTC Code
DTC Detection Condition
Trouble Area
U1331
Destination in ...
