Toyota Tacoma (2015-2018) Service Manual: Registration
REGISTRATION
PROCEDURE
1. DESCRIPTION OF CODE REGISTRATION
HINT:
- Registering an ID code enables the entry and start function, wireless door lock control function and engine immobiliser function to be operated.
- Code registration is needed when the certification ECU (smart key ECU assembly), steering lock ECU (steering lock actuator or upr bracket assembly) or electrical key transmitter sub-assembly is replaced with a new one.
- This vehicle does not have a key slot. Therefore, while facing the logo
side of the electrical key transmitter sub-assembly towards the engine switch,
hold the transmitter near the engine switch as shown in the illustration
to register the electrical key transmitter sub-assembly.
.png)
|
*1 |
Engine Switch |
|
*2 |
Electrical Key Transmitter Sub-assembly |
2. KEY REGISTRATION PROCEDURES WHEN ADDING OR REPLACING KEY OR WHEN KEY IS LOST
HINT:
- The following procedures require the use of the Techstream:
- - New key ID registration
- - Additional key ID registration
- - Key ID erasure
- A maximum of 7 keys can be registered (this includes any keys registered when the vehicle was purchased).
- In the chart below, the numbers in the "Procedure" column (1, 2, 3, etc.) indicate the step numbers. Perform the steps in numerical order.
|
Customer Request/Condition |
Registration Procedure Condition |
Procedure |
Refer to |
|---|---|---|---|
|
Registering additional key |
Customer must bring at least 1 key |
1. Register additional keys as necessary (additional key ID registration) |
PROCEDURE "C" |
NOTICE: If the customer brings at least 1 key, it is possible to perform these procedures. However, if any additional keys are registered before reregistering the customer's keys, the customer's keys cannot be reregistered and become unusable. Therefore, if the customer does not bring all of their keys, be sure to explain to them that any keys not brought will become unusable after additional keys are registered. HINT: After key ID erasure, any remaining keys that are not reregistered at this time cannot be used. Therefore, immediately after key ID erasure, be sure to reregister all available remaining keys. |
Customer must bring at least 1 key |
1. Using remaining key, clear all registered keys except one (key ID erasure) |
PROCEDURE "D" |
|
2. Register additional keys as necessary (additional key ID registration) |
PROCEDURE "C" |
||
|
All keys are lost |
- |
1. Reset all keys (all keys ID erasure (key code reset)) |
PROCEDURE "E" |
|
2. Register all keys (new key ID registration) |
PROCEDURE "A" |
3. PART REPLACEMENT AND KEY REGISTRATION PROCEDURES
(a) If a malfunctioning ECU is discovered through troubleshooting of the smart key system, use the ECU replacement and key registration procedures in the table below.
HINT:
- The following procedures require the use of the Techstream:
- - New key ID registration
- - Additional key ID registration
- - Key ID erasure
- - ECU code registration
- A maximum of 7 keys can be registered (this includes any keys registered when the vehicle was purchased).
- In the chart below, the numbers in the "Procedure" column (1, 2, 3, etc.) indicate the step numbers. Perform the steps in numerical order.
|
Malfunctioning ECU |
Condition |
Procedure |
Refer to |
|
|---|---|---|---|---|
|
Certification ECU (smart key ECU assembly) |
Customer has brought all keys |
1. Replace certification ECU (smart key ECU assembly) |
- |
|
|
2. Reregister all customer's keys |
PROCEDURE "B"*1 |
|||
|
3. ECU communication ID registration |
PROCEDURE "G"*1 |
|||
|
Some keys are lost |
Key ID codes can be registered and cleared |
1. Clear key codes (key ID erasure) |
PROCEDURE "D" |
|
|
2. Perform additional key registration procedure (additional key ID registration) HINT: If some keys are not registered during above step, they will be disabled because they cannot be registered later. |
PROCEDURE "C"*1 |
|||
|
3. Replace certification ECU (smart key ECU assembly) |
- |
|||
|
4. Reregister all keys |
PROCEDURE "B" |
|||
|
5. ECU communication ID registration |
PROCEDURE "G" |
|||
|
Key ID codes cannot be either registered or cleared |
1. Replace certification ECU (smart key ECU assembly) |
- |
||
|
2. Replace steering lock ECU (steering lock actuator or upr bracket assembly) |
- |
|||
|
3. Reregister all keys (new key ID registration) HINT: If some keys are not registered during above step, they will be disabled because they cannot be registered later. |
PROCEDURE "A" |
|||
|
4. ECU communication ID registration |
PROCEDURE "G" |
|||
|
Certification ECU (smart key ECU assembly) |
All keys are lost |
1. Replace certification ECU (smart key ECU assembly) |
- |
|
|
2. Replace steering lock ECU (steering lock actuator or upr bracket assembly) |
- |
|||
|
3. Register all keys (new key ID registration) |
PROCEDURE "A" |
|||
|
4. ECU communication ID registration |
PROCEDURE "G" |
|||
|
Steering lock ECU (steering lock actuator or upr bracket assembly) |
Customer has brought at least 1 key |
1. Replace steering lock ECU (steering lock actuator or upr bracket assembly) |
- |
|
|
2. Register recognition codes in ECUs (ECU code registration) |
PROCEDURE "F" |
|||
|
All keys are lost |
1. Replace certification ECU (smart key ECU assembly) |
- |
||
|
2. Replace steering lock ECU (steering lock actuator or upr bracket assembly) |
- |
|||
|
3. Register all keys (new key ID registration) |
PROCEDURE "A" |
|||
|
4. ECU communication ID registration |
PROCEDURE "G" |
|||
- *1 : It is only necessary to perform processes 1 through 3.
4. KEY REGISTRATION (PROCEDURE "A")
(a) New key ID registration:
HINT:
In the chart below, the numbers in the "Procedure" column (1, 2, 3, etc.) indicate the step numbers. Perform the steps in numerical order.
|
Process |
Procedure |
|---|---|
|
1. Start of registration |
|
|
2. Confirmation of ECU code |
HINT: Mode is automatically selected by Techstream (new registration mode or add mode) |
|
3. Verification of unregistered key* |
|
|
4. Registration of ID code |
|
|
5. End of registration |
|
- *: Repeat this process for each key which is to be registered to the vehicle. Finish the procedure for each key within 30 seconds. If the procedure for any of the keys is not finished within the specified time, perform the registration from process 1 again.
- If "Smart Key System" is canceled, registration cannot be performed
(See page
.gif) ).
).
5. KEY REGISTRATION (PROCEDURE "B")
(a) New key ID registration:
HINT:
In the chart below, the numbers in the "Procedure" column (1, 2, 3, etc.) indicate the step numbers. Perform the steps in numerical order.
|
Process |
Procedure |
|---|---|
|
1. Start of registration |
|
|
2. Confirmation of ECU code |
HINT: Mode is automatically selected by Techstream (new registration mode or add mode) |
|
3. Confirmation of all registered keys*1 |
|
|
4. Confirmation of ECU code |
|
|
5. Verification of unregistered key*2 |
|
|
6. Registration of ID code |
|
|
7. End of registration |
|
- *1: Repeat this process for each key registered to the vehicle. Finish the procedure for each key within 30 seconds. If the procedure for any of the keys is not finished within the specified time, perform the registration from process 1 again. When performing the key confirmation procedure for a key, the security indicator light comes on and remains on until all the keys are confirmed.
- *2: Repeat this process for each key which is to be registered to the vehicle. Finish the procedure for each key within 30 seconds. If the procedure for any of the keys is not finished within the specified time, perform the registration from process 1 again.
- If "Smart Key System" is canceled, registration cannot be performed
(See page ).
6. KEY REGISTRATION (PROCEDURE "C")
(a) Additional key ID registration:
HINT:
In the chart below, the numbers in the "Procedure" column (1, 2, 3, etc.) indicate the step numbers. Perform the steps in numerical order.
|
Process |
Procedure |
|---|---|
|
1. Start of registration |
|
|
2. Confirmation of registered key*1 |
|
|
3. Confirmation of ECU code |
|
|
4. Verification of unregistered key*2 |
|
|
5. Registration of ID code |
|
|
6. End of registration |
|
- *1: Perform this process for one of the keys registered to the vehicle. Finish the procedure within 30 seconds. If the procedure is not finished within the specified time, perform the registration from process 1 again.
- *2: Repeat this process for each key which is to be registered to the vehicle. Finish the procedure for each key within 30 seconds. If the procedure for any of the keys is not finished within the specified time, perform the registration from process 1 again.
- If "Smart Key System" is canceled, registration cannot be performed
(See page ).
7. KEY REGISTRATION (PROCEDURE "D")
(a) Key ID erasure:
HINT:
- This procedure clears all the registered key codes except one master key code.
- In the chart below, the numbers in the "Procedure" column (1, 2, 3, etc.) indicate the step numbers. Perform the steps in numerical order.
|
Process |
Procedure |
|---|---|
|
1. Start of erasure |
|
|
2. Confirmation of registered key* |
|
|
3. Confirmation of ECU code |
|
|
4. Erasure of ID code |
|
|
5. End of erasure |
|
- *: Perform this process for one of the keys registered to the vehicle. Finish the procedure within 30 seconds. If the procedure is not finished within the specified time, perform the erasure from process 1 again.
- If "Smart Key System" is canceled, registration cannot be performed
(See page ).
8. KEY REGISTRATION (PROCEDURE "E")
(a) All keys ID erasure:
HINT:
In the chart below, the numbers in the "Procedure" column (1, 2, 3, etc.) indicate the step numbers. Perform the steps in numerical order.
|
Process |
Procedure |
|---|---|
|
1. Start of erasure |
|
|
2. Confirmation of ECU code |
|
|
3. Erasure of ID code |
|
|
4. End of erasure |
|
- If "Smart Key System" is canceled, registration cannot be performed
(See page ).
9. KEY REGISTRATION (PROCEDURE "F")
(a) ECU code registration:
HINT:
In the chart below, the numbers in the "Procedure" column (1, 2, 3, etc.) indicate the step numbers. Perform the steps in numerical order.
|
Process |
Procedure |
|---|---|
|
1. Start of registration |
|
|
2. Confirmation of registered key* |
|
|
3. Erasure of ECU code |
|
|
4. End of registration |
|
- *: Perform this process for one of the keys registered to the vehicle. Finish the procedure within 30 seconds. If the procedure is not finished within the specified time, perform the registration from process 1 again.
- If "Smart Key System" is canceled, registration cannot be performed
(See page ).
- If there are any electronic devices near the driver seat which may cause wave interference, such as cell phones, personal computers, portable music players, other electrical key transmitter sub-assemblies, etc., turn them off or move them away from the driver seat.
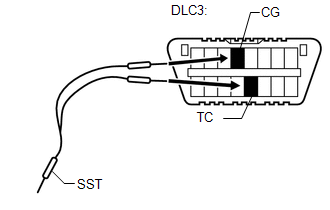
10. KEY REGISTRATION (PROCEDURE "G")
SST: 09843-18040
(a) ECU communication ID registration:
NOTICE:
- The ECU communication ID should be registered when the certification ECU (smart key ECU assembly) is replaced in order for the ECU communication ID to match.
- The engine cannot be started unless the ECU communication ID is registered.
- After registration, pressing the engine switch may not start the engine on the first try. If so, press the engine switch again.
- After the engine is started, clear DTC B2799 (code for ECM immobiliser
communication error) using either of the following methods:
- Use the Techstream.
- Disconnect the cable from the negative (-) battery terminal for 30 seconds.
|
(1) Using SST, connect terminals 13 (TC) and 4 (CG) of the DLC3. |
|
(2) Turn the engine switch on (IG) (do not start the engine) and leave it as is for 30 minutes.
(3) Turn the engine switch off and disconnect terminals 13 (TC) and 4 (CG).
(4) Check that the engine starts and stays on for more than 3 seconds.
 Problem Symptoms Table
PROBLEM SYMPTOMS TABLE
HINT:
Use the table below to help determine the cause of problem symptoms.
If multiple suspected areas are listed, the potential causes of the symptoms
are lis ...
 Diagnosis System
DIAGNOSIS SYSTEM
1. DESCRIPTION
(a) The certification ECU (smart key ECU assembly) and ECM control the vehicle
engine immobiliser system functions. Engine immobiliser system data and Diagnostic
...
Other materials:
Parts Location
PARTS LOCATION
ILLUSTRATION
ILLUSTRATION
ILLUSTRATION
ILLUSTRATION
ILLUSTRATION
...
Terminals Of Ecm
TERMINALS OF ECM
1. CHECK ECM
HINT:
The standard normal voltage between each pair of ECM terminals is shown in the
table below. The appropriate conditions for checking each pair of terminals are
also indicated. The result of checks should be compared with the standard normal
voltage for t ...
Low Power Supply Voltage Malfunction (C1241)
DESCRIPTION
If a malfunction is detected in the power supply circuit, the skid control ECU
(brake actuator assembly) stores this DTC and the fail-safe function prohibits ABS
operation.
This DTC is stored when the +BS terminal voltage deviates from the DTC detection
condition due to a malfunc ...
