On-vehicle Inspection
ON-VEHICLE INSPECTION
PROCEDURE
1. INSPECT ENGINE OIL LEVEL
(a) Warm up the engine, and then stop the engine and wait for 5 minutes.
(b) Check that the engine oil level is between the low level and full level marks on the dipstick.
If low, check for leakage and add engine oil up to the full level mark.
NOTICE:
Do not fill engine oil above the full level mark.
2. INSPECT OIL QUALITY
(a) Check the engine oil for deterioration, water contamination, discoloration or thinning.
If the quality is visibly poor, replace the engine oil and oil filter element
(See page .gif) ).
).
3. INSPECT OIL PRESSURE
(a) Remove the oil pressure switch (See page
).
|
(b) Install an oil pressure gauge. Text in Illustration
|
|
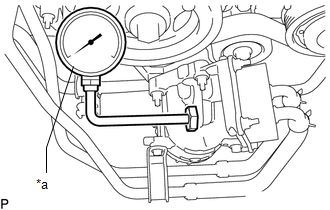
(c) Warm up the engine.
(d) Inspect the oil pressure.
Standard Oil Pressure:
|
Condition |
Specified Condition |
|---|---|
|
Idling |
29 kPa (0.3 kgf/cm2, 4.2 psi) or higher |
|
3000 rpm |
294 to 588 kPa (3.0 to 6.0 kgf/cm2, 43 to 85 psi) |
If the pressure is not as specified, check the oil pump (See page
).
(e) Remove the oil pressure gauge.
(f) Install the oil pressure switch (See page
).