Toyota Tacoma (2005–2015) Owners Manual: Hood
Release the lock from the inside of the vehicle to open the hood.
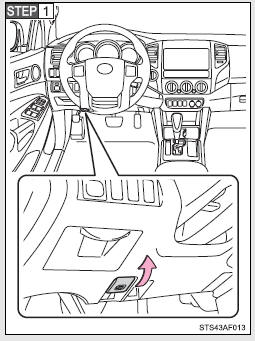
Pull the hood release lever.
The hood will pop up slightly.
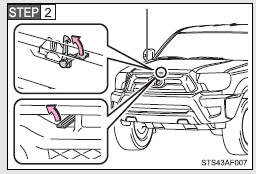
Pull up the hood catch lever and lift the hood.
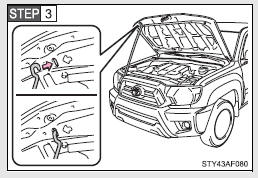
Hold the hood open by inserting the supporting rod into the slot.
CAUTION
■Pre-driving check
Check that the hood is fully closed and locked.
If the hood is not locked properly, it may open while the vehicle is in motion and cause an accident, which may result in death or serious injury.
■After installing the support rod into the slot
Make sure the rod supports the hood securely from falling down on to your head or body.
NOTICE
■When closing the hood
Be sure to return the support rod to its clip before closing the hood. Closing the hood with the support rod up could cause the hood to bend.
 Do-it-yourself service precautions
If you perform maintenance yourself, be sure to follow the correct procedures
as given in these sections.
CAUTION
The engine compartment contains many mechanisms and fluids that may move sudde ...
 Engine compartment
2.7 L 4-cylinder (2TR-FE) engine
1. Washer fluid tank
2.Radiator cap
3.Engine coolant reservoir
4. Engine oil filler cap
5. Power steering fluid reservoir
6. Engine oil level dipstick
7. Bra ...
Other materials:
While Alarm is Armed, Battery is Reconnected but Alarm does not Sound
DESCRIPTION
While the alarm is armed, the EEPROM inside the main body ECU (multiplex network
body ECU) will remember the armed state even if the battery is disconnected, and
the alarm will sound when the battery is reconnected.
If the alarm does not sound when the battery is reconnected, the a ...
Black Screen
PROCEDURE
1.
CHECK DISPLAY SETTING
(a) Check that the display is not in "Screen Off" mode.
OK:
The display setting is not in "Screen Off" mode.
NG
CHANGE SCREEN TO SCREEN ON MODE
OK
...
Lost Communication with ECM/PCM "A" Missing Message (U010087)
DESCRIPTION
The engine control unit and the transmission control unit are located inside
the ECM. The engine control unit intercommunicates with the transmission control
unit with the Controller Area Network (CAN).
If there is a problem in this intercommunication, the ECM stores a DTC.
...
