Toyota Tacoma (2015-2018) Service Manual: Disassembly
DISASSEMBLY
PROCEDURE
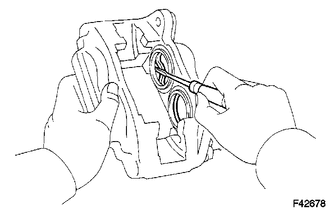
1. REMOVE CYLINDER BOOT
(a) Using a screwdriver, remove the 4 cylinder boots from the caliper.
2. REMOVE FRONT DISC BRAKE PISTON
(a) Prepare a wooden plate to hold the pistons.
|
(b) Place the plate between the pistons and insert a pad into one side. |
|

(c) Use compressed air and remove the pistons one side at a time from the cylinder.
CAUTION:
Do not place your fingers in front of the pistons when using compressed air.
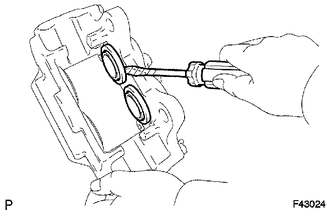
3. REMOVE PISTON SEAL
(a) Using a screwdriver, remove the 4 piston seals from the cylinder.
4. REMOVE FRONT DISC BRAKE BLEEDER PLUG
(a) Remove the bleeder plug cap and bleeder plug from the disc brake cylinder.
 Components
COMPONENTS
ILLUSTRATION
ILLUSTRATION
...
 Removal
REMOVAL
CAUTION / NOTICE / HINT
HINT:
Use the same procedure for the LH side and RH side.
The following procedure listed is for the LH side.
PROCEDURE
1. REMOVE FRONT WHEEL
2. ...
Other materials:
Components
COMPONENTS
ILLUSTRATION
HINT:
The following specifications are for BD22AN (w/ Differential Lock). BD22AN differentials
are equipped with M10 rear differential carrier to rear axel housing fasteners.
ILLUSTRATION
ILLUSTRATION
...
Lost Communication with ECM (U0100,U0142,U0155)
DESCRIPTION
DTC No.
DTC Detecting Condition
Trouble Area
U0100
No communication with ECM
CAN communication system
ECM
U0142
No communication with main body ECU
...
Additional Key cannot be Registered
DESCRIPTION
If additional registration is not possible, a malfunction in the certification
ECU (smart key ECU assembly), engine switch, electrical key transmitter sub-assembly
or steering lock ECU (steering lock actuator or UPR bracket assembly) is suspected.
CAUTION / NOTICE / HINT
NOTICE ...
