
Toyota Tacoma (2015-2018) Service Manual: Diagnosis System
DIAGNOSIS SYSTEM
1. DESCRIPTION
(a) When troubleshooting OBD II (On-Board Diagnostics) vehicles, an OBD II scan tool (complying with SAE J1978) must be connected to the DLC3 (Data Link Connector 3) of the vehicle. Various data in the vehicle ECM (Engine Control Module) can be then read.
(b) OBD II regulations require that the vehicle on-board computer illuminate the MIL (Malfunction Indicator Lamp) on the instrument panel when the computer detects a malfunction in:
.png)
(1) The emission control system components.
(2) The powertrain control components (which affect vehicle emissions).
(3) The computer itself.
In addition, the applicable DTCs prescribed by SAE J2012 are recorded in the ECM memory. If the malfunction does not recur in 3 consecutive trips, the MIL turns off automatically but the DTCs remain recorded in the ECM memory.
(c) To check for DTCs, connect the Techstream to the DLC3. The Techstream displays
DTCs, freeze frame data, and a variety of the engine data. The DTCs and freeze frame
data can be cleared with the Techstream. In order to enhance OBD function on vehicles
and develop the off-board diagnosis system, Controller Area Network (CAN) communication
is used in this system. CAN is a network which uses a pair of data transmission
lines spanning multiple computers and sensors. It allows for high speed communications
between the systems and simplification of the wire harness connections (See page
.gif) ).
).
2. NORMAL MODE AND CHECK MODE
(a) The diagnosis system operates in normal mode during normal vehicle use. In normal mode, 2 trip detection logic is used to ensure accurate detection of malfunctions. Check mode is also available as an option for technicians. In check mode, 1 trip detection logic is used for duplicating malfunction symptoms and increasing the system's ability to detect malfunctions, including intermittent problems (the Techstream only).
3. 2 TRIP DETECTION LOGIC
(a) When a malfunction is first detected, the malfunction is temporarily stored in the ECM memory (1st trip). If the same malfunction is detected during the subsequent driving cycle, the MIL is illuminated (2nd trip).
4. FREEZE FRAME DATA
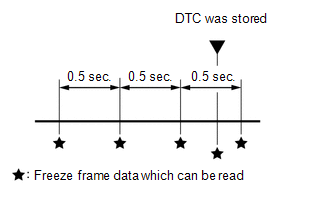
(a) The ECM records vehicle and driving condition information as freeze frame data the moment a DTC is stored. When troubleshooting, freeze frame data can be helpful in determining whether the vehicle was running or stopped, whether the engine was warmed up or not, whether the air fuel ratio was lean or rich, as well as other data recorded at the time of a malfunction.
(b) The Techstream records freeze frame data in 5 different instances: 1) 3 times before the DTC is stored, 2) once when the DTC is stored, and 3) once after the DTC is stored. These sets of data can be used to simulate the vehicle condition around the time when the malfunction occurred. The data may help in finding the cause of the malfunction, or in judging if the DTC was caused by a temporary malfunction.
5. DLC3 (Data Link Connector 3)
(a) Check the DLC3 (See page ).
6. BATTERY VOLTAGE
Standard Voltage:
11 to 14 V
- If the voltage is below 11 V, recharge or replace the battery before proceeding to the next step.
7. MIL (Malfunction Indicator Lamp)
(a) The MIL illuminates when the turning the ignition switch to ON (the engine is not running).
(b) The MIL should turn off when the engine is started. If the MIL remains illuminated, the diagnosis system has detected a malfunction or abnormality in the system.
HINT:
If the MIL does not illuminate when the turning the ignition switch to ON, check
the MIL circuit (See page ).
 Problem Symptoms Table
PROBLEM SYMPTOMS TABLE
HINT:
Use the table below to help determine the cause of problem symptoms.
If multiple suspected areas are listed, the potential causes of the symptoms
are lis ...
 Dtc Check / Clear
DTC CHECK / CLEAR
NOTICE:
When the diagnosis system is changed from normal mode to check mode or vice versa,
all DTCs and freeze frame data recorded in normal mode are cleared. Before changing
m ...
Other materials:
System Description
SYSTEM DESCRIPTION
GENERAL
The cruise control main switch is used to turn the dynamic radar cruise control
system on and off, as well as operate 7 functions: SET, - (COAST), TAP-DOWN, RES
(RESUME), + (ACCEL), TAP-UP and CANCEL. The SET, TAP-DOWN, and - (COAST) functions,
and the RES (RESUME) ...
Cargo Light Switch
Components
COMPONENTS
ILLUSTRATION
Inspection
INSPECTION
PROCEDURE
1. INSPECT DECK LIGHT SWITCH ASSEMBLY
(a) Check the resistance.
(1) Measure the resistance according to the value(s) in the table below.
Text in Illustration
*a
Compone ...
Disassembly
DISASSEMBLY
PROCEDURE
1. REMOVE STEERING GEAR OUTLET RETURN TUBE
(a) Using a union nut wrench, remove the steering gear outlet return tube.
2. REMOVE STEERING TURN PRESSURE TUBE
(a) Using a union nut wrench, remove the 2 pressure tubes.
(b) Remove the 4 O-rings from the pressure tubes.
3. ...
