Toyota Tacoma (2015-2018) Service Manual: Cooling System
On-vehicle Inspection
ON-VEHICLE INSPECTION
PROCEDURE
1. INSPECT FOR COOLANT LEAK
CAUTION:
Do not remove the radiator cap sub-assembly, cylinder block drain cock plug or radiator drain cock plug while the engine and radiator assembly are still hot. Pressurized, hot engine coolant and steam may be released and cause serious burns.
(a) Remove the radiator cap sub-assembly.
(b) Fill the radiator assembly with engine coolant and install a radiator cap tester.
(c) Warm up the engine.
(d) Using the radiator cap tester, increase the pressure inside the radiator assembly to 118 kPa (1.2 kgf/cm2, 17 psi), and then check that the pressure does not drop.
If the pressure drops, check the hose, radiator assembly and engine water pump assembly for leakage. If no external leakage is found, check the heater core, cylinder block sub-assembly and cylinder head sub-assembly.
(e) Remove the radiator cap tester.
(f) Install the radiator cap sub-assembly.
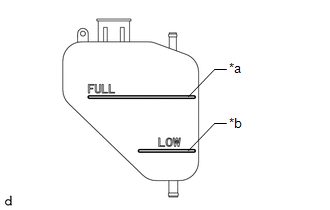
2. INSPECT ENGINE COOLANT LEVEL IN RESERVOIR
|
(a) The engine coolant should be between the LOW and FULL lines when the engine is cold. Text in Illustration
If the engine coolant is below the LOW line, check for leakage and add TOYOTA Super Long Life Coolant (SLLC) or similar high quality ethylene glycol based non-silicate, non-amine, non-nitrite, non-borate coolant with long-life hybrid organic acid technology to the FULL line. NOTICE: Never use water as a substitute for engine coolant. |
|
3. INSPECT ENGINE COOLANT QUALITY
CAUTION:
Do not remove the radiator cap sub-assembly, cylinder block drain cock plug or radiator drain cock plug while the engine and radiator assembly are still hot. Pressurized, hot engine coolant and steam may be released and cause serious burns.
(a) Remove the radiator cap sub-assembly.
(b) Check for excessive deposits of rust or scales around the radiator cap sub-assembly and radiator filler hole. Also, the engine coolant should be free of oil.
If the engine coolant is excessively dirty, replace the engine coolant.
(c) Install the radiator cap sub-assembly.
 Coolant
Replacement
REPLACEMENT
PROCEDURE
1. REMOVE NO. 2 ENGINE UNDER COVER SUB-ASSEMBLY (w/ Off Road Package)
2. REMOVE NO. 1 ENGINE UNDER COVER SUB-ASSEMBLY
3. DRAIN ENGINE COOLANT
CAUTION:
...
 Radiator
...
Other materials:
XM Tuner Antenna Disconnected (B15FE,B15FF)
DESCRIPTION
These DTCs are stored when a malfunction occurs in the antenna assembly with
holder which is connected to the radio and display receiver assembly.
DTC No.
DTC Detection Condition
Trouble Area
B15FE
The antenna assembly with ...
Installation
INSTALLATION
CAUTION / NOTICE / HINT
HINT:
Perform "Inspection After Repairs" after replacing the fuel pump assembly (See
page ).
PROCEDURE
1. SET FUEL PUMP ASSEMBLY
HINT:
Perform "Inspection After Repairs" after replacing the fuel pump assembly (See
page ).
...
Precaution
PRECAUTION
1. IGNITION SWITCH EXPRESSIONS
(a) The type of ignition switch used on this model differs according to the specifications
of the vehicle. The expressions listed in the table below are used in this section.
Expression
Ignition Switch (Position)
Engine ...
