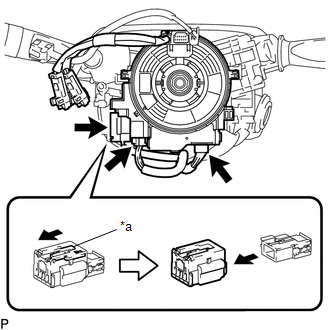
(a) Slide the slider and disconnect the airbag connector.
(b) Disconnect the 2 connectors from the spiral cable sub-assembly with sensor.
Text in Illustration
*a
Slider
NOTICE:
When handling the airbag connector, take care not to damage the airbag wire harness.
(c) Disengage the 3 claws to remove the spiral cable sub-assembly with
sensor.
NOTICE:
Do not replace the spiral cable sub-assembly when the ignition
switch is ON and battery cable is connected.
Do not rotate the spiral cable sub-assembly when the ignition
switch is ON and the battery cable is connected.
Make sure the steering wheel is installed and centered before
rotating the steering sensor when performing steering angle sensor
operation inspections (inspecting for abnormal noise, diagnosis
inspections, etc.).
Do not remove the steering sensor from the spiral cable sub-assembly.
Related Tacoma materials
Stereo Component Amplifier Malfunction (B15A3)
DESCRIPTION
This DTC is stored when a malfunction occurs in the stereo component amplifier
assembly.
DTC No.
DTC Detection Condition
Trouble Area
B15A3
...
Vehicle Position Mark Deviates Greatly
CAUTION / NOTICE / HINT
NOTICE:
If standard size tires are not installed, the vehicle position mark
may deviate from the route even if the navigation system is operating normally.
Make sure that standard size tires are installed to the vehicle before
inspection.
PROCE ...
Terminals Of Ecu
TERMINALS OF ECU
Text in Illustration
*a
Component without harness connected
(Skid Control ECU [Brake Actuator Assembly])
-
-
...
.gif)
.png)