INSTALLATION
PROCEDURE
1. INSTALL REAR BUMPER ASSEMBLY
(a) Using an engine lifter or equivalent, engage the 2 pins to install the rear bumper assembly.
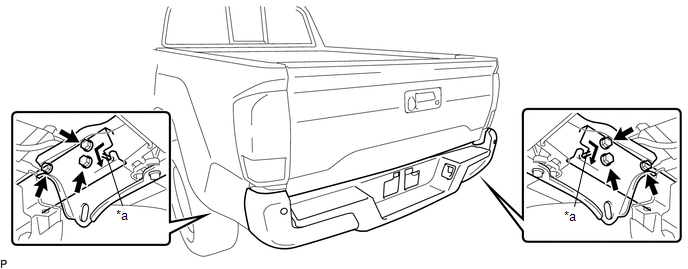
Text in Illustration
|
*a |
Pin |
- |
- |
NOTICE:
(b) Install the 6 bolts.
Torque:
90 N·m {918 kgf·cm, 66 ft·lbf}
(c) Connect the 2 connectors.
2. PERFORM BLIND SPOT MONITOR BEAM AXIS INSPECTION (w/ Blind Spot Monitor)
Click here
3. PERFORM DIAGNOSTIC SYSTEM CHECK (w/ Blind Spot Monitor)
Click here
Disassembly
ReassemblyPressure Control Solenoid "A" Actuator Stuck Off (P07457F)
SYSTEM DESCRIPTION
The ECM uses the vehicle speed signal and signals from the transmission revolution
sensors (NT, SP2) to detect the actual gear (1st, 2nd, 3rd, 4th, 5th or 6th gear).
The ECM compares the actual gear with the shift schedule in the ECM memory to
detect mechanical problems of t ...
Removal
REMOVAL
PROCEDURE
1. REMOVE ROOF HEADLINING ASSEMBLY (for LED Type Stop Light)
for Double Cab:
(See page
)
for Access Cab:
(See page
)
2. REMOVE CENTER STOP LIGHT ASSEMBLY (for Bulb Type Stop Light)
(a) Apply protective tape around the center stop light as ...
Wireless Charger Power Source Circuit
DESCRIPTION
This is the power source circuit to operate the mobile wireless charger cradle
assembly.
WIRING DIAGRAM
CAUTION / NOTICE / HINT
NOTICE:
Inspect the fuses for circuits related to this system before performing the following
inspection procedure.
PROCEDURE
1.
...