Toyota Tacoma (2005–2015) Owners Manual: If you have a flat tire
Remove the flat tire and replace it with the spare provided.
■ Before jacking up the vehicle
● Stop the vehicle on a hard, flat surface.
● Set the parking brake.
● Shift the shift lever to P (automatic transmission) or R (manual transmission).
● Stop the engine.
● Turn on the emergency flashers.
■ Location of the spare tire

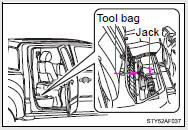
■ Location of the jack and tools
 Regular Cab models
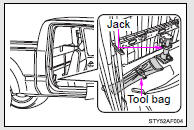
 Access Cab models
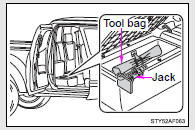
 Double Cab models
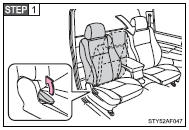
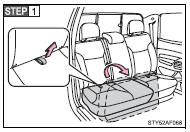
Taking out the jack and tool bag
 Regular Cab models with bench type
seat
Regular Cab models with bench type
seat
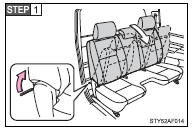
Pull the lever and fold down the seatback.
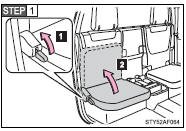
 Regular Cab models with separated
type seat
Regular Cab models with separated
type seat
Pull the lever and fold down the seatback.
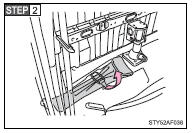
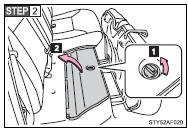
Unhook the strap and remove the tool bag.
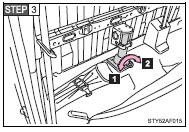
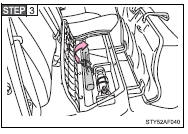
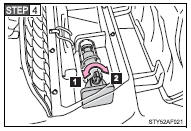
 Loosen and remove the jack.
1. Loosen
2. Tighten
 Access Cab models
1.Pull up the lever.
2.Raise the bottom cushion up.
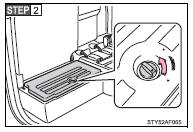
Turn the knob counterclockwise.
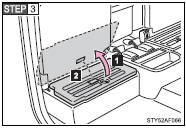
1.Open the lid.
2. Press the lid against the bottom of the lower cushion until it is supported by the hookand- loop fastener.
Make sure that the lid is supported to prevent it from closing unexpectedly.
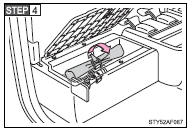
Unhook the strap and remove the tool bag.
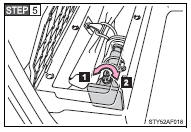
Loosen and remove the jack.
1. Loosen
2. Tighten
 Double Cab models
Swing the bottom cushion up by pulling the lock release strap.
1. Turn the knob counterclockwise.
2. Open the lid.
Unhook the strap and remove the tool bag.
Loosen and remove the jack.
1. Loosen
2. Tighten
Assemble the jack handle (in the tool bag)
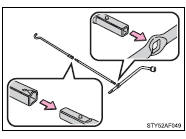
Assemble the jack handle extension as shown.
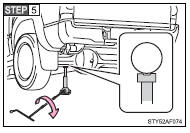
Taking out the spare tire
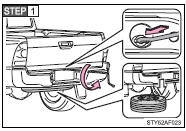
Insert the end of the jack handle extension into the lowering screw and turn it counterclockwise.
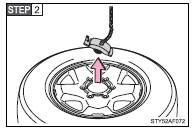
After the tire is lowered completely to the ground, remove the holding bracket.
Replacing a flat tire
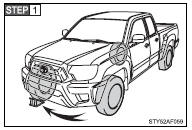
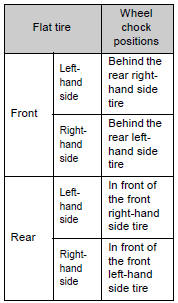
Chock the tires.
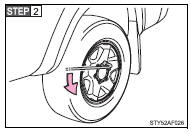
Slightly loosen the wheel nuts (one turn).
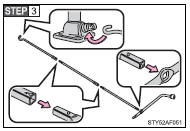
Assemble the jack handle extension as shown.
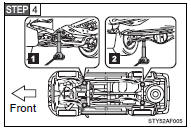
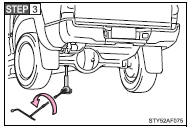
Position the jack at the correct jack point as shown.
1. Front
2. Rear
Make sure the jack is positioned on a level and solid place.
Raise the vehicle until the tire is slightly raised off the ground.
When positioning the jack under the rear axle housing, make sure the groove on the top of the jack fits with the rear axle housing.
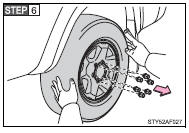
Remove all the wheel nuts and the tire.
When resting the tire on the ground, place the tire so that the wheel design faces up to avoid scratching the wheel surface.
Installing the tire
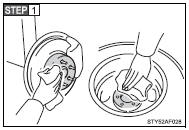
Remove any dirt or foreign matter from the wheel contact surface.
If foreign matter is on the wheel contact surface, the wheel nuts may loosen while the vehicle is in motion, and the tire may come off the vehicle.
 Install the tire and loosely tighten
each wheel nut by hand by approximately the same amount.
Install the tire and loosely tighten
each wheel nut by hand by approximately the same amount.
 Replacing a steel wheel with a steel
wheel
Replacing a steel wheel with a steel
wheel
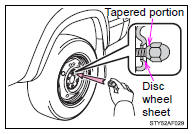
Tighten the nuts until the tapered portion comes into loose contact with the disc wheel sheet.
 Replacing an aluminum wheel with
a steel wheel
Replacing an aluminum wheel with
a steel wheel
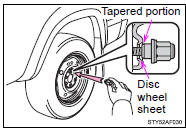
Tighten the nuts until the tapered portion comes into loose contact with the disc wheel sheet.
 Replacing an aluminum wheel with
an aluminum wheel
Replacing an aluminum wheel with
an aluminum wheel
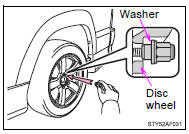
Tighten the nuts until the washer of the nut comes into loose contact with the disc wheel.
Lower the vehicle.
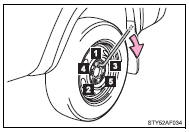
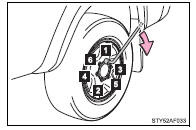
 Firmly tighten each nut two or three
times in the order shown in the illustration.
Firmly tighten each nut two or three
times in the order shown in the illustration.
Tightening torque: 83 ft·lbf (113 N·m, 11.5 kgf·m)
 2WD models except PreRunner
4WD models and PreRunner
Stowing the flat tire, jack and all tool
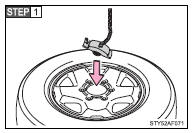
Lay down the tire with the outer side facing up, and install the holding bracket.
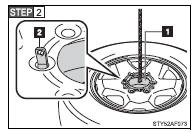
4WD models only: Fasten the claws of the holding bracket into the wheel holes as shown in the illustration.
1. Holding bracket
2. Claw
 Then secure the tire, taking
care that the tire goes straight up without catching on any other part, to prevent
it from flying forward during a collision or sudden braking.
Then secure the tire, taking
care that the tire goes straight up without catching on any other part, to prevent
it from flying forward during a collision or sudden braking.
 Stow the tools and jack securely.
■After completing the tire change
The tire pressure warning system must be reset.
■When using the temporary spare tire
As the temporary spare tire is not equipped with the tire pressure warning valve and transmitter, low inflation pressure of the spare tire will not be warned. Also, if you replace the temporary spare tire after the tire pressure warning light comes on, the light remains on.
CAUTION
■Using the jack
Improper use of the jack may lead to death or serious injuries due to the vehicle suddenly falling off the jack.
●Do not use the jack for any purpose other than replacing tires or installing and removing tire chains.
●Only use the jack that comes with this vehicle for replacing a flat tire.
Do not use it on other vehicles, and do not use other jacks for replacing tires on this vehicle.
●Always check that the jack is securely set to the jack point.
●Do not put any part of your body under the vehicle supported by a jack.
●Do not start or run the engine while your vehicle is supported by the jack.
●Do not raise the vehicle while someone is in it.
●When raising the vehicle, do not put an object on or under the jack.
●Do not raise the vehicle to a height greater than that required to replace the tire.
●Use a jack stand if it is necessary to get under the vehicle.
Take particular care when lowering the vehicle to ensure that no one working on or near the vehicle will be injured.
■Using the jack handle
Tighten all the screws securely to prevent the extension parts from coming apart unexpectedly.
■Replacing a flat tire
●Observe the following precautions.
Failure to do so may result in serious injury: • Lower the spare tire completely to the ground before removing it from under the vehicle.
• Do not try to remove the wheel ornament by hand. Take due care in handling the ornament to avoid unexpected personal injury.
CAUTION
■Replacing a flat tire
• Do not touch the disc wheels or the area around the brakes immediately after the vehicle has been driven.
After the vehicle has been driven the disc wheels and the area around the brakes will be extremely hot. Touching these areas with hands, feet or other body parts while changing a tire, etc. may result in burns.
●Failure to follow these precautions could cause the wheel nuts to loosen and the tire to fall off, resulting in death or serious injury.
• Have the wheel nuts tightened with a torque wrench to 83 ft·lbf (113 N·m, 11.5 kgf·m) as soon as possible after changing wheels.
• When installing a tire, only use wheel nuts that have been specifically designed for that wheel.
• If there are any cracks or deformations in the bolt screws, nut threads or bolt holes of the wheel, have the vehicle inspected by your Toyota dealer.
• Do not attach a heavily damaged wheel ornament, as it may fly off the wheel while the vehicle is moving.
• When installing the wheel nuts, be sure to install them with the tapered ends facing inward.
■When using the temporary spare tire
●Remember that your temporary spare tire is specifically designed for use with your vehicle. Do not use your temporary spare tire on another vehicle.
●Do not use two temporary spare tires simultaneously.
●Replace the temporary spare tire with a standard tire as soon as possible.
●Avoid sudden acceleration, deceleration and braking, as well as sharp cornering.
CAUTION
■Speed limit when using the temporary spare tire
Do not drive at speeds in excess of 50 mph (80 km/h) when a temporary spare tire is installed on the vehicle.
The temporary spare tire is not designed for driving at high speeds. Failing to observe this precaution may lead to an accident causing death or serious injury.
■Driving with tire chains and the temporary spare tire
Do not fit tire chains to the temporary spare tire.
Tire chains may damage the vehicle body and adversely affect driving performance.
■When the spare tire is attached
The vehicle speed may not be correctly detected, and the following systems may not operate correctly: ●ABS & Brake assist
●VSC
●TRAC
●Active traction control system (if equipped)
●Hill-start assist control system (if equipped)
●Downhill assist control system (if equipped)
●AUTO LSD system
●Cruise control (if equipped)
Also, not only can the following system not be utilized fully, it may actually negatively effect the drive-train components: ●4WD system
NOTICE
■Do not drive the vehicle with a flat tire
Do not continue driving with a flat tire.
Driving even a short distance with a flat tire can damage the tire and the wheel beyond repair.
■When stowing the flat tire
Ensure that there is no object caught between the tire and the vehicle underbody.
■When replacing the tires
●When removing or fitting the wheels, tires or the tire pressure warning valve and transmitter, contact your Toyota dealer as the tire pressure warning valve and transmitter may be damaged if not handled correctly.
●Replace the grommets for the tire pressure warning valves and transmitters as well.
■To avoid damage to the tire pressure warning valves and transmitters
When a tire is repaired with liquid sealants, the tire pressure warning valve and transmitter may not operate properly. If a liquid sealant is used, contact your Toyota dealer or other qualified service shop as soon as possible. Make sure to replace the tire pressure warning valve and transmitter when replacing the tire.
 If a warning light turns on or a warning buzzer sounds
Calmly perform the following actions if any of the warning lights turn on
or flash. If a light turns on or flashes, but then turns off, this does not necessarily
indicate a malfunction in the syst ...
 If the engine will not start
If the engine still does not start after following the correct starting procedure
(→P. 141) or releasing the steering lock (→P. 142), confirm the following points.
■ The engine wi ...
Other materials:
Rear Differential Lock Position SW Stuck OFF (P17BB)
DESCRIPTION
This DTC is output when an OFF malfunction of the differential lock indicator
switch is detected.
DTC No.
Detection Item
DTC Detection Condition
Trouble Area
P17BB
Rear Differential Lock Position SW Stuck OFF
...
Reassembly
REASSEMBLY
PROCEDURE
1. INSTALL FRONT OIL PUMP OIL SEAL
(a) Using SST and a hammer, install a new front oil pump oil seal to
the front oil pump body sub-assembly.
SST: 09350-30020
09351-32140
Standard depth:
-0.3 to 0.3 mm (-0.0118 to 0.0118 in.)
...
Road Test
ROAD TEST
PROBLEM SYMPTOM CONFIRMATION
HINT:
The dynamic radar cruise control system has 2 cruise control modes:
constant speed control mode and vehicle-to-vehicle distance control mode.
Vehicle-to-vehicle distance control mode is selected by default when
the dyna ...
