Toyota Tacoma manuals

Toyota Tacoma (2015-2018) Service Manual: Wireless Charger Power Source Circuit

DESCRIPTION

This is the power source circuit to operate the mobile wireless charger cradle assembly.

WIRING DIAGRAM
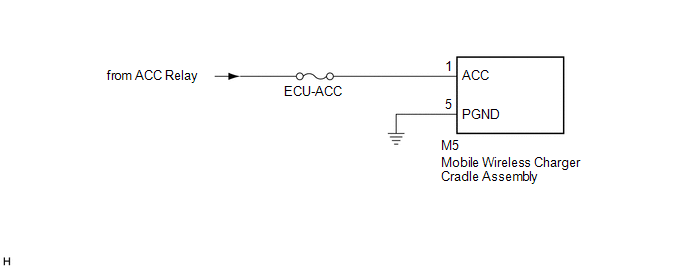
CAUTION / NOTICE / HINT

CAUTION / NOTICE / HINT

NOTICE:

Inspect the fuses for circuits related to this system before performing the following inspection procedure.

PROCEDURE

1.

CHECK HARNESS AND CONNECTOR (MOBILE WIRELESS CHARGER CRADLE ASSEMBLY POWER SOURCE)

(a) Disconnect the M5 mobile wireless charger cradle assembly connector.

(b) Measure the resistance according to the value(s) in the table below.

Standard Resistance:

Tester Connection

Condition

Specified Condition

M5-5 (PGND) - Body ground

Always

Below 1 Ω

M5-1 (ACC) - Body ground

Always

10 kΩ or higher

(c) Measure the voltage according to the value(s) in the table below.

Standard Voltage:

Tester Connection

Switch Condition

Specified Condition

M5-1 (ACC) - M5-5 (PGND)

Ignition switch ACC

11 to 14 V

OK

PROCEED TO NEXT SUSPECTED AREA SHOWN IN PROBLEM SYMPTOMS TABLE

NG

REPAIR OR REPLACE HARNESS OR CONNECTOR

Terminals Of Ecu
TERMINALS OF ECU 1. MOBILE WIRELESS CHARGER CRADLE ASSEMBLY Tester Connection Wiring Color Terminal Description Condition Specified Condition ...

Main Switch Signal Circuit
DESCRIPTION When the wireless charger main switch (mobile wireless charger switch) is turned on, this circuit sends an on signal to the mobile wireless charger cradle assembly using the power sup ...

Other materials:

Parking Brake Lever
Components COMPONENTS ILLUSTRATION ILLUSTRATION Installation INSTALLATION PROCEDURE 1. INSTALL PARKING BRAKE SWITCH ASSEMBLY 2. INSTALL PARKING BRAKE LEVER SUB-ASSEMBLY (a) Install the 2 toothed washers and parking brake lever support to the parking brake lever. (b) Install th ...

Clock
Adjusts the hours Adjusts the minutes ■The clock is displayed when The engine switch is in the ACC or ON position. ■When disconnecting and reconnecting battery terminals The time display will automatically be set to 1:00. ...

Installation
INSTALLATION PROCEDURE 1. INSTALL COOLER CONDENSER ASSEMBLY (a) Engage the 2 claws to install the 2 condenser upper brackets. (b) Engage the 2 claws to install the 2 condenser lower brackets. (c) Lift the cooler condenser assembly up from the rear side of the vehicle, and install ...

© 2011-2026 Copyright www.ttguide.net