REMOVAL
PROCEDURE
1. REMOVE FRONT DOOR SCUFF PLATE LH (for Double Cab)
.gif)
2. REMOVE FRONT DOOR SCUFF PLATE LH (for Access Cab)
3. REMOVE COWL SIDE TRIM BOARD LH
4. REMOVE INSTRUMENT CLUSTER CENTER FINISH PANEL SUB-ASSEMBLY
5. REMOVE INSTRUMENT CLUSTER FINISH PANEL ASSEMBLY
6. REMOVE INSTRUMENT PANEL LOWER FINISH PANEL SUB-ASSEMBLY
7. REMOVE NAVIGATION RECEIVER ASSEMBLY WITH BRACKET (w/ Navigation System)
8. REMOVE RADIO AND DISPLAY RECEIVER ASSEMBLY WITH BRACKET (w/o Navigation System)
9. REMOVE HAZARD WARNING SIGNAL SWITCH ASSEMBLY (AIR CONDITIONING CONTROL ASSEMBLY) (for Automatic Air Conditioning System)
|
(a) Disengage the 8 clips to separate the hazard warning signal switch assembly (air conditioning control assembly). |
|
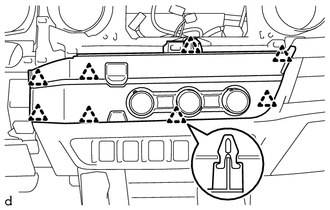
(b) Disconnect the connectors to remove the hazard warning signal switch assembly (air conditioning control assembly).
10. REMOVE HAZARD WARNING SIGNAL SWITCH ASSEMBLY (AIR CONDITIONING CONTROL ASSEMBLY) (for Manual Air Conditioning System)
|
(a) Disengage the 8 clips to separate the hazard warning signal switch assembly (air conditioning control assembly). |
|
(b) Disconnect the connectors to remove the hazard warning signal switch assembly (air conditioning control assembly).