Toyota Tacoma (2015-2018) Service Manual: Reassembly
REASSEMBLY
PROCEDURE
1. INSTALL RADIATOR GRILLE MOULDING
|
(a) Engage the 8 claws to install the radiator grille moulding. |
|
.png)
(b) Install the 8 screws.
2. INSTALL NO. 1 RADIATOR GRILLE GARNISH
(a) for Type A and Type B:
|
(1) Engage the 2 guides and 4 claws and 2 pins as shown in the illustration. |
|
|
(2) Install the No. 1 radiator grille garnish with 2 new spring nuts. |
|
(b) for Type C:
|
(1) Engage the 3 guides and 2 claws as shown in the illustration. |
|

|
(2) Install the No. 1 radiator grille garnish with 2 new spring nuts. |
|
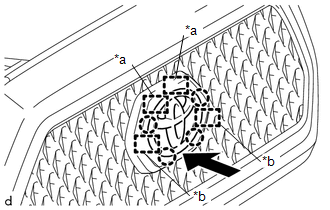
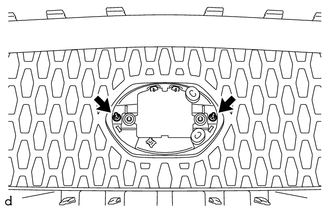
3. INSTALL MILLIMETER WAVE RADAR SENSOR ASSEMBLY (w/ Toyota Safety Sense P)
Click here .gif)
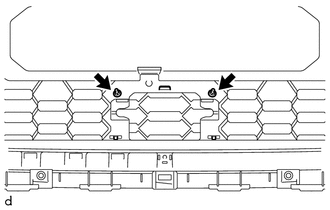
4. INSTALL MILLIMETER WAVE RADAR WIRE (w/ Toyota Safety Sense P)
Click here
 Installation
INSTALLATION
PROCEDURE
1. INSTALL RADIATOR GRILLE
(a) Engage the 10 guides to install the radiator grille.
(b) Install the 2 clips.
(c) Install the 2 screws.
(d) Remove the protective tape.
(e) ...
 Rear Body Side Panel Protector
Components
COMPONENTS
ILLUSTRATION
ILLUSTRATION
Installation
INSTALLATION
CAUTION / NOTICE / HINT
HINT:
Use the same procedure for the RH side and LH side.
The following pr ...
Other materials:
Problem Symptoms Table
PROBLEM SYMPTOMS TABLE
NOTICE:
Before replacing the ECM, refer to Registration.
w/o Smart Key System: Click here
w/ Smart Key System: Click here
When the millimeter wave radar sensor assembly is replaced with a new
one, adjustment of the radar sensor beam axis must be ...
Reassembly
REASSEMBLY
CAUTION / NOTICE / HINT
HINT:
Perform "Inspection After Repairs" after replacing the cylinder head sub-assembly
or cylinder head LH (See page ).
PROCEDURE
1. INSTALL SPARK PLUG TUBE
NOTICE:
When using a new cylinder head, the spark plug tubes must be replaced.
...
Installation
INSTALLATION
PROCEDURE
1. INSTALL WATER INLET WITH THERMOSTAT SUB-ASSEMBLY
(a) Install a new gasket to the water inlet with thermostat sub-assembly.
(b) Install the water inlet with thermostat sub-assembly to the timing chain
cover assembly with the 2 bolts and nut.
Torque:
10 N·m {102 kgf ...
