Toyota Tacoma manuals

Toyota Tacoma (2015-2018) Service Manual: Reassembly

REASSEMBLY

PROCEDURE

1. INSTALL REAR AXLE HUB BOLT

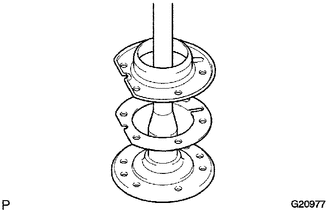
(a) Install a new deflector gasket and deflector onto the rear axle shaft.

HINT:

Align the 2 notches.

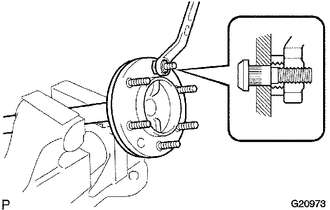
(b) Install the 6 bolts through the axle hub.

(c) Install the washer plate, as shown in the illustration, through the hub bolt, and install the hub bolt by tightening the hub nut.

2. INSTALL REAR AXLE HUB AND BEARING ASSEMBLY
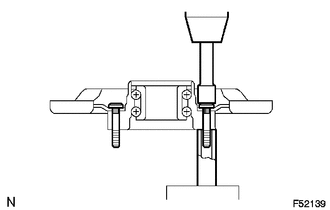
(a) Position the backing plate on the rear axle bearing, and install the 4 parking

(a) Position the backing plate on the rear axle bearing, and install the 4 parking brake plates onto the rear axle housing bolts using 2 socket wrenches and a press.

HINT:

The left and right side bearing assemblies have different part numbers and are not interchangeable side to side.

3. INSTALL REAR AXLE SHAFT WASHER

(a) Install the rear axle shaft plate washer onto the rear axle shaft.

4. INSTALL REAR AXLE BEARING RETAINER INNER

(a) Install a new rear axle bearing retainer inner onto the rear axle shaft.

5. INSTALL REAR AXLE SHAFT
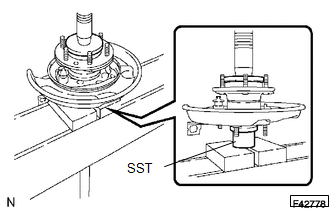
(a) Using SST and a press, install the rear axle shaft onto the rear axle bearing.

(a) Using SST and a press, install the rear axle shaft onto the rear axle bearing.

SST: 09521-25011

6. INSTALL REAR AXLE SHAFT SNAP RING

(a) Using a snap ring expander, install a new snap ring.

(a) Using a snap ring expander, install a new snap ring.

Installation
INSTALLATION PROCEDURE 1. INSTALL REAR AXLE SHAFT OIL SEAL (a) Using SST and a hammer, install a new oil seal. SST: 09950-60020 09951-00770 SST: 09950-70010 09951-07150 2. INSTALL REAR AXLE ...

Clutch
...

Other materials:

Low Pitched Horn
Components COMPONENTS ILLUSTRATION Inspection INSPECTION PROCEDURE 1. INSPECT LOW PITCHED HORN ASSEMBLY (a) Check the operation. (1) Apply battery voltage to the terminal 1 and body ground, and check that the low pitched horn assembly sounds. Text in Illustration ...

Terminals Of Ecu
TERMINALS OF ECU 1. AIRBAG SENSOR ASSEMBLY Terminal No. Terminal Symbol Destination A21-1 P2+ Instrument panel passenger without door airbag assembly (Front passenger side squib 2nd step) A21-2 ...

Terminals Of Ecm
TERMINALS OF ECM 1. ECM HINT: The standard voltage between each pair of ECM terminals is shown in the table below. In the table, first follow the information under "Condition". Look under "Terminal No. (Symbol)" for the terminals to be inspected. The standard voltage b ...

В© 2011-2026 Copyright www.ttguide.net