Toyota Tacoma (2005ŌĆō2015) Owners Manual: Using a Bluetooth┬« phone
The hands-free system is a function that allows you to use your cellular phone without touching it.
This system supports Bluetooth®. Bluetooth® is a wireless data system that allows the cellular phone to wirelessly connect to the hands-free system and make/receive calls.
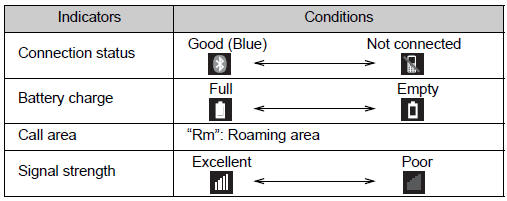
Before making a phone call, check the connection status, battery charge, call area and signal strength.
If a Bluetooth® device cannot be connected, check the connection status on the phone screen. If the device is not connected, either register or reconnect it.
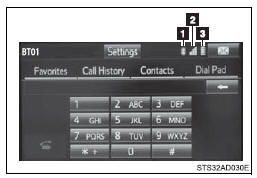
Phone screen
To display the screen shown below, press the
 switch on the steering wheel or press
the
switch on the steering wheel or press
the  button.
Several functions are available to operate on each screen that is displayed by selecting the 4 tabs.
 Device name
 Bluetooth┬« connection status
Bluetooth® connection status
■ Microphone

The vehicleŌĆÖs built in microphone is used when talking on the phone.
The person you are speaking to can be heard from the front speakers.
To use the hands-free system, you must register your Bluetooth® phone in the system.
Status display
You can check indicators such as signal strength and battery charge on any screen.
 Connection status
 Signal strength
 Battery charge
Making a call
Once a Bluetooth® phone is registered, you can make a call using the following procedure:
■ Dialing
 Display the phone screen.
 Select the ŌĆ£Dial PadŌĆØ tab and enter
a phone number.
Select the ŌĆ£Dial PadŌĆØ tab and enter
a phone number.
To delete the input phone number, select
 .
.
For the first digit, you can enter ŌĆ£+ŌĆØ by selecting ŌĆ£ ŌĆØ
for a while.
ŌĆØ
for a while.
 Press the
 switch on the steering wheel or select
 .
.
■ Dialing from the contacts list
You can dial a number from the contact data imported from your cellular phone. The system has one contact for each registered phone. Up to 2500 contacts may be stored in each contact.
 Display the phone screen.
 Select ŌĆ£ContactsŌĆØ tab.
 Choose the desired contact to call
from the list.
Choose the desired contact to call
from the list.
 Choose the number and then press
the
Choose the number and then press
the  switch on the steering wheel or
select
switch on the steering wheel or
select  .
.
■ When the contact is empty
You can transfer the phone numbers in a Bluetooth® phone to the system.
Operation methods differ between PBAP (Phone Book Access Profile) compatible and PBAP incompatible Bluetooth® phones. If the cellular phone does not support either PBAP or OPP (Object Push Profile) service, you cannot transfer contacts.
● For PBAP compatible Bluetooth┬« phones
 When ŌĆ£Automatic Contact/History TransferŌĆØ
is set to on
When ŌĆ£Automatic Contact/History TransferŌĆØ
is set to on
 Select the ŌĆ£ContactsŌĆØ tab.
 Check that a confirmation screen
is displayed when the operation is complete.
Check that a confirmation screen
is displayed when the operation is complete.
Transfer the contact data to the system using a Bluetooth® phone.
 When ŌĆ£Automatic Contact/History
TransferŌĆØ is set to off
When ŌĆ£Automatic Contact/History
TransferŌĆØ is set to off
 Select the ŌĆ£ContactsŌĆØ tab.
 Select the desired item.
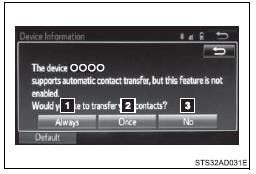
 Select to transfer new contacts
from a cellular phone, select ŌĆ£AlwaysŌĆØ and then enable ŌĆ£Automatic TransferŌĆØ.
Select to transfer new contacts
from a cellular phone, select ŌĆ£AlwaysŌĆØ and then enable ŌĆ£Automatic TransferŌĆØ.
 Select to transfer all the contacts
from a connected cellular phone only once.
Select to transfer all the contacts
from a connected cellular phone only once.
 Select to cancel transferring.
 Check that a confirmation screen
is displayed when the operation is complete.
Check that a confirmation screen
is displayed when the operation is complete.
● For PBAP incompatible but OPP compatible Bluetooth┬« phones
 Select the ŌĆ£ContactsŌĆØ tab.
 Follow the steps in ŌĆ£Update contacts
from phoneŌĆØ from ŌĆ£STEP 2ŌĆØ.
Follow the steps in ŌĆ£Update contacts
from phoneŌĆØ from ŌĆ£STEP 2ŌĆØ.
■ Calling using favorites list
You can make a call using numbers registered in the contact.
 Display the phone screen.
 Select ŌĆ£FavoritesŌĆØ tab.
 Select the desired number to make
a call.
Select the desired number to make
a call.
■ Dialing from call history
You can make a call using the call history, which has the 3 functions below.
 calls which you missed
 calls which you received
 calls which you made
 Display the phone screen.
 Select ŌĆ£Call HistoryŌĆØ tab.
 Select
 or the desired entry from the list.
 When
When
 is selected
 Check that the ŌĆ£CallŌĆØ screen is
displayed.
Check that the ŌĆ£CallŌĆØ screen is
displayed.
 When the desired contact is selected
 Select the desired number.
 Check that the ŌĆ£CallŌĆØ screen is
displayed.
Check that the ŌĆ£CallŌĆØ screen is
displayed.
■Call history list
●If you make a call to or receive a call from a number registered in the contact, the name is displayed in the call history.
●If you make multiple calls to the same number, only the last call made is displayed in the call history.
■International calls
You may not be able to make international calls, depending on the mobile phone in use.
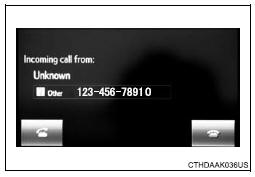
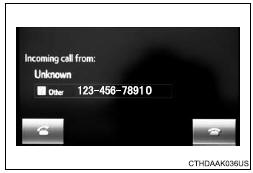
Receiving a call
When a call is received, the following screen is displayed together with a sound.
■ To answer the phone
Press the  switch on the steering
wheel or select
switch on the steering
wheel or select  .
.
■ To refuse a call
Press the  switch on the steering
wheel or select
switch on the steering
wheel or select  .
.
■ To adjust the incoming call volume
Turn the ŌĆ£PWR┬ĘVOLŌĆØ knob.
■International calls
Received international calls may not be displayed correctly depending on the cellular phone in use.
Speaking on the phone
The following screen is displayed when speaking on the phone.
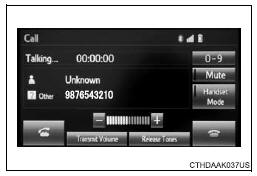
■ To adjust the call volume
Select ŌĆ£-ŌĆØ or ŌĆ£+ŌĆØ. You can also adjust the volume using the volume knob.
■ To prevent the other party from hearing your voice
Select ŌĆ£MuteŌĆØ.
■ Inputting tones
When using phone services such as an answering service or a bank, you can store phone numbers and code numbers in the contact.
 Select ŌĆ£0-9ŌĆØ.
 Input the number.
● Release Tones
ŌĆ£Release TonesŌĆØ appear when a continuous tone signal(s) containing a ŌĆ£wŌĆØ is registered in the contact list.
 Select ŌĆ£Release TonesŌĆØ.
■Release Tones
●A continuous tone signal is a character string that consists of numbers and the characters ŌĆ£pŌĆØ or ŌĆ£wŌĆØ. (e.g.056133w0123p#1∗) ●When the ŌĆ£pŌĆØ pause tone is used, the tone data up until the next pause tone will be automatically sent after 2 seconds have elapsed. When the ŌĆ£wŌĆØ pause tone is used, the tone data up until the next pause tone will be automatically sent after a user operation is performed.
●Release tones can be used when automated operation of a phone based service such as an answering machine or bank phone service is desired.
A phone number with continuous tone signals can be registered in the contact list.
●Tone data after a ŌĆ£wŌĆØ pause tone can be operated on voice command during a call.
■ To transfer a call
Select ŌĆ£Handset ModeŌĆØ to change from a hands-free call to a cellular phone call.
Select ŌĆ£Handset ModeŌĆØ to off from a cellular phone call to a handsfree call.
■ Transmit volume setting
 Select ŌĆ£Transmit VolumeŌĆØ.
 Select the desired level for the
transmit volume.
Select the desired level for the
transmit volume.
 Select ŌĆ£OKŌĆØ.
■ To hang up
Press the  switch on the steering
wheel or select
switch on the steering
wheel or select  .
.
■ Call waiting
When a call is interrupted by a third party while talking, an incoming call message will be displayed.
To talk with the other party: Press the
 switch on the steering wheel or select
 .
.
To refuse the call: Press the  switch
on the steering wheel or select
switch
on the steering wheel or select  .
.
Every time you press the  switch
on the steering wheel or select
switch
on the steering wheel or select  during
call waiting, you will be switched to the other party.
during
call waiting, you will be switched to the other party.
■Transferring calls
●If you transfer from the cellular phone to hands-free, the hands-free screen will be displayed, and you can operate the system using the screen.
●Transfer method and operation may vary according to the cellular phone used.
●For operation of the cellular phone in use, see the phoneŌĆÖs manual.
■Call waiting operation
Call waiting operation may differ depending on your phone company and cellular phone.
Bluetooth® phone message function
Received messages can be forwarded from the connected Bluetooth® phone, enabling checking and replying using the multimedia system.
Depending on the type of Bluetooth® phone connected, received messages may not be transferred to the message inbox.
If the phone does not support the message function, this function cannot be used.
■ Displaying ŌĆ£Message InboxŌĆØ screen
 Press the
 switch on the steering wheel or press
the
switch on the steering wheel or press
the  button.
 Select
 on the phone screen.
Check that the ŌĆ£Message InboxŌĆØ screen is displayed.
■ Receiving a message
When an e-mail/SMS/MMS is received, the incoming message screen pops up with sound and is ready to be operated on the screen.
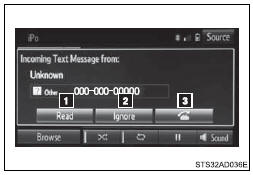
 E-mail: Select to check the message.
 Select to refuse the message.
 Select to call the message sender.
■Receiving a message
●Depending on the cellular phone used for receiving messages, or its registration status with the navigation system, some information may not be displayed.
●The pop up screen is separately available for incoming e-mail and SMS/ MMS messages under the following conditions: E-mail: ŌĆó ŌĆ£Incoming E-mail DisplayŌĆØ is set to ŌĆ£Full ScreenŌĆØ.
ŌĆó ŌĆ£E-mail Notification PopupŌĆØ is set to on. (→P. 338) SMS/MMS:
■ Checking the messages
 Display the ŌĆ£Message InboxŌĆØ screen.
 Select the desired message from
the list.
Select the desired message from
the list.
 Check that the message is displayed.

 E-mails: Select ŌĆ£Mark UnreadŌĆØ or
ŌĆ£Mark ReadŌĆØ to mark mail unread or read on the ŌĆ£Message InboxŌĆØ screen.
E-mails: Select ŌĆ£Mark UnreadŌĆØ or
ŌĆ£Mark ReadŌĆØ to mark mail unread or read on the ŌĆ£Message InboxŌĆØ screen.
This function is available when ŌĆ£Update Message Read Status on PhoneŌĆØ is set to on
 Select to make a call to the sender.
 Select to have messages read out.
To cancel this function, select ŌĆ£StopŌĆØ.
Select to have messages read out.
To cancel this function, select ŌĆ£StopŌĆØ.
 Select to display the previous
or next message.
Select to display the previous
or next message.
 Select to reply the message.
■Check the messages
●Depending on the type of Bluetooth┬« phone being connected, it may be necessary to perform additional steps on the phone.
●Messages are displayed in the appropriate connected Bluetooth┬« phoneŌĆÖs registered mail address folder.
Select the tab of the desired folder to be displayed.
●Only received messages on the connected Bluetooth┬« phone can be displayed.
●The text of the message is not displayed while driving.
●When ŌĆ£Automatic Message ReadoutŌĆØ is set to on, messages will be automatically read out.
●Turn the ŌĆ£PWR⋅VOLŌĆØ knob to adjust the message read out volume.
●The message read out function is available even while driving.
■ Replying to a message
 Display the ŌĆ£Message InboxŌĆØ
screen.
Display the ŌĆ£Message InboxŌĆØ
screen.
 Select the desired message
from the list.
Select the desired message
from the list.
 Select ŌĆ£Quick MessageŌĆØ.
 Select the desired message.
 Select ŌĆ£SendŌĆØ.
● Editing quick reply message
This operation cannot be performed while driving.
 Select ŌĆ£Quick MessageŌĆØ.
 Select
 corresponding to the desired message
to edit.
corresponding to the desired message
to edit.
 Select ŌĆ£OKŌĆØ when editing is completed.
■ Calling the message sender
Calls can be made to an e-mail/SMS/MMS message senderŌĆÖs phone number.
 Display the ŌĆ£Message InboxŌĆØ screen.
 Select the desired message.
 Select
 .
.
 Check that the ŌĆ£CallŌĆØ screen is
displayed.
Check that the ŌĆ£CallŌĆØ screen is
displayed.
● Calling from a number within a message
Calls can be made to a number identified in a messageŌĆÖs text area.
 Display the ŌĆ£Message InboxŌĆØ screen.
 Select the desired message.
 Select the text area.
 Select
 corresponding to the desired number.
 Check that the ŌĆ£CallŌĆØ screen is
displayed.
Check that the ŌĆ£CallŌĆØ screen is
displayed.
● Calling from the incoming message screen
Using the steering wheel switches (if equipped)
The steering wheel switches can be used to operate a connected cellular phone.
■ Operating a telephone using the steering wheel switches
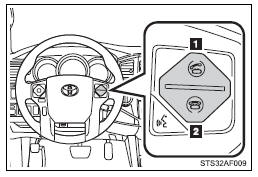
 Off hook switch
ŌĆó Make a call
ŌĆó Receive a call
ŌĆó Display ŌĆ£PhoneŌĆØ screen
 On hook switch
ŌĆó End a call
ŌĆó Refuse a call
Bluetooth® phone settings
You can adjust the hands-free system to your desired settings.
■ ŌĆ£Phone/Message SettingsŌĆØ screen
To display the screen shown below, press the ŌĆ£SETUPŌĆØ button, and select ŌĆ£PhoneŌĆØ on the ŌĆ£SetupŌĆØ screen.
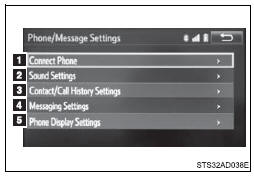
 Set the phone connection
 Sound Settings
 Contact/Call History Settings
 Messaging Settings
 Phone Display Settings
■ Sound setting
 Display the ŌĆ£Phone/Message SettingsŌĆØ
screen.
Display the ŌĆ£Phone/Message SettingsŌĆØ
screen.
 Select ŌĆ£Sound SettingsŌĆØ on the
ŌĆ£Phone/Message SettingsŌĆØ screen.
Select ŌĆ£Sound SettingsŌĆØ on the
ŌĆ£Phone/Message SettingsŌĆØ screen.
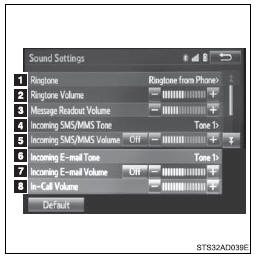
 Set the desired ringtone.
 Adjust the ringtone volume.
 Adjust the message readout volume.
 Set the desired incoming SMS/MMS
tone.
Set the desired incoming SMS/MMS
tone.
 Adjust the incoming SMS/ MMS tone
volume.
Adjust the incoming SMS/ MMS tone
volume.
 Set the incoming e-mail tone.
 Adjust the incoming e-mail tone
volume.
Adjust the incoming e-mail tone
volume.
 Adjust the default volume of the
other partyŌĆÖs voice.
Adjust the default volume of the
other partyŌĆÖs voice.
■To return to the default settings
Select ŌĆ£DefaultŌĆØ, and then ŌĆ£YesŌĆØ.
Contact/Call history settings
The contact can be transferred from a Bluetooth® phone to the system.
The contact also can be added, edited and deleted.
The call history can be deleted and contact and favorites can be changed.
 Display the ŌĆ£Phone/Message SettingsŌĆØ
screen.
Display the ŌĆ£Phone/Message SettingsŌĆØ
screen.
 Select ŌĆ£Contact/Call History SettingsŌĆØ.
 Select the desired item to be set.

 For PBAP compatible Bluetooth®
phones, select to set automatic contact/history transfer on/off. When set to on,
the phoneŌĆÖs contact data and history are automatically transferred.
For PBAP compatible Bluetooth®
phones, select to set automatic contact/history transfer on/off. When set to on,
the phoneŌĆÖs contact data and history are automatically transferred.
 Select to update contacts from
the connected phone.
Select to update contacts from
the connected phone.
 Select to sort contacts by the
first name or last name field.
Select to sort contacts by the
first name or last name field.
 Select to add contacts to the favorites
list.
Select to add contacts to the favorites
list.
 Select to delete contacts from
the favorites list.
Select to delete contacts from
the favorites list.
 Select to display contact images.
 Select to clear contacts from the
call history.
Select to clear contacts from the
call history.
 Select to add new contacts to the
contact list.*
Select to add new contacts to the
contact list.*
 Select to edit contacts in the
contact list.*
Select to edit contacts in the
contact list.*
 Select to delete contacts from the
contact list.*
Select to delete contacts from the
contact list.*
 Select to reset all setup items.*
*: For PBAP compatible Bluetooth┬« phones only, this function is available when ŌĆ£Automatic Contact/ History TransferŌĆØ is set to off.
■ Update contacts from phone
Operation methods differ between PBAP compatible and PBAP incompatible but OPP compatible Bluetooth® phones.
If your cellular phone is neither PBAP nor OPP compatible, the contacts cannot be transferred.
● For PBAP Compatible Bluetooth┬« Phones
 Select ŌĆ£Update Contacts from PhoneŌĆØ.
 Check that a confirmation screen
is displayed when the operation is complete.
Check that a confirmation screen
is displayed when the operation is complete.
This operation may be unnecessary depending on the type of cellular phone.
Depending on the type of cellular phone, OBEX authentication may be required when transferring contact data. Enter ŌĆ£1234ŌĆØ into the Bluetooth┬« phone.
If another Bluetooth® device is connected when transferring contact data, depending on the phone, the connected Bluetooth® device may need to be disconnected.
Depending on the type of Bluetooth® phone being connected, it may be necessary to perform additional steps on the phone.
● For PBAP Incompatible Bluetooth┬« Phones
 Select ŌĆ£Update Contacts from PhoneŌĆØ.
 Transfer the contact data to the
system using a Bluetooth® phone.
Transfer the contact data to the
system using a Bluetooth® phone.
This operation may be unnecessary depending on the type of cellular phone.
Depending on the type of cellular phone, OBEX authentication may be required when transferring contact data. Enter ŌĆ£1234ŌĆØ into the Bluetooth┬« phone.
To cancel this function, select ŌĆ£CancelŌĆØ.
 Select ŌĆ£DoneŌĆØ when it appears on
the screen.
Select ŌĆ£DoneŌĆØ when it appears on
the screen.
 Check that a confirmation screen
is displayed when the operation is complete.
Check that a confirmation screen
is displayed when the operation is complete.
● Updating the contacts in a different way (From the ŌĆ£Call HistoryŌĆØ screen)
For PBAP compatible Bluetooth┬« phones, this function is available when ŌĆ£Automatic Contact/History TransferŌĆØ is set to off.
 Display the phone screen.
 Select the ŌĆ£Call HistoryŌĆØ tab and
select a contact not yet registered in the contact list.
Select the ŌĆ£Call HistoryŌĆØ tab and
select a contact not yet registered in the contact list.
 Select ŌĆ£Update ContactŌĆØ.
 Select the desired contact.
 Select a phone type for the phone
number.
Select a phone type for the phone
number.
■ Registering a new contact to the contact list
New contact data can be registered. Up to 4 numbers per person can be registered. For PBAP compatible Bluetooth┬« phones, this function is available when ŌĆ£Automatic Contact/History TransferŌĆØ is set to off.
 Select ŌĆ£New ContactŌĆØ.
 Enter the name and select ŌĆ£OKŌĆØ.
 Enter the phone number and select
ŌĆ£OKŌĆØ.
Enter the phone number and select
ŌĆ£OKŌĆØ.
 Select the phone type for the phone
number.
Select the phone type for the phone
number.
 To add another number to this contact,
select ŌĆ£YesŌĆØ.
To add another number to this contact,
select ŌĆ£YesŌĆØ.
● Registering a new contact in a different way (From the ŌĆ£Call HistoryŌĆØ screen)
 Display the phone screen.
 Select the ŌĆ£Call HistoryŌĆØ tab and
select a contact not yet registered in the contact list.
Select the ŌĆ£Call HistoryŌĆØ tab and
select a contact not yet registered in the contact list.
 Select ŌĆ£Add to ContactsŌĆØ.
 Follow the steps in ŌĆ£Registering a
new contact to the contact listŌĆØ from ŌĆ£STEP 3ŌĆØ.
Follow the steps in ŌĆ£Registering a
new contact to the contact listŌĆØ from ŌĆ£STEP 3ŌĆØ.
■ Editing the contact data
For PBAP compatible Bluetooth┬« phones, this function is available when ŌĆ£Automatic Contact/History TransferŌĆØ is set to off.
 Select ŌĆ£Edit ContactŌĆØ.
 Select the desired contact.
 Select
 corresponding to the desired name or
number.
corresponding to the desired name or
number.
 For editing the name
 Follow the steps in ŌĆ£Registering
a new contact to the contact listŌĆØ from ŌĆ£STEP 3ŌĆØ.
Follow the steps in ŌĆ£Registering
a new contact to the contact listŌĆØ from ŌĆ£STEP 3ŌĆØ.
 For editing the number
 Follow the steps in ŌĆ£Registering
a new contact to the contact listŌĆØ from ŌĆ£STEP 4ŌĆØ.
Follow the steps in ŌĆ£Registering
a new contact to the contact listŌĆØ from ŌĆ£STEP 4ŌĆØ.
● Editing the contacts in a different way (From the ŌĆ£Contact DetailsŌĆØ screen)
 Display the phone screen.
 Select the ŌĆ£ContactsŌĆØ, ŌĆ£Call HistoryŌĆØ
tab or the ŌĆ£FavoritesŌĆØ tab and select the desired contact.
Select the ŌĆ£ContactsŌĆØ, ŌĆ£Call HistoryŌĆØ
tab or the ŌĆ£FavoritesŌĆØ tab and select the desired contact.
 Select ŌĆ£Edit ContactŌĆØ.
ŌĆ£E-mail AddressesŌĆØ: Select to display all registered e-mail addresses for the contact.
 Follow the steps in ŌĆ£Editing the
contact dataŌĆØ from ŌĆ£STEP 4ŌĆØ.
Follow the steps in ŌĆ£Editing the
contact dataŌĆØ from ŌĆ£STEP 4ŌĆØ.
■ Deleting the contact data
For PBAP compatible Bluetooth┬« phones, this function is available when ŌĆ£Automatic Contact/History TransferŌĆØ is set to off.
 Select ŌĆ£Delete ContactsŌĆØ.
 Select the desired contact and select
ŌĆ£DeleteŌĆØ.
Select the desired contact and select
ŌĆ£DeleteŌĆØ.
 Select ŌĆ£YesŌĆØ when the confirmation
screen appears.
Select ŌĆ£YesŌĆØ when the confirmation
screen appears.
● Deleting the contact in a different way (From the ŌĆ£Contact DetailsŌĆØ screen)
Display the phone screen.
Select the ŌĆ£ContactsŌĆØ, ŌĆ£Call HistoryŌĆØ
tab or the ŌĆ£FavoritesŌĆØ tab and select the desired contact.
Select ŌĆ£Edit ContactŌĆØ.
Select ŌĆ£YesŌĆØ when the confirmation
screen appears.
■ Favorites list setting
Up to 15 contacts (maximum of 4 numbers per contact) can be registered in the favorites list.
● Registering the contacts in the favorites list
 Select ŌĆ£Add FavoriteŌĆØ.
 Select the desired contact to add
to the favorites list.
Select the desired contact to add
to the favorites list.
Dimmed contacts are already stored as a favorite.
 Check that a confirmation screen
is displayed when the operation is complete.
Check that a confirmation screen
is displayed when the operation is complete.
 When 15 contacts have already been
registered to the favorites list
When 15 contacts have already been
registered to the favorites list
 When 15 contacts have already been
registered to the favorites list, a registered contact needs to be replaced.
When 15 contacts have already been
registered to the favorites list, a registered contact needs to be replaced.
Select ŌĆ£YesŌĆØ when the confirmation screen appears to replace a contact.
 Select the contact to be replaced.
 Check that a confirmation screen
is displayed when the operation is complete.
Check that a confirmation screen
is displayed when the operation is complete.
 Registering contacts in the favorites
list in a different way (from the ŌĆ£ContactsŌĆØ screen)
Registering contacts in the favorites
list in a different way (from the ŌĆ£ContactsŌĆØ screen)
 Display the phone screen.
 Select the ŌĆ£ContactsŌĆØ tab.
 Select
 at the beginning of the desired contact
list name to be registered in the favorites list.
at the beginning of the desired contact
list name to be registered in the favorites list.
When selected,  is changed to
 , and the contact is registered in
the favorites list.
, and the contact is registered in
the favorites list.
 Registering contacts in the favorites
list in a different way (from the ŌĆ£Contact DetailsŌĆØ screen)
Registering contacts in the favorites
list in a different way (from the ŌĆ£Contact DetailsŌĆØ screen)
 Display the phone screen.
 Select the ŌĆ£ContactsŌĆØ tab or the
ŌĆ£Call HistoryŌĆØ tab and select the desired contact.
Select the ŌĆ£ContactsŌĆØ tab or the
ŌĆ£Call HistoryŌĆØ tab and select the desired contact.
 Select ŌĆ£Add FavoriteŌĆØ.
 Check that a confirmation screen
is displayed when the operation is complete.
Check that a confirmation screen
is displayed when the operation is complete.
● Deleting the contacts in the favorites list
 Select ŌĆ£Remove FavoriteŌĆØ.
Select the desired contacts and
select ŌĆ£RemoveŌĆØ.
Select ŌĆ£YesŌĆØ when the confirmation
screen appears.
Check that a confirmation screen
is displayed when the operation is complete.
 Deleting contacts in the favorites
list in a different way (from the ŌĆ£ContactsŌĆØ screen)
Deleting contacts in the favorites
list in a different way (from the ŌĆ£ContactsŌĆØ screen)
Display the phone screen.
Select the ŌĆ£ContactsŌĆØ tab.
Select
 at the beginning of the contact list
name to be deleted from the favorites. list.
at the beginning of the contact list
name to be deleted from the favorites. list.
When selected,  is changed to
 , and the data is deleted from the
list.
, and the data is deleted from the
list.
 Deleting contacts in the favorites
list in a different way (from the ŌĆ£Contact DetailsŌĆØ screen)
Deleting contacts in the favorites
list in a different way (from the ŌĆ£Contact DetailsŌĆØ screen)
 Display the phone screen.
Select the ŌĆ£ContactsŌĆØ, ŌĆ£Call HistoryŌĆØ
tab or the ŌĆ£FavoritesŌĆØ tab and select the desired contact to delete.
Select ŌĆ£Remove FavoriteŌĆØ.
Select ŌĆ£YesŌĆØ when the confirmation
screen appears.
 Check that a confirmation screen
is displayed when the operation is complete.
Check that a confirmation screen
is displayed when the operation is complete.
■ Message Settings
 Display the ŌĆ£Phone/Message SettingsŌĆØ
screen.
Display the ŌĆ£Phone/Message SettingsŌĆØ
screen.
 Select ŌĆ£Messaging SettingsŌĆØ.
 Select the desired item to be set.
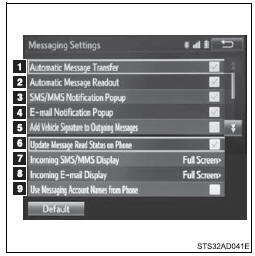
 Set automatic message transfer on/off.
 Set automatic message readout on/off.
 Set the SMS/MMS notification popup
on/off.
Set the SMS/MMS notification popup
on/off.
 Set the e-mail notification popup
on/off.
Set the e-mail notification popup
on/off.
 Set adding the vehicle signature
to outgoing messages on/ off.
Set adding the vehicle signature
to outgoing messages on/ off.
 Set updating message read status
on phone on/off.
Set updating message read status
on phone on/off.
 Change the incoming SMS/ MMS display.
ŌĆ£Full ScreenŌĆØ: When an SMS/ MMS message is received, the incoming SMS/MMS display screen is displayed and can be operated on the screen.
ŌĆ£Drop-DownŌĆØ: When an SMS/ MMS message is received, a message is displayed on the upper side of the screen.
 Change the incoming e-mail display.
ŌĆ£Full ScreenŌĆØ: When an e-mail is received, the incoming e-mail display screen is the displayed and can be operated on the screen.
ŌĆ£Drop-DownŌĆØ: When an e-mail is received, a message is displayed on the upper side of the screen.
 Set display of messaging account
names on the inbox tab on/off.
Set display of messaging account
names on the inbox tab on/off.
When set to on, messaging account names used on the cellular phone will be displayed.
● Displaying the ŌĆ£Messaging SettingsŌĆØ screen in a different way
 Display the phone screen.
 Select
 .
.
 Select ŌĆ£SettingsŌĆØ.
■To return to the default settings
Select ŌĆ£DefaultŌĆØ, and then ŌĆ£YesŌĆØ.
■ Phone Display Settings
 Display the ŌĆ£Phone/Message SettingsŌĆØ
screen.
Display the ŌĆ£Phone/Message SettingsŌĆØ
screen.
 Select ŌĆ£Phone Display SettingsŌĆØ.
 Select the desired item to be set.
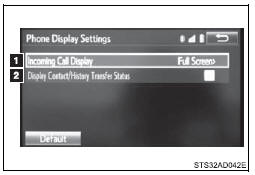
 Change the incoming call display.
ŌĆ£Full ScreenŌĆØ: When a call is received, the hands-free screen is displayed and can be operated on the screen.
ŌĆ£Drop-DownŌĆØ: A message is displayed on the upper side of the screen.
 Set display of the contact/history
transfer completion message on/off.
Set display of the contact/history
transfer completion message on/off.
Voice command system
The voice command system enables the hands-free system to be operated using voice commands.
Operations of the voice command system can be performed by selecting the menu corresponding to each function on the screen.
Even if any menu is selected, commands displayed on all menus can be operated.
■ Using the voice command system
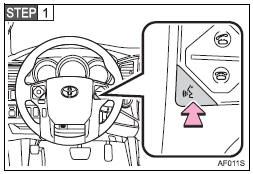
Press the talk switch.
To cancel the voice command system, press and hold the talk switch.
 After a beep sounds, say the desired
command.
After a beep sounds, say the desired
command.
On the list screen, you can select the desired command.
■Microphone
■When using the microphone
●It is unnecessary to speak directly into the microphone when giving a command.
●It is not necessary to wait for the confirmation beep before speaking a command.
●Voice commands may not be recognized if: ŌĆó Spoken too quickly.
ŌĆó Spoken at a low or high volume.
ŌĆó The roof or windows are open.
ŌĆó Passengers are talking while voice commands are spoken.
ŌĆó The air conditioning speed is set high.
ŌĆó The air conditioning vents are turned towards the microphone.
●In the following conditions, the system may not recognize the command properly and using voice commands may not be possible: ŌĆó The command is incorrect or unclear. Note that certain words, accents or speech patterns may be difficult for the system to recognize.
ŌĆó There is excessive background noise, such as wind noise.
■ Casual speech recognization
Due to natural language speech recognition technology, this system enables recognition of a command when spoken naturally. However, the system cannot recognize every variation of each command.
In some situations, it is possible to omit the command for the procedure and directly state the desired operation.
Not all voice commands are displayed in the short cut menu.
This function is available in English, Spanish and French.
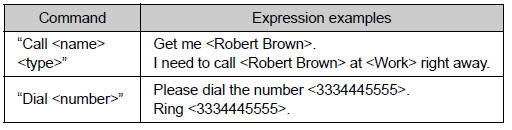
● Expression examples for each function
 Listening to Bluetooth® audio
The Bluetooth® audio system enables the user to enjoy music played on a portable
player from the vehicle speakers via wireless communication.
Select ŌĆ£ AudioŌĆØ on the ŌĆ£Select Audio SourceŌĆØ s ...
 Operating the sub woofer (on some Access Cab models)
OFF
ON
LIGHT ON
The sub woofer illumination turns on. In this position, the sub woofer operates. ...
Other materials:
Problem Symptoms Table
PROBLEM SYMPTOMS TABLE
HINT:
Use the table below to help determine the cause of problem symptoms.
If multiple suspected areas are listed, the potential causes of the symptoms
are listed in order of probability in the "Suspected Area" column of the
table. Check each sy ...
Parts Location
PARTS LOCATION
ILLUSTRATION
*A
for Vacuum Brake Booster
*B
for Hydraulic Brake Booster
*1
SKID CONTROL ECU (BRAKE ACTUATOR ASSEMBLY)
*2
SKID CONTROL ECU (MASTER CYLINDER SOLENOID)
*3
...
Interior Illumination Light
Components
COMPONENTS
ILLUSTRATION
Removal
REMOVAL
PROCEDURE
1. REMOVE INSTRUMENT PANEL LOWER CENTER FINISH PANEL
(See page )
2. REMOVE NO. 1 INTERIOR ILLUMINATION LIGHT ASSEMBLY
(a) Turn the No. 1 interior illumination light assembly in the direction
indicated by the ...
