Toyota Tacoma (2015-2018) Service Manual: Removal
REMOVAL
PROCEDURE
1. REMOVE AIR CONDITIONING CONTROL ASSEMBLY (for Automatic Air Conditioning System)
Click here .gif)
2. REMOVE AIR CONDITIONING CONTROL ASSEMBLY (for Manual Air Conditioning System)
Click here
3. REMOVE LOWER NO. 2 INSTRUMENT PANEL AIRBAG ASSEMBLY
Click here
4. REMOVE INSTRUMENT LOWER PANEL ASSEMBLY
Click here
5. REMOVE FRONT CONSOLE BOX
Click here
6. REMOVE NO. 2 INSTRUMENT PANEL GARNISH SUB-ASSEMBLY
Click here
7. REMOVE INSTRUMENT PANEL LOWER CENTER FINISH PANEL
Click here
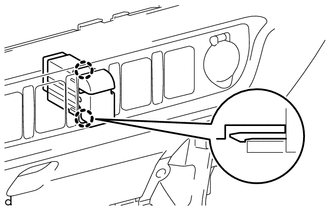
8. REMOVE REAR NO. 2 POWER WINDOW REGULATOR SWITCH ASSEMBLY
|
(a) Disengage the 2 claws to remove the rear No. 2 power window regulator switch assembly. |
|
 Inspection
INSPECTION
PROCEDURE
1. INSPECT REAR NO. 2 POWER WINDOW REGULATOR SWITCH ASSEMBLY
*a
Component without harness connected
(Rear No. 2 Power Window Regulator Switch Assembl ...
 Installation
INSTALLATION
PROCEDURE
1. INSTALL REAR NO. 2 POWER WINDOW REGULATOR SWITCH ASSEMBLY
(a) Engage the 2 claws to install the rear No. 2 power window regulator switch
assembly.
2. INSTALL INSTRUMENT ...
Other materials:
Freeze Frame Data
FREEZE FRAME DATA
1. FREEZE FRAME DATA
(a) When a DTC is stored, the 4 wheel drive control ECU stores the current vehicle
state as Freeze Frame Data.
HINT:
Freeze Frame Data at the time a DTC is stored:
When the 4 wheel drive control ECU stores data at the time a DTC is stored, no
updates w ...
Cellular Phone cannot Send/Receive
PROCEDURE
1.
CHECK "Bluetooth" SETTINGS
(a) Check if the cellular phone is registered as a connected device and the "Bluetooth"
settings are correct.
OK:
The cellular phone is registered as a connected device and "Bluetooth" settin ...
Components
COMPONENTS
ILLUSTRATION
ILLUSTRATION
ILLUSTRATION
ILLUSTRATION
ILLUSTRATION
ILLUSTRATION
ILLUSTRATION
ILLUSTRATION
ILLUSTRATION
ILLUSTRATION
...
