Toyota Tacoma (2015-2018) Service Manual: Removal
REMOVAL
CAUTION / NOTICE / HINT
HINT:
When removing the name plates or stripe tapes, heat the vehicle body or tail gate and name plates or stripe tapes using a heat light.
Heating Temperature|
Item |
Temperature |
|---|---|
|
Vehicle Body or Tail Gate |
40 to 60°C (104 to 140°F) |
|
Name Plate or Stripe Tape |
20 to 30°C (68 to 86°F) |
NOTICE:
Do not heat the vehicle body, tail gate, name plate or stripe tape excessively.
PROCEDURE
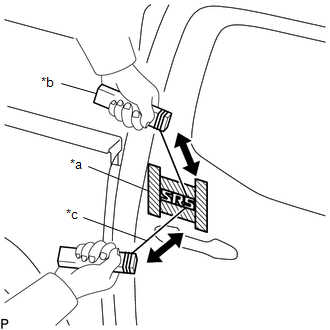
1. REMOVE NO. 1 FRONT DOOR NAME PLATE (for LH Side)
|
(a) Put protective tape around the No. 1 front door name plate. |
|
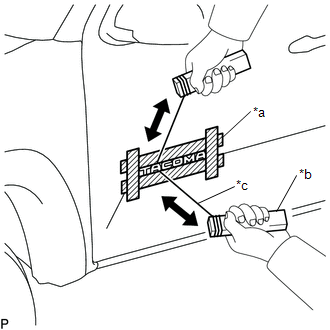
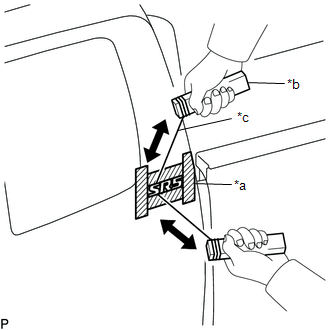
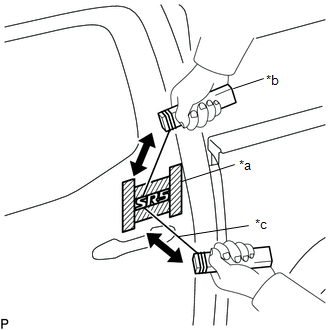
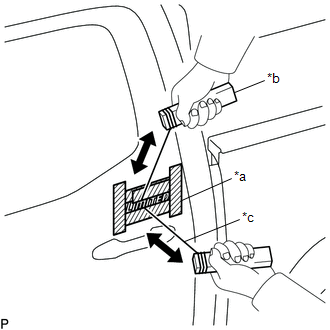
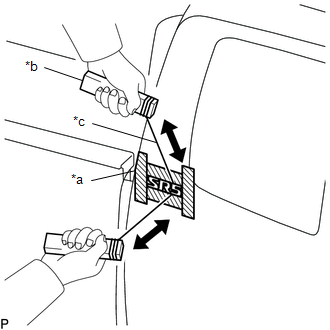
(b) Insert a piano wire between the vehicle body and No. 1 front door name plate.
(c) Tie objects that can serve as handles (for example, wooden blocks) to both wire ends.
(d) Pull the piano wire and cut the double-sided tape that holds the No. 1 front door name plate to the vehicle body.
NOTICE:
- If reusing the No. 1 front door name plate, take care not to damage the No. 1 front door name plate.
- Be careful not to damage the vehicle body.
(e) Remove the No. 1 front door name plate.
(f) Remove the protective tape.
|
(g) for LED Fog Light: (1) Put protective tape around the No. 1 front door name plate. (2) Insert a piano wire between the vehicle body and No. 1 front door name plate. (3) Tie objects that can serve as handles (for example, wooden blocks) to both wire ends. (4) Pull the piano wire and cut the double-sided tape that holds the No. 1 front door name plate to the vehicle body. NOTICE:
(5) Remove the No. 1 front door name plate. (6) Remove the protective tape. |
|
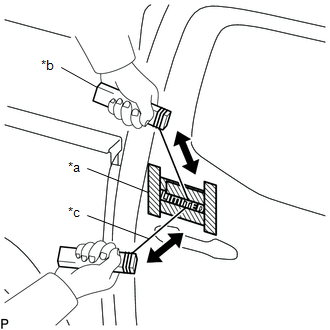
2. REMOVE NO. 1 FRONT DOOR NAME PLATE (for RH Side)
|
(a) Put protective tape around the No. 1 front door name plate. |
|
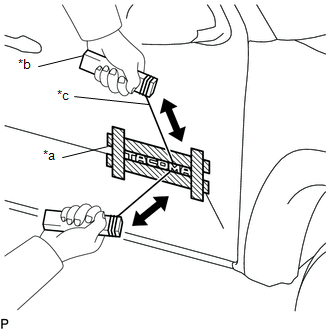
(b) Insert a piano wire between the vehicle body and No. 1 front door name plate.
(c) Tie objects that can serve as handles (for example, wooden blocks) to both wire ends.
(d) Pull the piano wire and cut the double-sided tape that holds the No. 1 front door name plate to the vehicle body.
NOTICE:
- If reusing the No. 1 front door name plate, take care not to damage the No. 1 front door name plate.
- Be careful not to damage the vehicle body.
(e) Remove the No. 1 front door name plate.
(f) Remove the protective tape.
|
(g) for LED Fog Light: (1) Put protective tape around the No. 1 front door name plate. (2) Insert a piano wire between the vehicle body and No. 1 front door name plate. (3) Tie objects that can serve as handles (for example, wooden blocks) to both wire ends. (4) Pull the piano wire and cut the double-sided tape that holds the No. 1 front door name plate to the vehicle body. NOTICE:
(5) Remove the No. 1 front door name plate. (6) Remove the protective tape. |
|
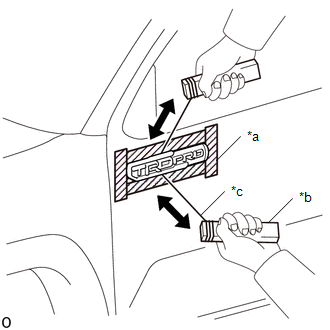
3. REMOVE NO. 1 ROOF SIDE NAME PLATE (for LH Side)
(a) for Access Cab:
|
(1) Put protective tape around the No. 1 roof side name plate. |
|
(2) Insert a piano wire between the vehicle body and No. 1 roof side name plate.
(3) Tie objects that can serve as handles (for example, wooden blocks) to both wire ends.
(4) Pull the piano wire and cut the double-sided tape that holds the No. 1 roof side name plate to the vehicle body.
NOTICE:
- If reusing the No. 1 roof side name plate, take care not to damage the No. 1 roof side name plate.
- Be careful not to damage the vehicle body.
(5) Remove the No. 1 roof side name plate.
(6) Remove the protective tape.
(b) for Double Cab Type A:
|
(1) Put protective tape around the No. 1 roof side name plate. |
|
(2) Insert a piano wire between the vehicle body and No. 1 roof side name plate.
(3) Tie objects that can serve as handles (for example, wooden blocks) to both wire ends.
(4) Pull the piano wire and cut the double-sided tape that holds the No. 1 roof side name plate to the vehicle body.
NOTICE:
- If reusing the No. 1 roof side name plate, take care not to damage the No. 1 roof side name plate.
- Be careful not to damage the vehicle body.
(5) Remove the No. 1 roof side name plate.
(6) Remove the protective tape.
(c) for Double Cab Type B:
|
(1) Put protective tape around the No. 1 roof side name plate. |
|
(2) Insert a piano wire between the vehicle body and No. 1 roof side name plate.
(3) Tie objects that can serve as handles (for example, wooden blocks) to both wire ends.
(4) Pull the piano wire and cut the double-sided tape that holds the No. 1 roof side name plate to the vehicle body.
NOTICE:
- If reusing the No. 1 roof side name plate, take care not to damage the No. 1 roof side name plate.
- Be careful not to damage the vehicle body.
(5) Remove the No. 1 roof side name plate.
(6) Remove the protective tape.
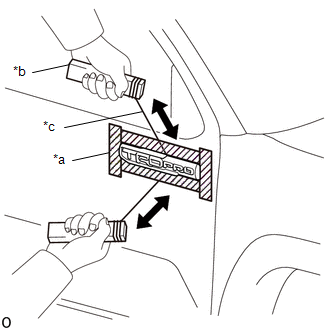
4. REMOVE NO. 1 ROOF SIDE NAME PLATE (for RH Side)
(a) for Access Cab:
|
(1) Put protective tape around the No. 1 roof side name plate. |
|
(2) Insert a piano wire between the vehicle body and No. 1 roof side name plate.
(3) Tie objects that can serve as handles (for example, wooden blocks) to both wire ends.
(4) Pull the piano wire and cut the double-sided tape that holds the No. 1 roof side name plate to the vehicle body.
NOTICE:
- If reusing the No. 1 roof side name plate, take care not to damage the No. 1 roof side name plate.
- Be careful not to damage the vehicle body.
(5) Remove the No. 1 roof side name plate.
(6) Remove the protective tape.
(b) for Double Cab Type A:
|
(1) Put protective tape around the No. 1 roof side name plate. |
|
(2) Insert a piano wire between the vehicle body and No. 1 roof side name plate.
(3) Tie objects that can serve as handles (for example, wooden blocks) to both wire ends.
(4) Pull the piano wire and cut the double-sided tape that holds the No. 1 roof side name plate to the vehicle body.
NOTICE:
- If reusing the No. 1 roof side name plate, take care not to damage the No. 1 roof side name plate.
- Be careful not to damage the vehicle body.
(5) Remove the No. 1 roof side name plate.
(6) Remove the protective tape.
(c) for Double Cab Type B:
|
(1) Put protective tape around the No. 1 roof side name plate. |
|
(2) Insert a piano wire between the vehicle body and No. 1 roof side name plate.
(3) Tie objects that can serve as handles (for example, wooden blocks) to both wire ends.
(4) Pull the piano wire and cut the double-sided tape that holds the No. 1 roof side name plate to the vehicle body.
NOTICE:
- If reusing the No. 1 roof side name plate, take care not to damage the No. 1 roof side name plate.
- Be careful not to damage the vehicle body.
(5) Remove the No. 1 roof side name plate.
(6) Remove the protective tape.
5. REMOVE NO. 2 REAR BODY NAME PLATE (for 4WD)
|
(a) Put protective tape around the No. 2 rear body name plate. |
|
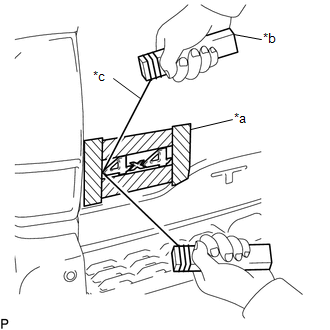
(b) Insert a piano wire between the tail gate and No. 2 rear body name plate.
(c) Tie objects that can serve as handles (for example, wooden blocks) to both wire ends.
(d) Pull the piano wire and cut the double-sided tape that holds the No. 2 rear body name plate to the tail gate.
NOTICE:
- If reusing the No. 2 rear body name plate, take care not to damage the No. 2 rear body name plate.
- Be careful not to damage the tail gate.
(e) Remove the No. 2 rear body name plate.
(f) Remove the protective tape.
6. REMOVE NO. 3 REAR BODY NAME PLATE (for 2GR-FKS)
|
(a) Put protective tape around the No. 3 rear body name plate. |
|
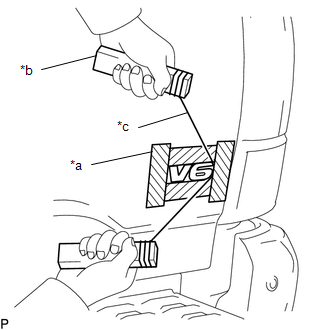
(b) Insert a piano wire between the tail gate and No. 3 rear body name plate.
(c) Tie objects that can serve as handles (for example, wooden blocks) to both wire ends.
(d) Pull the piano wire and cut the double-sided tape that holds the No. 3 rear body name plate to the tail gate.
NOTICE:
- If reusing the No. 3 rear body name plate, take care not to damage the No. 3 rear body name plate.
- Be careful not to damage the tail gate.
(e) Remove the No. 3 rear body name plate.
(f) Remove the protective tape.
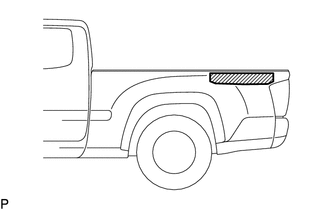
7. REMOVE REAR BODY STRIPE LH (w/ Stripe Tape)
|
(a) Pull back an edge of the rear body stripe LH and pull it parallel to the vehicle body to remove it. |
|
8. REMOVE REAR BODY STRIPE RH (w/ Stripe Tape)
HINT:
Use the same procedure described for the LH side.
 Components
COMPONENTS
ILLUSTRATION
*A
for Access Cab
-
-
*1
NO. 1 FRONT DOOR NAME PLATE
*2
NO. 1 ROOF SIDE NAME P ...
 Radiator Grille
...
Other materials:
Multi-terrain Select Indicator Light Remains ON
DESCRIPTION
Refer to Multi-terrain Select Indicator Light does not Come ON (See page
).
WIRING DIAGRAM
CAUTION / NOTICE / HINT
NOTICE:
When replacing the skid control ECU (master cylinder solenoid), perform
calibration (See page
).
Inspect the fuses for circuits related ...
Components
COMPONENTS
ILLUSTRATION
*1
FUEL PUMP ASSEMBLY
*2
FUEL PUMP LIFTER ASSEMBLY
*3
FUEL PUMP LIFTER GUIDE
*4
FUEL PUMP SPACER GASKET
*5
NO. 1 FUEL PIPE SUB-ASSEMBLY
*6
...
Test Mode Procedure
TEST MODE PROCEDURE
1. TEST MODE PROCEDURE (for Using Techstream)
HINT:
If the ignition switch is turned from the ON to the ACC or LOCK position
during test mode, DTCs related to the signal check function will be cleared.
During test mode, the skid control ECU (master cylinder ...
