Toyota Tacoma (2015-2018) Service Manual: Removal
REMOVAL
CAUTION / NOTICE / HINT
.png) Text in Illustration
Text in Illustration
|
*a |
Object Exceeding Weight Limit of Transmission Jack |
- Be sure to perform this procedure with several people as the rear differential carrier assembly is very heavy.
- Be sure to follow the procedure described in the repair manual, or the transmission jack may suddenly drop or a part may fall.
HINT:
The following procedures are for BD22 (w/o Differential Lock).
PROCEDURE
1. REMOVE REAR WHEELS
2. REMOVE REAR PROPELLER SHAFT ASSEMBLY (for 2WD)
(See page .gif) )
)
3. REMOVE REAR PROPELLER SHAFT ASSEMBLY (for 4WD)
(See page )
4. DRAIN DIFFERENTIAL OIL
(See page )
5. REMOVE REAR AXLE SHAFT WITH BACKING PLATE LH
(See page )
6. REMOVE REAR AXLE SHAFT WITH BACKING PLATE RH
HINT:
Use the same procedure described for the LH side.
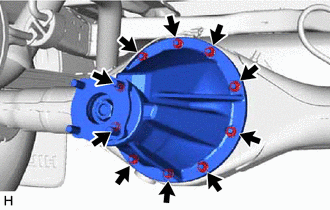
7. REMOVE REAR DIFFERENTIAL CARRIER ASSEMBLY
|
(a) Remove the 10 nuts, 10 washers and rear differential carrier assembly. CAUTION: The rear differential carrier assembly is a heavy component. Make sure that it is supported securely. NOTICE:
|
|
8. REMOVE REAR DIFFERENTIAL CARRIER GASKET
 Components
COMPONENTS
ILLUSTRATION
HINT:
The following specifications are for BD22A (w/o Differential Lock). BD22A differentials
are equipped with M10 rear differential carrier to rear axel housing fastener ...
 Inspection
INSPECTION
PROCEDURE
1. INSPECT DIFFERENTIAL PINION AND SIDE GEAR
(a) Check that there is no damage to the pinion gear or side gear.
If the pinion gear and/or side gear is damaged, replace the dif ...
Other materials:
Driving the vehicle
The following procedures should be observed to ensure safe driving.
■ Starting the engine
■ Driving
Automatic transmission
With the brake pedal depressed,
shift the shift lever to D.
Release the parking brake.
Gradually release the brake pedal
and gently depress the acceler ...
Pressure Control Solenoid "G" Performance (Shift Solenoid Valve SL4) (P2808)
SYSTEM DESCRIPTION
The ECM uses the vehicle speed signal and signals from the transmission revolution
sensors (NT, SP2) to detect the actual gear (1st, 2nd, 3rd, 4th, 5th or 6th gear).
The ECM compares the actual gear with the shift schedule in the ECM memory to
detect mechanical problems of t ...
Terminals Of Ecm
TERMINALS OF ECM
1. ECM
HINT:
The standard voltage between each pair of ECM terminals is shown in the table
below. In the table, first follow the information under "Condition". Look under
"Terminal No. (Symbol)" for the terminals to be inspected. The standard voltage
b ...
