Toyota Tacoma (2015-2018) Service Manual: Installation
INSTALLATION
PROCEDURE
1. INSTALL FRONT BUMPER ASSEMBLY
(a) w/ Fog Light:
(1) Connect the 2 connectors.
(b) Engage the 3 claws and guide to install the front bumper assembly.
(c) Remove the protective tape.
(d) Install the 6 clips.
(e) Engage the clamp.
(f) Connect the connector.
(g) Install the 2 bolts and 4 screws.
Torque:
Bolt :
5.0 N·m {51 kgf·cm, 44 in·lbf}
Screw :
2.8 N·m {29 kgf·cm, 25 in·lbf}
|
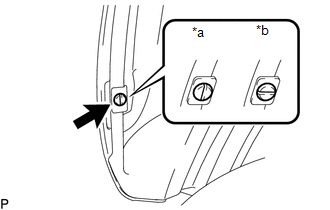
(h) Install the pin hold clip as shown in the illustration. NOTICE: Insert the pin hold clip with the slot aligned vertically. Do not rotate the clip after inserting it. After installation, confirm that the slot is aligned vertically. HINT: Use the same procedure for the RH side and LH side. |
|
(i) w/o Over Fender:
(1) Install the screw.
HINT:
Use the same procedure for the RH side and LH side.
2. INSTALL RADIATOR GRILLE
Click here .gif)
3. INSTALL FRONT NO. 1 WHEEL OPENING EXTENSION PAD (w/ Front Spoiler)
(a) Install front No. 1 wheel opening extension pad with 9 screws.
4. INSTALL FRONT FENDER WHEEL OPENING MOULDING (w/ Over Fender)
Click here .gif)
5. INSTALL FRONT FENDER MUDGUARD (w/ Mudguard)
Click here .gif)
6. ADJUST MILLIMETER WAVE RADAR SENSOR ASSEMBLY
Click here .gif)
 Removal
REMOVAL
PROCEDURE
1. REMOVE FRONT FENDER MUDGUARD (w/ Mudguard)
Click here
2. REMOVE FRONT FENDER WHEEL OPENING MOULDING (w/ Over Fender)
Click here
3. REMOVE FRONT NO. 1 WHEEL OPENING EXTEN ...
Other materials:
Parts Location
PARTS LOCATION
ILLUSTRATION
*A
for Vacuum Brake Booster
*B
for Hydraulic Brake Booster
*1
BRAKE ACTUATOR ASSEMBLY (SKID CONTROL ECU)
*2
BRAKE BOOSTER WITH MASTER CYLINDER ASSEMBLY (SKID CONTROL ECU)
...
Installation
INSTALLATION
CAUTION / NOTICE / HINT
CAUTION:
Wear protective gloves. Sharp areas on the parts may injure your hands.
HINT:
Use the same procedure for both the RH and LH sides.
The procedure described below is for the LH side.
PROCEDURE
1. INSTALL FRONT SEAT AIRBAG ASSEMBLY ...
Operation Check
OPERATION CHECK
1. CHECK WINDOW LOCK SWITCH
HINT:
Before performing the window lock switch operation check, make sure that the
window lock switch is off (the switch is not pushed in).
(a) Check that the front passenger and rear windows cannot be operated from each
power window regulator swit ...


