Toyota Tacoma (2015-2018) Service Manual: Transmitter Battery(w/ Smart Key System)
Replacement
REPLACEMENT
CAUTION / NOTICE / HINT
NOTICE:
Take extra care when handling these precision electronic components.
PROCEDURE
1. REMOVE TRANSMITTER BATTERY
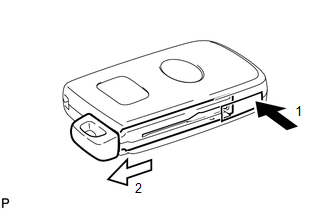
(a) Push the release hook knob and extract the mechanical key as shown
in the illustration.
Text in Illustration
*a
Release Hook Knob
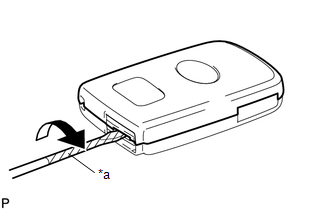
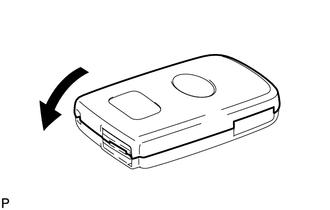
(b) Insert a precision screwdriver with its tip wrapped in protective
tape into the gap, and turn the screwdriver to remove the transmitter housing
cover.
Text in Illustration
*a
Protective Tape
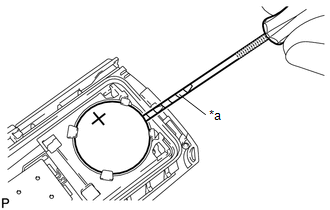
(c) Using a screwdriver with its tip wrapped in protective tape, remove
the transmitter battery.
Text in Illustration
*a
Protective Tape
NOTICE:
Do not push the terminals with your finger.
Do not forcibly pry up the transmitter battery. The terminals
may be damaged.
Do not touch the transmitter battery with wet hands. Water may
cause rust.
Do not touch or move any components inside the electrical transmitter.
It may interfere with proper operation.
When replacing the transmitter battery, before starting work,
remove static electricity that has built up in the body by touching,
for example, the vehicle to prevent the electrical transmitter from
being damaged.
2. INSTALL TRANSMITTER BATTERY
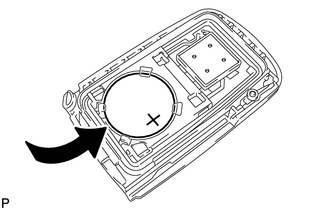
(a) Install a new transmitter battery with the positive (+) side facing
upward, as shown in the illustration.
NOTICE:
Do not bend the transmitter battery electrode during insertion.
Keep the transmitter cover interior free of dust and oil.
When replacing the transmitter battery, before starting work,
remove static electricity that has built up in the body by touching,
for example, the vehicle to prevent the electrical transmitter from
being damaged.
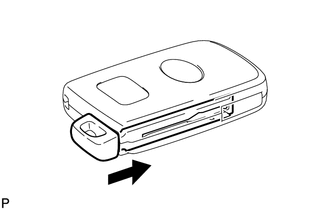
(b) Install the transmitter housing cover by pressing down on it as shown
in the illustration.
(c) Insert the mechanical key as shown in the illustration.
(d) Press one of the transmitter switches and check that the LED illuminates.
OK:
Transmitter LED illuminates when switch is pressed.
Related Tacoma materials
Cautions & Notices
CAUTION
This is a warning against anything which may cause injury to people if the
warning is ignored. You are informed about what you must or must not do in order
to reduce the risk of injury to yourself and others.
NOTICE
This is a warning against anything which may cause damage to the vehi ...
Installation
INSTALLATION
PROCEDURE
1. INSTALL VACUUM WARNING SWITCH ASSEMBLY (for 2GR-FKS)
Click here
2. INSTALL BRAKE VACUUM CHECK VALVE ASSEMBLY (for 2TR-FE)
(a) Install a new grommet onto the brake booster assembly.
...
System Description
SYSTEM DESCRIPTION
1. LIN COMMUNICATION SYSTEM DESCRIPTION
The LIN communication system is used for communication between the components
in the tables below. If communication cannot be performed through LIN communication
because of an open in the communication lines or other reasons, the maste ...