
Toyota Tacoma (2015-2018) Service Manual: Rear Axle Hub Bolt
Installation
INSTALLATION
PROCEDURE
1. INSTALL REAR AXLE HUB BOLT
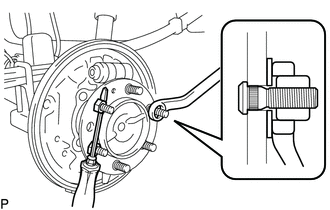
(a) Install a new hub bolt through the axle hub.
(b) Install the washer plate, as shown in the illustration, through the hub bolt, and install the hub bolt by tightening the hub nut.
2. APPLY HIGH TEMPERATURE GREASE
.gif)
3. INSTALL REAR BRAKE SHOE
4. INSTALL FRONT BRAKE SHOE
5. INSPECT REAR DRUM BRAKE INSTALLATION
6. INSTALL REAR BRAKE DRUM SUB-ASSEMBLY
7. ADJUST REAR DRUM BRAKE SHOE CLEARANCE
8. INSTALL REAR WHEEL
Torque:
113 N·m {1152 kgf·cm, 83 ft·lbf}
9. INSPECT PARKING BRAKE LEVER TRAVEL
10. ADJUST PARKING BRAKE LEVER TRAVEL
Removal
REMOVAL
PROCEDURE
1. REMOVE REAR WHEEL
2. REMOVE REAR BRAKE DRUM SUB-ASSEMBLY
.gif)
3. REMOVE FRONT BRAKE SHOE
4. REMOVE REAR BRAKE SHOE
5. REMOVE REAR AXLE HUB BOLT
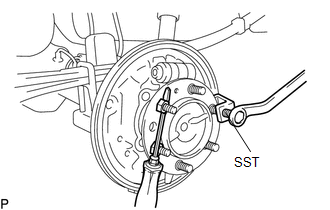
(a) Using SST, remove the hub bolt.
SST: 09650-17011
 Front Axle Hub Bolt
Installation
INSTALLATION
PROCEDURE
1. INSTALL FRONT AXLE HUB BOLT
(a) Install a new hub bolt through the axle hub.
(b) Install the washer plate, as shown in the illustration, through the hub ...
 Rear Axle Shaft
...
Other materials:
Reassembly
REASSEMBLY
PROCEDURE
1. INSTALL OIL PUMP COVER
(a) Apply fresh engine oil to the drive and driven rotors.
(b) Place the drive and driven rotors into the timing chain cover assembly
with the marks facing the oil pump cover side.
Text in Illustration
*a
...
System Description
SYSTEM DESCRIPTION
1. ENGINE IMMOBILISER SYSTEM DESCRIPTION
The engine immobiliser system is designed to prevent the vehicle from being stolen.
This system uses the transponder key ECU assembly that stores the key ID codes of
authorized ignition keys. If an attempt is made to start the engine ...
Reassembly
REASSEMBLY
PROCEDURE
1. INSTALL REAR WHEEL CYLINDER CUP KIT
(a) Provisionally tighten the bleeder plug to the rear wheel brake cylinder,
and install the bleeder plug cap.
(b) Apply lithium soap base glycol grease to 2 new cylinder cups and the 2 pistons.
(c) Install the cylinder cup onto ea ...
