Replace the battery with a new one if it is discharged.
■ You will need the following items:
Lithium battery CR2032
■ Replacing the battery
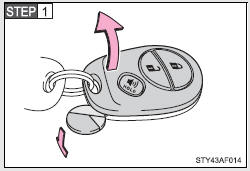
Remove the cover using a coin protected with tape etc.
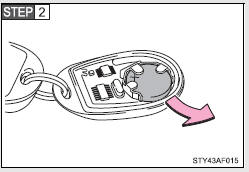
Remove the discharged transmitter battery.
Insert a new battery with the “+� terminal facing up.
■If the wireless remote control battery is discharged
The following symptoms may occur.
●The wireless remote control will not function properly.
●The operational range is reduced.
■Use a CR2032 lithium battery
●Batteries can be purchased at your Toyota dealer, jewelers, or camera stores.
●Replace only with the same or equivalent type recommended by your Toyota dealer.
●Dispose of used batteries according to the local laws.
CAUTION
■Removed battery and other parts
These parts are small and if swallowed by a child, they can cause choking.
Keep away from children. Failure to do so could result in death or serious injury.
■Certification for the lithium battery
RISK OF EXPLOSION IF BATTERY IS REPLACED BY AN INCORRECT TYPE. DISPOSE OF USED BATTERIES ACCORDING TO THE INSTRUCTIONS
NOTICE
■For normal operation after replacing the battery
Observe the following precautions to prevent accidents.
●Always work with dry hands.
Moisture may cause the battery to rust.
●Do not touch or move any other components inside the remote control.
●Do not bend either of the battery terminals.